|
IRC: #irrational-typesetting-wizardry |
posts: col.tune import mask2 hydra2 fax mask1 hydra1 slctrx timing origin grid |
Typesetting in Arabic2015-05-05It has come to my attention that Aegisub doesn't support right-to-left text and thus typesetting in Arabic is a huge pain in the ass. I have therefore decided to attempt to solve at least some of those issues. The bulk of the work is this script. It's designed to fix 3 things: the order of text with inline tags, the order of text with line breaks, and punctuation misplaced by Aegisub. You can read the detailed description of the functions here. Another issue, apparently, is editing the text. I don't quite know what exactly is happening there, but we've been able to determine that while the Edit Box doesn't have any RTL support, the lua interface does. I don't know how good that is, but it should be better than nothing, so for editing text, you can use the Multi-Line Editor. The next issue is gradients. As I understand it, gradient by character is impossible with Arabic, so the next best thing is gradient by word. There are probably no specific tools for that, since other languages just use GBC, but there are ways to do it. It can be done in two phases. 1. You set the same type of tag before each word. 2. You apply a gradient to those tags. So first, how to set the tag before each word. This is rather easy with colours, since I implemented "colorize by word" in Colorize. Just pick any 2 colours, check "colorize by word", and press "Colorize". For any other tag (works with colours too), you can use Hydra. You just need to use one of the presets for inline tags. Use the preset "custom pattern", and the pattern is "* ", or in other words, asterisk and space, without the quotation marks. This means that the selected tag(s) will be placed before every space, thus before every word. (Except the first one - do that one the regular way.) So not you have {tag}word{tag}word{tag}word{tag}word. If 2 consecutive tags are the same, they don't change anything, including the word order! So don't use "Fix inline tags" until each tag has a different value. If you use Colorize with different colours, you can fix the inline tags now, but if you use Hydra, you'll need an extra step. Now, you have for example a \frz tag before each word, and you need to gradient them. Set the desired value for the first and last tag, and use the Regradient function in Recalculator. (v3.0+) The function is fuly explained in the manuals. Now, if you used Colorize and fixed the inline tags beforehand, you would be done now. But if you used Hydra, you still need to fix inline tags with Aladin's Lamp, and your gradient will be in the opposite direction. So use any values for the first gradient because you'll have to redo it after you fix inline tags. So to make it clearer: 1. Add your start tag and inline tags with Hydra. 2. Apply a temporary gradient. 4. Adjust the first and last values for the gradiented tag. 5. Apply the real gradient with Recalculator. Or a slightly quicker way with Colorize: 1. Use Colorize by word with any 2 (or more but no point) colours. 2. Fix inline tags with Aladin's Lamp. 3. Adjust the first and last values for the gradiented tag. 4. Apply the real gradient with Recalculator. It is mainly important to understand how the "Fix inline tags" function works. (See the manual.) If you want to add a gradient and you already have inline tags, you have to first use the "Fix inline tags" function to revert the state of the line into the "working" order. I hope this helps to make work with RTL text easier. Walls of Text2014-12-08So I got tricked into another project. I thought it would take me a day or two, but it was actually something like 4-6 hours a day for almost a whole week. At least it's done properly, though. Somebody had the suggestion that I should write descriptions/guides/manuals for all my scripts, here on the website. Most of my scripts already have descriptions, but I do try to not make them too long (usually), and I suppose they may sometimes be somewhat unclear, especially for non-native speakers. So what I was working on the whole week was this thing here. All scripts described in as much detail as I could think of. As I was writing it, it made me sometimes wonder if the function I was describing could do some specific things, so I tested it and in some cases found out it couldn't, so I went and upgraded the script so that it would. Thus a few more hours went into that. The result was over 10 scripts updated. Several things that might be worth mentioning: - Cycle scripts have been merged into one for convenience, and alignment cycle was added. This arrangement also makes it really easy to add more cycles for other tags if needed. - HYDRA can do inline tags for sections, which means that you select a part of a line, and tags get applied before it and returned to previous state after it. Like when one word in a sentence is different colour than the rest of it. - I added capitalization to MultiEditor, and some more tags too. - Gradients in Colorize can be made to apply between linebreaks instead of one for the whole line, so you get a gradient for each visible line of text. Laziness Leads to Useless Creativity2014-08-13My latest lua functions are less and less practical because obviously the practical ones have already been written. I still write new ones because: 1. I'm super lazy to do things by hand, to type, and to repeatedly place the cursor into a small space somewhere 2. I like the challenges 3. I can So basically every time I'm typesetting something and I feel like this could be done with at least 10% less effort, I think about writing a script. I don't really care if the benefit is only 10% and nobody else will use it, for reasons explained above. So here's the latest useless function, its purpose, and its reasons. This is an eyecatch from Hanayamata. In case it's difficult to tell.  Obviously I re-use it from previous episodes, but as you can see, those bastards slightly change the colours every time.  And I really hate clicking somewhere in the middle of this mess for each colour to fix it. I can't see which colour is which, and when the text is chopped into small pieces, often just one letter at a time, it's kinda hard to tell which part is what. Also, did I mention that I was lazy? So I figured some improvement to this process is warranted... 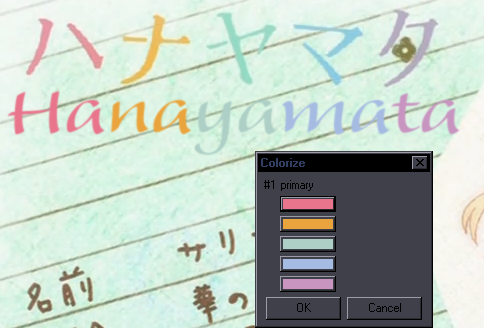 ...and implemented this "Tune colours" function in Colorize (v4.0). Isn't that nice?! Now I can clearly see what's what! It simply reads all the colours it finds in the line and sorts them by type.  There. Fixed. Now, the real challenge was: What if the same colour appears several times and I wanna change only one? (Because gsub simply replaces one pattern with another.) So I used the Colorize-by-letters function and experimented. 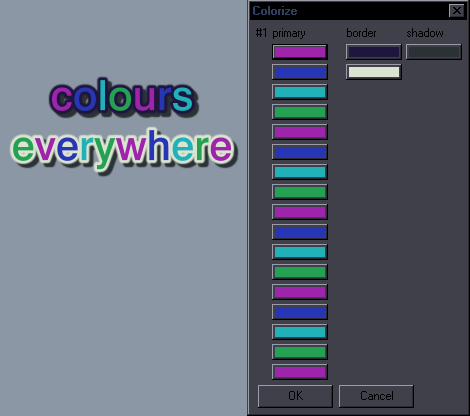 Here's what you get when you run it on such a line... 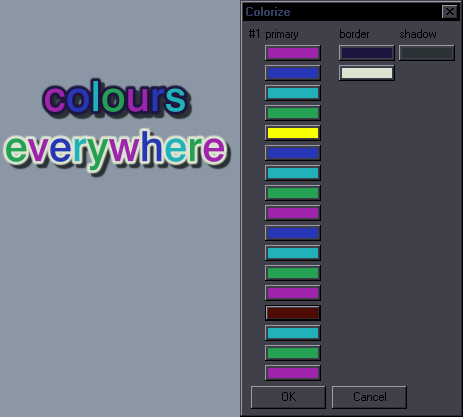 Obviously I figured it out, so... here I change one letter to yellow and one to dark red.  And the correct parts change as they're supposed to. If you colorize borders and shadows too, you get it all in a nice palette that you'll probably never need. 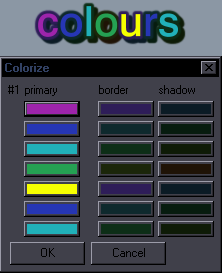 That's not the point though. Hanayamata was the point, and this is just side effects. Though who knows. If you need GBC and it's not linear and it's a bit chaotic and unpredictable, maybe this will help. Also the #1 in the corner is the number of the line, if you select more, but doing that is even more useless. Since I'm already writing, I'll mention a few other recent additions. HYDRA 3.9 can add a transform to each block of tags, which can probably only be reasonably useful with a bunch of inline colours that all need to transform to the same one, like fade to black. Masquerade is a bit more versatile with masks. Mainly you can add your own to the menu pretty easily. Then there's also the 'remask' function that lets you replace one mask with another without changing the tags. Speaking of masks, if you have any cool ones, hand them over so I can add them to the collection. An "Unimportant" But Versatile Script2014-07-04This script ironically called Unimportant has probably escaped almost everyone's attention because they falsely believe it's actually unimportant (or because they can't be bothered reading the instructions). It is, however, my second largest script (after Relocator) and has plenty of useful functions. Unlike most others, this one doesn't focus on anything specific, but rather has everything that didn't fit into the other ones. It may look complicated at first glance, but it really isn't. It consists of seven main parts. 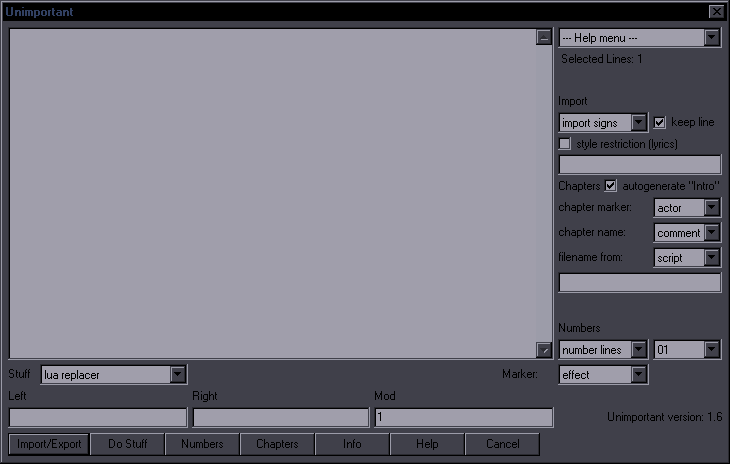 1. The large empty area which gets used by a number of functions. 2. The Import/Export part on the right (just the dropdown and 2 checkboxes) + Import/Export button 3. The Chapters part (3 dropdowns and a checkbox) + Chapters button 4. The Numbers part (3 dropdowns and uses bottom part) 5. The Stuff part (Stuff dropdown + uses Marker dropdow and bottom part) 6. The bottom part - Left/Right/Mod fields 7. Help menu + Help button Help is simple. You select one of the options and click Help, and you get a guide for all the functions. What I'm writing here is something like an extended guide with images and examples. One extra thing is the Info button. With it you can get all kinds of information about the script, selection, and active line. 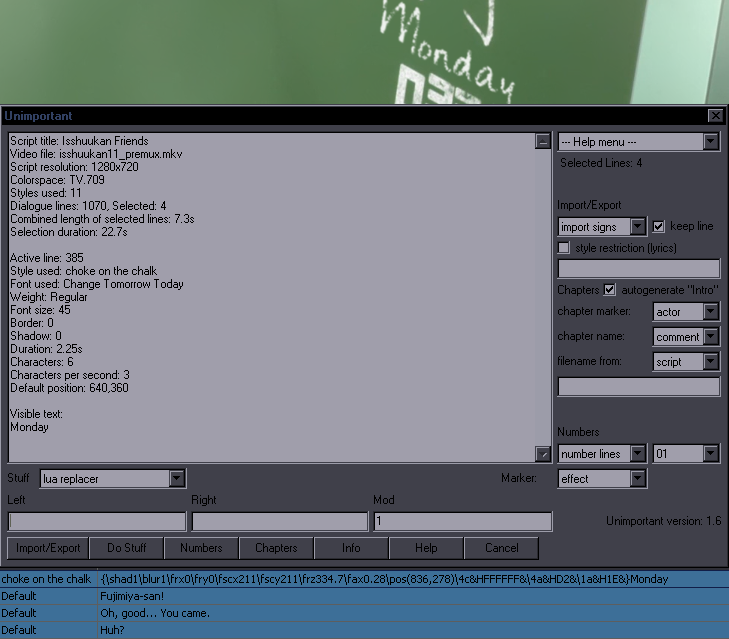 The top part is pretty clear. Combined length vs duration is the selected lines with and without the times between them. The middle part is about the active line and its default style values. The most helpful thing here is the default position, as in position without a \pos tag present. At the top of the lua script, there are some settings you can change, like default values for the GUI, and paths for use with some functions. (We'll get to that in a bit.) IMPORT/EXPORT This is a powerful tool, very similar to lyger's templater, but without the complex GUI. Export First, how to export a sign.  Here's a sign in 3 layers, with a mask on the bottom layer. It has "mask test" in the effect field. This is the marker by which the sign is recognized, or in other words, the name of the sign. The "x" in actor field for the mask marks a line that shouldn't be changed in any way. (Later about that.) You can easily save/export this whole sign. Just select "export sign" and click the Import/Export button. 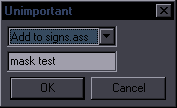 Here you have 2 options. Add the sign to "signs.ass" or create a new file. I recommend just using signs.ass. The sings are distinguished from one another by the name in the effect field, so there's no need to make more files. Also having just signs.ass makes importing easier. If you decide to create a new file anyway, the text field is where you set the filename. As for where this is saved, that depends on your settings. By default, signs.ass will be created in the script folder. This in my case creates a "signs.ass" for each show. This is what you have in settings: script_path="relative" relative_path="" absolute_path="D:\\typesetting\\"If you want an absolute path, change script_path to "absolute" and "D:\\typesetting\\" to whatever you want. Remember to use double backslashes and include (a double) one at the end. Assuming you want to have a fixed path, you will have a "signs.ass" for all shows, so you may wanna have a "show - sign" pattern in the effect field. Or you can make a file for each sign, but you can't have more than 1 sign in anything other than "signs.ass". If you want a different relative path, for example you have a folder for each episode, but you want the signs in the show folder, you set relative_path to "..\\", which is one folder up from where your script is. So to export a sign, select all the lines that belong to the sign, set the name in the effect field, select "export sign", and just add it to "signs.ass". It doesn't matter how many lines the sign has. There should be no problem with a 1000-line gradient or even mocha'd signs. Mocha'd signs will get shifted to your current line's start time, keeping the timing sequence. Import To import a sign, with default settings just open Unimportant and hit Enter. The default option "import signs" works with "signs.ass". If you want another file, use "import sign", as in singular. Enter is bound to the Import/Export button, so this is simple. 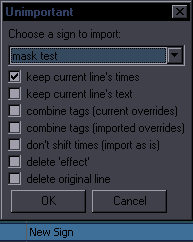 Import only works on the active line. Select the sign you need. (The list is a list of all signs found in "signs.ass".) In the most common case, you want to set the the timecodes to your current line, as is checked by default. You do not want this with mocha signs, so uncheck for those. With these default settings when you click OK, you get this:  The active line is commented, and the sign is imported as is, except the times are set to the current line. Without that checkbox, the first line's start time gets shifted to the active line's start time, and everything else gets shifted accordingly (mocha etc.). The other most common option is that you want the new line(s) say "New Sign" instead of "this is a test", so you check "keep current line's text", and you get this:  The text has been replaced, except for the mask because you have "x" in the actor field. If you want to change some tags, you set the tags in the current line and check "combine tags (current overrides)".  You can see blur0.6 was overridden by blur0.8, but again, not for the mask. (Note: actor must equal "x", not just contain it.) The other combine option will basically only take tags from the current line that don't exist in the saved sign. So blur would be ignored, but for example \shad would be added because it doesn't exist in the saved line. "don't shift times (import as is)" - This is rarely useful, but when I worked on Noucome with other people, I imported their typesetting with this. It's pretty much copypasting the whole file, but I didn't feel like opening the file and selecting 5000 lines, so I used "import sign" and typed the filename. As a side note here, it doesn't matter if the file with the signs has headers and stuff. Everything before the first "Dialogue:" is ignored. "delete 'effect'" of course clears the effect field for the imported lines. "delete original line" deletes the current line instead of just commenting it. 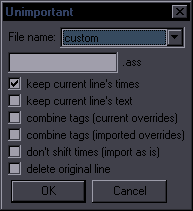 If you want to use "import sign" instead, there's just one difference. Instead of the effect field, it's the filename that works as the name of the sign. The "custom" option is the default, and you type the filename (no need for extension), and there are several presets, like "title" which would look for "title.ass". Import OP/ED are pretty much presets for "import sign", but without the other options because that would make no sense. You don't wanna change the text or mess with the times, so you have OP.ass saved, and it just gets shifted to the start time of the current line. To make this work right, your saved OP should have the first line timed to the first frame of the OP (and the current line should be timed to the first OP frame). Update Lyrics Know the feeling when you need to update OP/ED lyrics, and you're dealing with a mess like this? 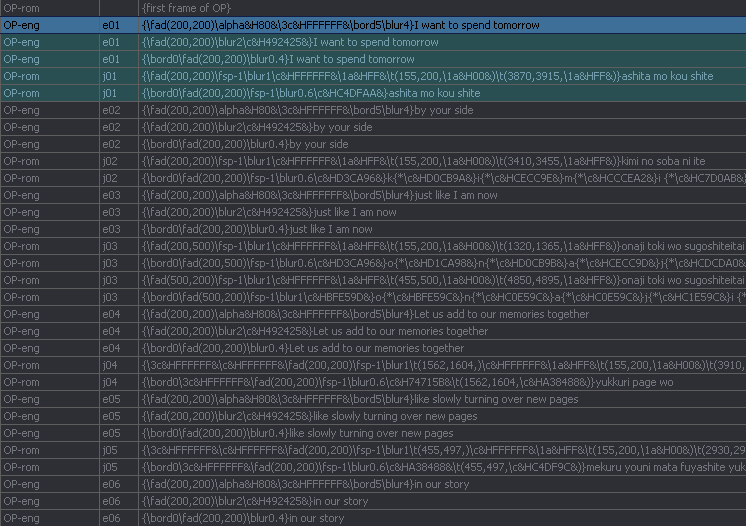 That's why I wrote this script. All you need is to have the lines numbered, something like you see here. No matter how many layers the first line has, it's still line 01. Whatever has the text of the first line of lyrics is line 01, even if it's mocha'd over 600 lines. The other thing you may need is to distinguish between Romaji and English. It's best to number the lines before styling the song, as whatever operations you do during styling, the numbers just follow their lines. But if you forget, you can use the Numbers section of Unimportant to do the numbering. (More on that later.) So what now? Open Unimportant and select "update lyrics". Paste lyrics into the large area. I just used a short part and changed some lines randomly here. 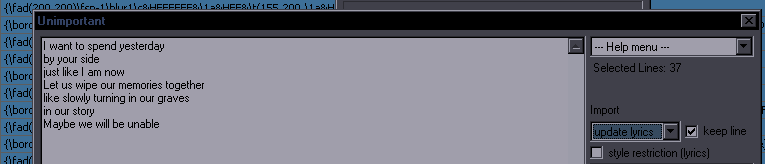 Important note: I'm updating English, so I need to set the pattern here:  The pattern is "Left[numbers]Right". I'm using "e[numbers]" and "j[numbers]", so for English it's "e" in Left and nothing in Right, and for Romaji it's "j" in Left. You could have numbering like "rom-01-OP", so you'd need "rom-" in Left and "-OP" in Right. Of course if you manage to select only the relevant lines, you only need numbers and no markers. Now you run the script... 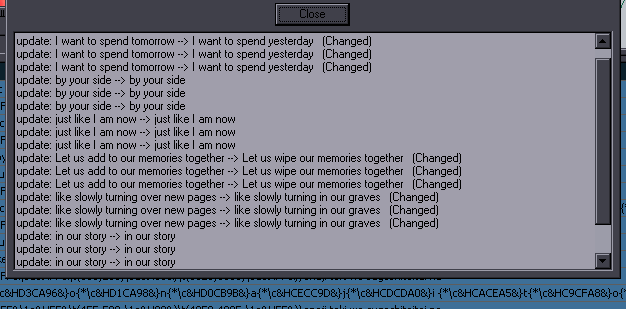 ...and you get a log with what exactly happened. This makes it easy to see if there was some mismatch. Lines with "(Changed)" are the ones that got updated, so you can see what did and what didn't. Whatever you paste in to the large area gets numbered by lines, and these numbers get matched up with the ones in the effect field. (You can also use actor field if you set the Marker to it.) If the lines have gradient by character, the tag before the last letter is saved and placed before the last letter of the new line. (So you just need to rerun gbc.) So this makes lyrics updating much faster than ctrl+h, especially with crazy styling and hundreds of lines. Obviously this doesn't work for karaoke, but karaoke is lame, so we don't care about it. NUMBERS Numbering lines can be pretty useful when you need to apply different effects to different sets of lines, like we just saw with updating lyrics. You can number lines using the effect, actor, or layer. You set this in the Marker dropdown menu. (Layer is not very useful, but it was easy to add it, and there are surprisingly many people who always request weird things.) There are several options for numbering. The obvious default choice is from 1 up. The modifications are: • You can start from any number • You can repeat each number X times • You can set a limit for how high the number can go before it returns to the starting value The way you use the GUI is "start/count by[limit]" in the Mod field. 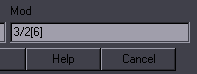 With "3/2[6]", the counting starts from 3, repeats each value 2 times and only goes to 6 before returning to 3. So the sequence you get is: 3 3 4 4 5 5 6 6 3 3 4 4 5 5 6 6 ... "10/3/15" would produce: 10 10 10 11 11 11 12 12 12 13 13 13 14 14 14 15 15 15 10 10 10 11 11 11 ... In addition to that, you can add markers before and after the number, using the Left and Right fields. So if Left="eng" and Right="-OP", your number 1 will be "eng01-OP".  The dropdown that says "01" lets you number 1 2 3, 01 02 03, 001 002 003, or 0001 0002 0003. You probably won't need more unless you're Haidaraaaaa. If you don't need a limit or count by more than 1, just leave those out. You can use "2[4]" to get 2 3 4 2 3 4, or 5/2 to get 5 5 6 6 7 7 8 8 9 9 ... etc. So how can we number this stuff so that we can update lyrics? 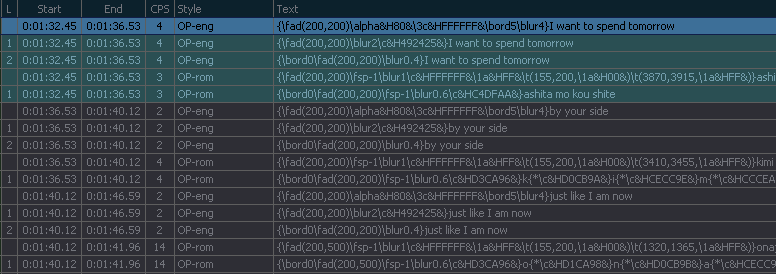 Using Selectrix and Numbers. 1. Select lines with eng in style. 2. There are 3 lines for each eng. lyrics line, so number with "1/3" and set "eng" or something in Left. (or Right if you prefer.) 3. Select lines with rom in style. 4. There are 2 lines for each rom. lyrics line, so number with "1/2" and set "jp" or whatever in Left or Right. That's the gist of it. Of course there may be irregularities, but you can always continue somewhere from the middle if you set the starting number higher. You can also switch "number lines" to "add to marker". This will add the content of Left and Right to existing content. So if you number lines and forget to set markers, you can do it with this. It adds Left and Right to whatever is already there, numbers or not. Obviously, Left adds before and Right adds after. Works for effect and actor, and just for fun... text. CHAPTERS This is old and everyone probably knows how to use it anyway, so I won't explain it here. Just use the Help if you need. STUFF This is the real "didn't fit anywhere else" section.  save/load - This work as a multi-clipboard, if you need to save several things while typesetting (without leaving Aegisub). Paste your stuff into the large area and click Do Stuff. Stuff gets saved. When you run this without pasting anything into the large area, it works as "load". You get a window with all the previous things saved. Each new save just adds a blank line and your stuff at the end of the existing save. It's very simple and unsophisticated. It gets wiped when you rescan automation. Probably not very useful for very large pastes, but you can save sets of tags or back up some lines. lua replacer - This is a replacer with lua regexp, using Left and Right fields. Aegi has ctrl+h with regexp, but to my knowledge it can't do captures. This is basically lua gsub. If you don't know how to use lua, then forget this. You can do something like this: Left: (%u%l+) (%u%l+) Right: %2 %1 What this will do is find a sequence of 2 words that start with uppercase and continue with lowercase, with a space between them, and it will reverse their order. So for example this will match characters' names and switch order between English and Japanese. Of course it will also match any other random 2 words that just happen to be capitalized. Anyway, if you know enough to use lua, you'll figure out what you can do with this. perl replacer - This is the same thing, but with perl regexp, using the Aegisub re module. lua calc - Experimental and poorly written, but can do some operations with numbers. Use like the replacer, and do calculations with captures. Captures are a, b, c, d, etc., instead of %1 %2. It goes up to "p", so you have 16 captures to work with. Example: Left: (%d) (%d)(%d) (%d) Right: a+1 b*3..c/2 d-5 The captures are a b c d. Mathematical operations work like you see. Wherever two things stuck together would be confusing, separate with 2 dots. Obviously there are limits to how complex you can get with this, and it's mostly useful for simple things like taking all the numbers in a line and multiplying them by 2. Technically you could shift clips or resize drawings, though there are better scripts for that. But sometimes there's something odd that no script covers, and this might help. (Note that the example above would most likely produce some idiotic results.) jump to next - This is like the stand-alone script, but with more options. You can use it with layer, style, actor, effect, and text. Select some lines, use for example "effect" as marker, and it will jump to the first next line that doesn't contain the same thing in "effect" as any of the selected lines. It's a bit clumsy compared to the hotkeyed version, but it has more options, which can still be sometimes useful with scripts that have thousands of lines. alpha shift - Place {\alpha&HFF&} before the first letter of visible text, split the line frame by frame, and run this. With each line, the alpha tag gets shifted by one letter, making the text appear letter by letter between lines. The alpha tag must be separated from other tags. (This function is more accessible in Masquerade.) merge inline tags - Merges two or more lines with the same visible text but different tags. If you have trouble combining gradient by character with other things, duplicate the line, gbc one line and do whatever with the other, and this will merge them keeping all the tags from both lines in the right places. If both contain the same tag in the same place but different value, the later line overrides the one before it. For example, if you want to gradient colour over the whole line, but you have a \bord tag in the middle, gbc will gradient the border for first half and colour for second half. So duplicate the line, nuke border on one and do the colour gradient, and merge with the other one that has the border. You can also do two sets of gbc and merge them. add comment - Type stuff in the large area, and it will be added as {comment} at the end of all selected lines. add comment line by line - Paste text into the large area, and it will be added as {comments}, but if you paste 10 lines, they will go one by one to the first 10 lines of selection. make comments visible - This nukes { } from comments, making them part of visible text. switch commented/visible - "Black text{White text}" becomes "{Black Text}White text", effectively switching comments and visible text. Should work fine with multiple comments and not mess with tags. You should be able to switch back and forth without messing anything up. fake capitals - For regular text, this sets given \fs to uppercase letters. For uppercase text, same happens for each first letter of a word. You set the \fs in the Left field. Example with fs 65: Text: Fake capitals Test. Result: {\fs65}F{\fs}ake capitals {\fs65}T{\fs}est. Text: FAKE CAPITALS TEST Result: {\fs65}F{\fs}AKE {\fs65}C{\fs}APITALS {\fs65}T{\fs}EST This can mainly be useful for fonts that are all uppercase. format dates - Formats dates to one of the following patterns: "January 1", "January 1st", "1st of January", "1st January". Will only work if the existing pattern is one of the 4. There's an option to log the changes. honorificslaughterhouse - Hides honorifics in comments: skiddiks{-kun}. transform \k to \t\alpha - Does what it says. Before: {\2a&HFF&\ko12}A{\ko12}B{\ko12}C After: {\2a&HFF&\alpha&HFF&\t(0,120,\alpha&H00&)}A{\alpha&HFF&\t(120,240,\alpha&H00&)}B{\alpha&HFF&\t(240,360,\alpha&H00&)}C Works with any kara tag (\k \kf \ko). convert framerate - Set original framerate in Left and target framerate in Right. Applies to the whole script, as it makes no sense to convert framerate for a selection. Messing with Masks2014-03-24There are several functions added to Relocator's Morphing Grounds. These allow for some simple operations with masks without needing ASSDraw or anything else. Extend Mask: This is mainly intended to easily convert something like a rounded square to another rounded rectangle. Expand Mask: This works like Recalculator's 'Multiply', except 1 is the basic value (equals to 100%). Not good for extending rounded squares, but good for turning a circle into an ellipsis. Flip mask: Flips a mask so that when used with its non-flipped counterpart, they create hollow space. Randomask: Moves points in a drawing, each in a random direction, by a factor taken from the positioning field.  Here are the examples. Blue ones on the left are the originals. Green ones are using 'extend', purple ones 'expand'. Everything is applied only in the X direction. Expand is the same as scaling, but you change the actual drawing coordinates, which allows you to combine the shape with others in various ways. You see that for the circle, 'extend' isn't very useful, but for the rounded square, you probably don't want the 'expand' version. Nowm, here's how you can quickly make a ring. 1. Duplicate the circle. 2. Use expand with 0.8 / 0.8. This will make a smaller circle - 80% size. 3. Use the flip function on it. 4. Copy the coordinates (you can get rid of this line now) and paste them at the end of the coordinates of the other line.  This is what you get.  And here's another example of how you can combine two shapes when you flip one. Teleporter can now shift masks, so that can be helpful too, since changing \pos is not exactly useful when combining two drawings. Now, the 'extend' thing only works as intended when the 0,0 coordinate is in the centre. Positive values get more positive, negative ones get more negative. If everything is to one side of 0,0, then it works like shifting. So if that happens, you can use the teleporter first, etc. Extend 100 / 0 will add 100px to each side. Extend 0 / -50 will subtract 50 from top and bottom. Expand 1 / 1 does nothing. Expand -1 / 1 (or 1 / -1) will do the same as 'flip'. Expand 2 / 2 doubles the size, 0.5 / 0.5 is half the size, etc. If the expand value is 0, it assumes you forgot to set it and changes it to 1 because 0 is kinda useless.  Of course, for anything more complicated, it's better to use ASSDraw or something else, but for simple modifications of basic shapes like these, you don't have to leave Aegisub.  The Hydraulics of Typesetting2014-03-04(No, the title doesn't make sense, but it's HYDRA-related.) I've been experimenting and messing around with some things, and I've implemented some in the new HYDRA. They're not all that extremely useful, but what do you expect from a tool that already does almost everything. One thing that was annoying me about HYDRA is that the GUI was/is loading slowly. After some testing, I concluded that it's not really the amount of things it loads, but rather the dropdown menus specifically. All GUIs that have no dropdowns load pretty much instantly. The more dropdowns, the slower the loading seems to be. So I got the idea of only loading the basic things first, and having the rest as an option. I made 3 modes: basic, medium, and full. In the settings, you have "startup_mode=1". That's the basic one. Obviously, 3 is the full one. This determines what state the GUI will normally load in. Here's what they look like. 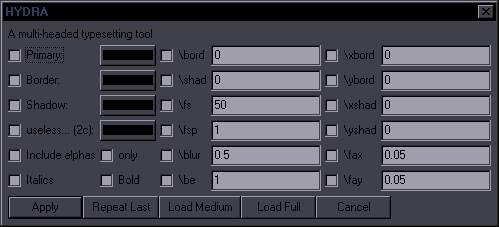 This is the basic mode. It has colours and most 'style' properties - the most commonly used things. It has buttons to switch to medium or full mode, so you're not really missing anything, and it loads fast. 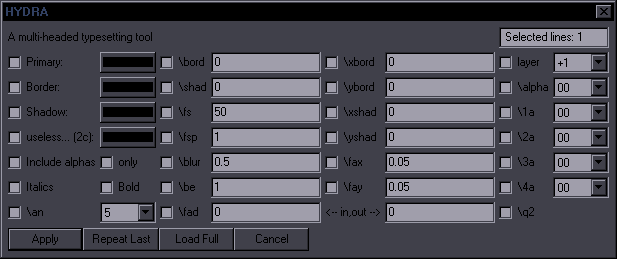 The medium mode is not that interesting, but I felt like keeping it. 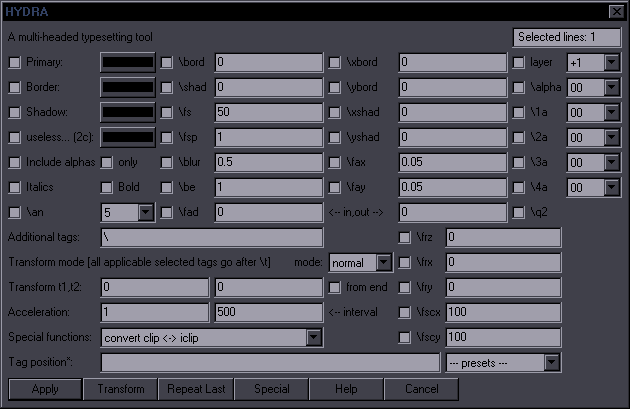 The full mode is pretty much the same as before, but with the additional option to load Help. I find it convenient to have basic mode as default and switch to full when I need some of the other stuff. If you don't wanna mess with all this, just use startup_mode=3. Another thing I played with is the colour picker with alpha. It hasn't been working until now, but since Plork fixed it, I figured I'd experiment with it. The interface is like the regular tool, so nothing much to say there. You pick a colour and alpha. That's all. 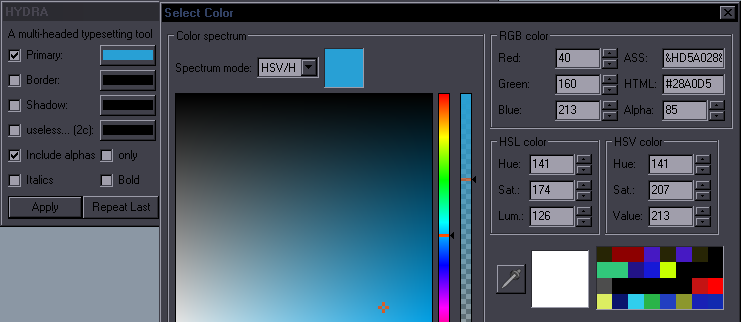 The way HYDRA handles it is through the "Include alphas" checkbox. Without checking it, it works like before, just with colours. If you check it, it applies alpha too. Since HYDRA also has those alphas with dropdown menus, I made it so that this overrides them, but they still work if you don't use this one. More importantly though, you need Aegisub r7993 or newer for this to work. On older versions, it should just ignore the alpha thing and work for colours. I don't really know how far back these colour pickers with alpha work at all, so if they don't, stick with HYDRA 3.33. (I think I'll finally add old versions to the scripts page.) I tried this on Aegisub 2.1.9, and it doesn't load the colour pickers at all. I think it was introduced in Aegisub 3.1. 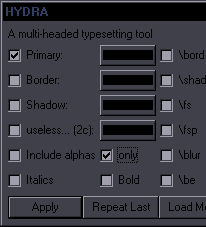 There's also the option to only use the alpha and not the colour. Check the (Include alphas) "only" box. The 'include' one gets acknowledged automatically, so no need to check that one. What you see in the picture will use alpha from the primary colour picker, but not the colour, so \1a but not \c. One other little thing I recently changed is that I allow decimals for \be. This is not supported by regular vsfilter or libass, but apparently xy-vsfilter can use those, so for that current jump in \blur between 1 and 1.0000000x, if you use \blur1\be0.2, it helps with the problem on xy-vsfilter. The other renderers just ignore the \be, as far as I can tell. I can't guarantee that it won't break anything; I just noticed it worked on xy-vsfilter. 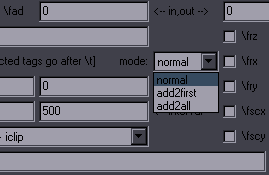 Then there's the transform mode. It's been there for a while, but while I'm at this... Normal mode is normal. Duh. "add2first" will add your transforms to the first transform it finds in the line. The usefulness is that if you have a colour transform and want to tweak the colour, you can do it with the eyedropper without fucking up any tags (as long as it's the first transform). It doesn't care about the timecodes of the transform, so don't try to set them. It keeps whatever the transform already has. "add2all" adds your transform to all transforms in the line. I don't know if it's useful at all, but it was easy to do, so I added it in case somebody ever needs it. If you ever need it, you can thank me for my planning ahead.  The last thing, not completely new but recent, are the inline tag presets. I'm not sure if they have any other use than prepare the line for gradient by character, but they are there. You can add tags before last letter, in the middle of the line, and in other places proportionate to the length of the line. I think this is primarily useful for colours (and mostly for song styling), so I added a much more useful version to Colorize. Check "Set colours across whole line", and choose the number of colours... 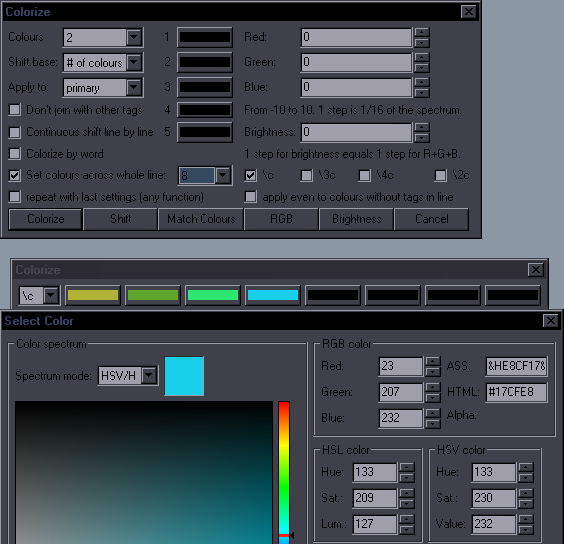 ...and the next GUI lets you choose those 8 (or however many you chose) colours, which colour it should apply to (\c, \3c...), and then it distributes them evenly from the start of the line to before the last character. Then you can use Gradient by character to fill in the blanks. Have fun. Two Ways of Calculating \fax2014-03-03As I'm sure everyone knows by now, I don't like having to type when typesetting. On the other hand, I like writing lua scripts, for some reason. So I've been thinking for a while about how to calculate the value for \fax instead of having to type one, see how it looks, change the number, and repeat until it's good. I figured I might be able to calculate it from two given points. It took several hours that involved looking up basic trigonometry because, seriously, after more than 15 years out of school, I don't remember any of that shit. In the end, I figured it out, and it works reasonable well under most circumstances.  Here's some lame example. I'm sure you can see how this needs \fax (among other things).  So the first way I thought of was using \pos and \org. What you do is move the \org point in the direction the letters should be leaning to (from \pos as a reference point). On one hand, this doesn't look very precise, but on the other, this will probably work well enough. For more precision, you can move the anchor and the origin point on the line left from "W" to make sure they're both on that line (which has the direction you're trying to match).  Once you get that done, use this function.  The script calculates \fax and nukes the \org. For a dirty solution that took about 2 seconds, this worked well enough.  It wouldn't be too useful if it only worked without any rotations, so I aimed to make it work with \frz. That posed two problems. Moving \org with some \frz was kinda messy and the sign was jumping all over the place, and obviously sometimes you need that \org for other things, like, you know, the origin of the rotation. So I was looking for another way to get two reference points. 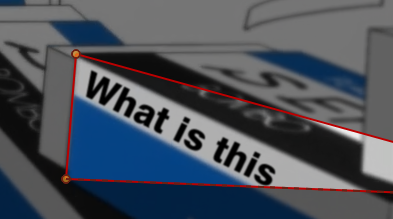 The solution I came up with (and that generally works much better than the first option) is vectorial clip. The \fax value is calculated from the first two points of the clip. It's the first 2 points you draw, as in, it uses the "m 0 0 l 0 0" pattern at the beginning. You don't need any more points (the clip will be deleted anyway), but I made a 3rd one just so you can see the sign. So the two points here are what the vertical direction of the letters should be. Just draw the line over anything that goes in the direction your text needs to match. 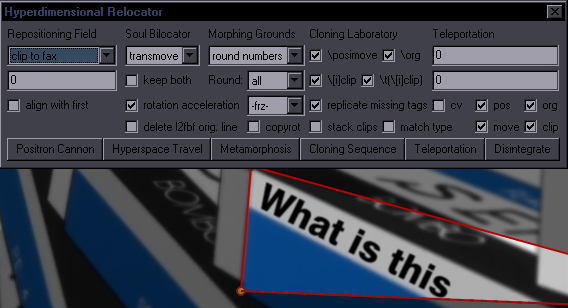 Now you use the "clip to fax" function. As I've said, it's more practical than the "org" version, because you can draw the clip anywhere disregarding of the text, but I left the other one in case you actually need the clip but not \org. 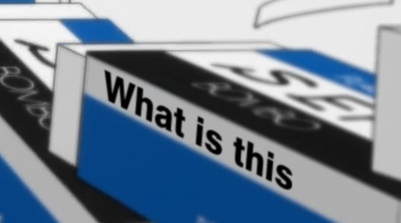 Here's the result. Kinda looks like ass because the sign isn't properly styled, but it worked. 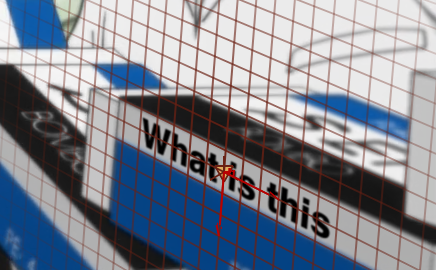 Showing the grid lets you see that the orientation is correct. The sign should be bigger on the right, so it needs a little \frx and \fry, so let's add those and fix up the other things.  There. Good enough. Now, obviously, trying to calculate it including \frx and \fry would be insane, so nope. Only works with \frz. (But as you see, a little \frx and \fry won't throw it off much.) There's also the issue of scaling, which proved more complicated than I hoped, so for this to work right, \fscx must be the same as \fscy. (Though again, minor discrepancy, like 5%, should be negligible.) That's the limitations, but I think this can probably cover more than 90% cases of when you need \fax. Quick Way to Make Custom Masks2014-03-01I used the convert-clip-to-drawing code and merged it into Masquerade. This allows you to make a mask of any shape quickly.  Here's a sample fake sign.  Style it. Place it.  Use the clip tool to draw the mask. You can use \2c as the colour for the mask. 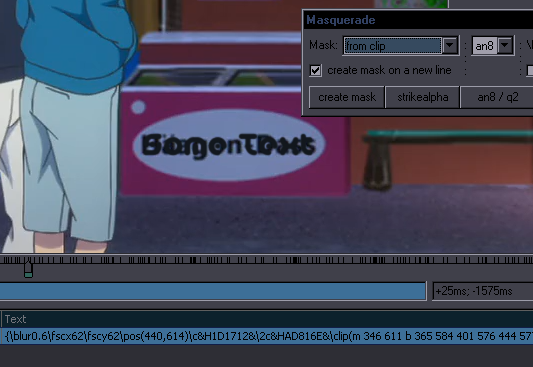 Run Masquerade. Select "from clip"... 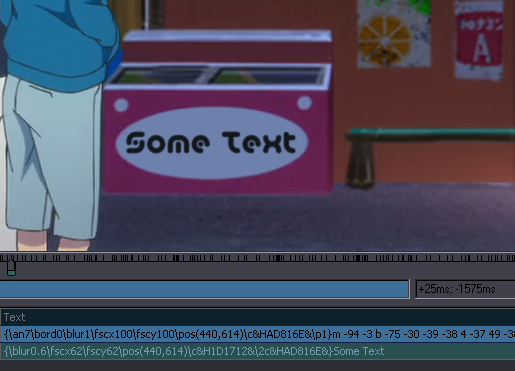 ...and the mask is there, in position, with the drawn shape, in the colour you used as \2c. k thx, that's all. HYDRA 3.0 - Inline Tags2014-01-15My extreme laziness to type made me try writing a function that would do inline tags, just to allow me to add a bunch of tags to the middle of the line without having to type them in the edit box. I haven't tested it extensively, and since I also rewrote half of the HYDRA code because of it, I'll leave it as a beta release until it gets properly tested. HYDRA 3.0 beta (Note: because of the changed code, HYDRA now kills duplicate tags by default.)  Here's how it works. The "Tag position" field loads the first selected line's text without tags and comments, like you see here. If you want to put tags before the word "Hydra", you put an asterisk before the word, like the image shows. I checked the primary colour, so when clicking Apply, the line becomes this:  That's basically it, if you use it on one simple line without trying anything weird. Now for all the non-standard cases and possible tricks. If you use it on multiple lines with the same text, it works on all lines as you'd expect. It always loads the text of the first selected line (which is not necessarily the active line). If the other lines have different text, nothing will happen with them. Now, the way it works is that it splits the line you see in the GUI into 3 parts: [before *][*][after *]. Then it makes a replacement of [before *][*][after *] with [before *][your new tags][after *]. This means that if you already have some other inline tags, like before the word "with", it won't work, because the pattern "tags with Hydra" doesn't actually exist — it's really "tags {\some tags here}with Hydra". You can simply bypass this by deleting the start of the line in the GUI and leaving only "with *Hydra". The function will then replace "with *Hydra" with "with {\your new tags}Hydra". So you see it just works on any pattern you give it that can be found in the line. If you just ignore the line's text completely, you can type "*a" in the GUI, and the new tags will be placed before every letter "a". Should you use the pattern "*b", it would in this case include the b's in \bord and \blur, so using very short patterns may just match things you don't want to match. If you select multiple lines and set the pattern to "*the", it will place the new tags before every instance of the word "the", disregarding what the rest of the text says, so if the selected lines have different texts but contain the word "the", the tags will go before that word. The inline-tag mode is activated when you put an asterisk in the line in the GUI. For lines that don't match the pattern, nothing will happen. If there's no asterisk, the line in the GUI is ignored, and HYDRA works the usual way. One more thing: You can add new tags to a place where tags already exist. So if you use the script again on the line where we already added a colour tag before "Hydra" and put the asterisk before "Hydra", the new tags will be added to the colour tag. In other words, this is the one exception where the pattern is matched even though there are tags that you don't see in the GUI. Do some testing and report if you find problems. Note: From version 3.61, this is fixed to work perfectly well with any inline tags, but you have to keep the whole text of the line in the GUI, so you can't use custom patterns with this. An added preset "custom pattern" handles that instead. Select Tricks and Sort Tricks2013-12-02I've been updating this script in the past few days, and I think it has pretty much all it needs now. Selectricks v2.3 should cover anything you may need in terms of selecting and sorting lines.  This is basically Aegisub's selecting and sorting functions in one, with a bunch of extra options. There are a few advantages of the inbuilt tools (like hotkeys for each sorting function), but a lot more advantages of this one. The main reason I started writing this a few months ago was to have the option to select by layer. This is quite useful to typesetters for adjusting signs with multiple layers, especially when mocha-tracked. When your typeset has 3 lines with different text, each of them in 3 layers mocha-tracked over 100 frames, and you need to fix colour on layer 1 for 1 of the 3 signs, it's still doable with the inbuilt tools, but a bit messy. Based on what I need most of the time when typesetting, I made the default setting to select from the current selection. For illustration, let's look at what I have to deal with in NouCome all the time. 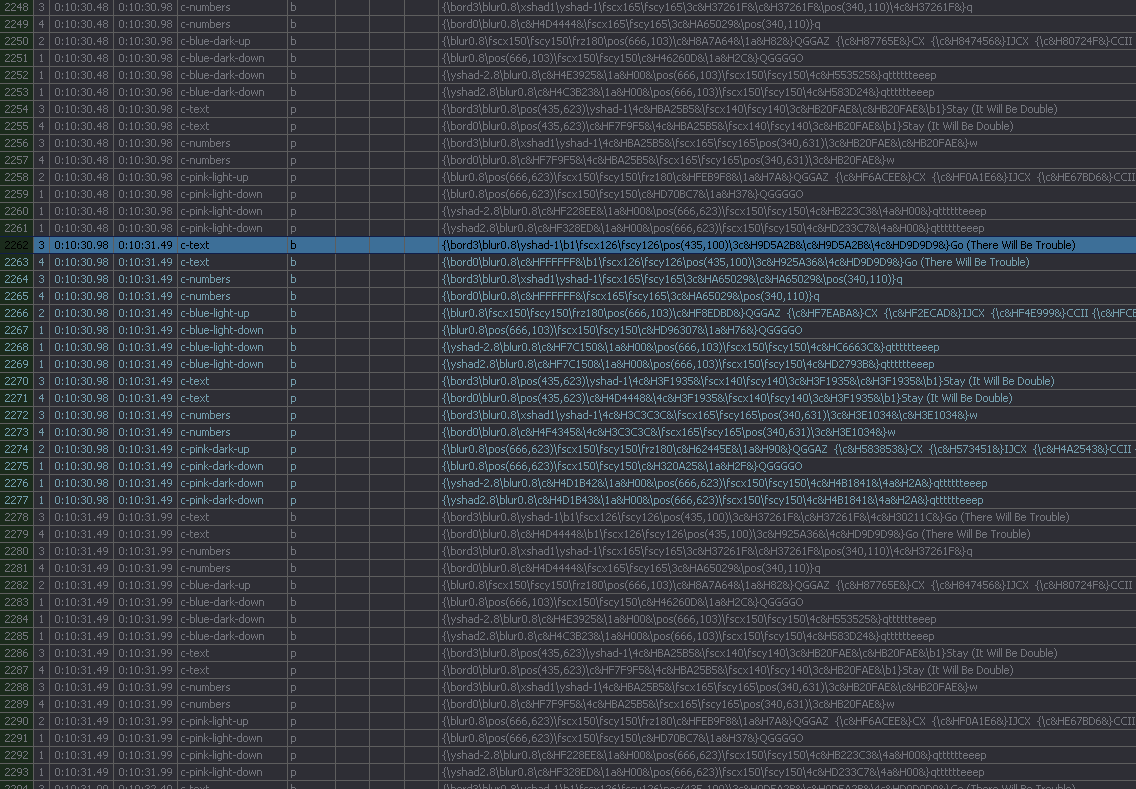 Those 16 highlighted lines are on the same frame(s). You can see that what I have on one frame has 4 different styles, 4 layers, and total chaos in the Text column. On the next frame, the styles are a bit different, and the text has different colours and some other things. This switches back and forth a few times, so the whole thing is 176 lines. Now, I may need to change the colour of "Go (There Will Be Trouble)", but only on layer 4, and not 3. To separate them with the inbuilt tools, you'd have to sort the 176 lines by layer (and even that was only added on my request), then by style, and then you'd still have the needed lines mixed with "Stay (It Will Be Double)". Aegisub doesn't sort by text, so you'd need to select by text, using "Intersect with selection". Not only is this kind of slow, but it also completely messes up your order of lines, and when you need to do something else, you'll have to reorder them differently. So as an example of what Selectricks can do, you would first select all the 176 lines. Then you can start with whatever, for example text. Select by text, match "trouble", click. Your selection is now on all lines with "Go (There Will Be Trouble)". Select by layers, match "4", click. Done. Not only you have selected the lines you need, but you also didn't mess up the order of lines. Since this is the way I mostly need to select stuff, the "Select from: current selection" option is default. The alternative, of course, is to select from all lines. Now, let's get back to the GUI and explain all the options. Select by is one of the two main things you need. One is typing the string you want to match, the other, this one, is where it should look for that string. We'll get to the details later. Select from: current selection / all lines. The inbuilt tool has some other options, like "add to selection" and "subtract from selection", but since I've never ever needed either of those, I haven't bothered including them. To be honest, I don't even really use the "all lines" option, because hitting ctrl+A before opening Selectricks is kinda faster than changing the option in the dropdown menu. matches / doesn't match should be pretty clear, and you'll need it pretty rarely. Match this is where you type the string. It remembers last search (unless you rescan scripts) and has a few checkbox options associated with it. case-sensitive / regexp / exact match — I hope I don't need to explain the first and last one. Regexp is limited because it's the lua regexp the automation scripts use. The only change I made to it is to allow \ where lua uses % (either will work). To be honest, I don't know how well this is working, but I seriously doubt that you will ever need more complex regexp than it can handle. Note: due to reasons, if you use \l or \u, you need to check "case-sensitive". exclude commented lines — By default, commented lines will not be selected, since you usually don't work with those, but you can uncheck this to include them. load results in an editor — Selectricks has the whole Multi-line Editor built in, so if you check it, it will load the matched selection in it, and you can for example use the Replace function on the selected lines. (I'll probably write more about the MultiEditor next time.) Numbers — I skipped this before. There are two types of strings to select by — text and numbers. While for text you have "matches / doesn't match" and the checkbox options on the right, for numbers you have ==, >=, and <=. This is easy to understand on the example of layers: you can select lines on layer 3, lines on layer 3 and below, or lines on layer 3 and above. The main two functions, selecting and sorting, each have its own button. The Preset button is for selecting only. I'll get to Sorting and Presets later. Now, let's get to all the options for "Select by". 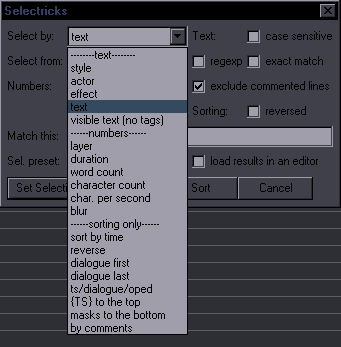 Style, actor, effect, text — These should all be clear. Sorting by effect can be handy if you use the effect field as marker for various things. The Unimportant script can number/mark lines with various patterns in the actor or effect field, which you can then use to distinguish between lines for easier separation. visible text (no tags) — This pretty much only searches text you'd see on the screen. It's applied to the Text field after all {\tags} and {comments} have been removed. The minor discrepancy is that it will include text that's after {\alpha&HFF&}, which is not really visible. layer — Obvious. duration — Duration of a line in milliseconds. word count — Pretty obvious. Excludes comments/tags. A "word" is a string containing letters and apostrophes. Hyphenated composites are counted as multiple words. character count — Excludes linebreaks, spaces, and some punctuation. character per second — This may help you find lines that are hard to read. blur — Reads the value from the first blur tag in the line, but 0 will also match lines with no blur tag. Don't forget that these can all be used with >= and <=. SORTING All the above-mentioned options work for both selecting and sorting. Sorting shouldn't need much extra explanation. Default sorting is in ascending order. If you want the order reversed, check that "reversed" checkbox that I skipped earlier. Lines with the same value of what you're sorting by stay in the original order, though with "reversed", they will be reversed too. There are a few "sorting only" options, which don't apply to selecting. sort by time is clear. There's no sorting by "end time" because I've never needed it, and neither do you. reverse — Simply reverses the line order. dialogue first — Dialogue lines go to the top, signs (and OP/ED) below. Dialogue lines are those with "Defa" or "Alt" in style. dialogue last — The reverse of the previous. ts/dialogue/oped — Signs to the top, anything matching "Defa" or "Alt" after that, and anything matching "OP" or "ED" at the end. While you may call your styles whatever you want, I recommend that the dialogue and OP/ED style names stick to this pattern, as many scripts can distinguish between them this way. Also note that everything in lua is case-sensitive unless specifically made not to be so, so OP/ED must be capitalized, as well as the D and A. Of course, a style named STOP will be matched as OP, and BORED as ED, so try to avoid that if you want to make good use of the scripts. (Some of my other scripts only match OP and ED at the start of the name, but not this one.) {TS} to the top — This, of course, does what it says it does. In the unlikely case that it doesn't do what it says it does, it's doing something that it's not supposed to do and should be reported to me so that I can make it do what it should have been doing all along. masks to the bottom — I dunno, Hdr asked for it. by comments — This means {this kind of }comments. Matches the first one in the line. You may thus use comments as additional markers for specific lines. 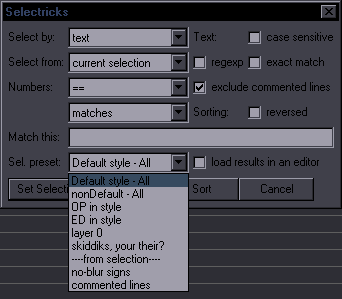 What's left is the Presets. Default style - All — This selects dialogue style (Defa/Alt) from the entire script. I use this when I open last week's episode, select the dialogue like this, delete it, and then I have OP/ED and episode-title typesets ready for shifting to the new episode. nonDefault - All — The opposite. OP / ED in style — Selects all lines that match OP/ED in style. Pretty useful for shifting OP/ED, unless you name some other styles confusingly or name your OP style "LOL". layer 0 — Selects all lines on layer 0. Not really sure how it's useful, but for some unclear reasons I included it. skiddiks, your their? — Requested by skiddiks, this selects all lines containing the words your, you're, their, there, they're. Something to do with him editing when sleep-deprived. All the options above select from the whole script. The two below select from current selection. no-blur signs — As I'm sure you didn't expect at all, this selects signs with no blur. commented lines — Yes. It selects commented lines. If you need to select only not-commented lines, just open Selectricks and click Set Selection with default settings. It will match an empty string (ie, all lines) but "exclude commented lines". To give a few examples of how you can use this, let's look back at that screenshot of NouCome script. If you want to select the lines that have "q" as text — {\bord0\blur0.8\c&HFFFFFF&\fscx165\fscy165\3c&HA65029&\pos(340,110)}q — you match just "q", check "exact match", and select by "visible text (no tags)". There are a bunch of lines with "qtttttteeep" as text. (Those are masks made with a special font.) If you need to select specific ones, you first select all the lines and then narrow it down. First by text "qtttttteeep", then by style (there are 4 different ones), and if you need only one of the two that are always together, the difference is positive and negative \yshad, so you could go by "ad2" or "ad-2" in Text. You can also, of course, sort them differently first. With all the options, it's always easy to sort them back into the original order. I highly recommend binding the script to a single key, like "S" (without shift/ctrl/alt), under Subtitle Grid. If you think there's still something missing that would be useful, let me know, and I may add it. Timing Operations2013-11-28One of the scripts that probably almost nobody ever noticed is ShiftCut. I originally wrote it because I had some script that had huge lead outs and I wanted to cut those. TPP can only add. Later, of course, I started adding things and pretty much added everything that TPP does, just so I'd eliminate the need for TPP completely and could use just one thing instead of two.  So, it's kind of like TPP with extra functions, and this is what it looks like now. To make it maybe less confusing, let's take it apart. 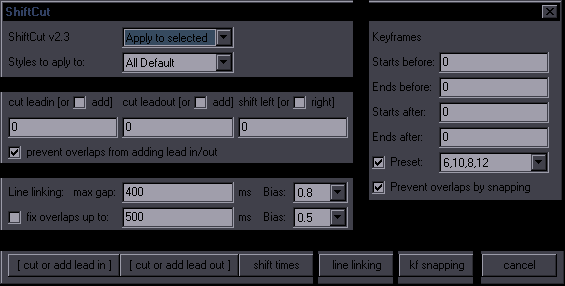 Top part is general settings, under it is lead in/out and shifting, then line linking, and on the right keyframe snapping. As you can see from the buttons, you only use one part at a time. Apply to selected / all lines. This should be obvious. Styles to apply to. There are 3 presets. All, All Default, Default+Alt. "All Default" applies to all styles with "Defa" in the name. "Default+Alt" applies to styles with "Defa" or "Alt" in the name. So this will match stuff like "Default Flashback" or "Alternative". After that it loads all styles present in your script. Cut / Add / Shift. As this was the original intent, the default setting is to cut leads. However, at the top of the script, there are options for all default values, so you can change it however you want. Times are in milliseconds, so with 200 in the lead in part, lead ins will be cut by 200 ms. If you want to create lead in/out, like with TPP, check the [or add] checkboxes. Shifting is simple, also in ms. Left is backward, right is forward, because, you know, that's what it looks like on the audio. Prevent overlaps from adding lead in/out. This should be the default setting, which makes sure that adding leads won't make lines overlap, but in case you really want to add lead out to a bunch of lines disregarding overlaps with lines after them, you can uncheck this. It can be useful for song styling where overlaps may not be a bad thing. Line linking. This is like in TPP. Bias 0.8 is 80% to the right, or in other words, 80% of the gap will become lead out and 20% will be lead in for the next line. Fixing overlaps is something extra I added, though now Aegisub has it too (but as far as I can tell it's either broken or I'm not sure what exactly it's doing). If you just set it to 50, it will fix one-frame overlaps. 500 means it will not allow overlaps up to 500 ms, so if it finds one, it does the opposite of line linking — it joins the lines based on the Bias setting. If you want to only fix overlaps, without line linking, set the gap for linking to 0. Keyframes. This is pretty much the same as in TPP, except the presets and preventing overlaps. If in TPP your ends_before setting is higher than starts_before, it will cause overlaps, which is kinda dumb because you probably don't want that unless you're dumb too. So the prevent_overlaps setting is pretty useful. The other advantage is having a few presets. I remember with TPP when I needed to just snap something_I_shifted to keyframes with like 2,2,2,2, I didn't remember the original settings when I needed them again. So this has 1,1,1,1, and 2,2,2,2, for snapping shifted stuff, and a few other presets, like 0,0,0,10 for fixing bleeds. You could even add your in the settings, as long as you don't fuck up the pattern. The setting is: kf_snap_presets={"1,1,1,1","2,2,2,2","6,6,8,12","6,6,10,12","6,10,8,12","8,8,8,12","0,0,0,10","7,12,10,13"} Keep the commas and quotation marks correct and you can add as many presets as you want. So in summary, what you have here in addition to regualr TPP stuff: cutting leads, adding leads even over other lines, shifting, fixing overlaps with a Bias setting (TPP seems to link them at the start of the overlap), preventing overlaps for keyframe snapping, and presets for keyframe snapping. Calculating Origin Point2013-11-27Continuing with aligning signs. I thought I'd try to actually calculate the origin point from given coordinates — an idea that jfs has been playing with for a while. After a few hours of trial and error I came up with a script half of which I don't really understand, but somehow magically it seems to work. I hope nobody finds bugs in it, because the code is sheer chaos to me. The usage is pretty simple though. You mark 4 points with the vectorial clip, and the script calculates where \org should be. 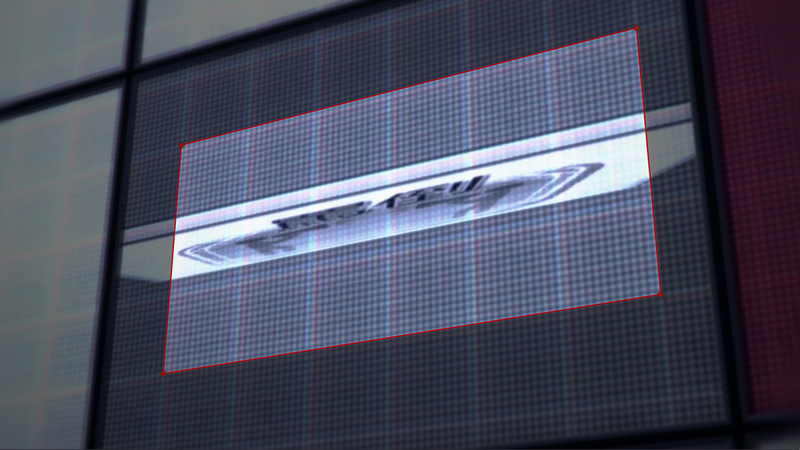 This is how you use it. Draw a tetragon that's aligned to the surface you want your sign on. Make the clip as large as you can, since on a smaller one any inaccuracies will be more obvious. Try to be as precise as you can. 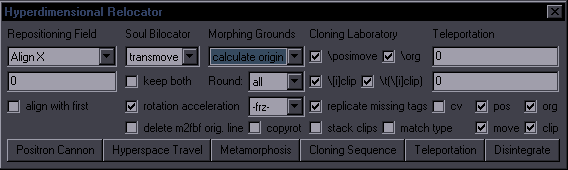 Now use this new function called "calculate origin". (Hyperdimensional Relocator v1.6) This, after doing a bunch of calculations I don't really remember or understand, will put the \org tag in your line, with supposedly correct coordinates. This may or may not work right, but so far it's been working in my tests. There will be some inaccuracies as a result of the clip drawn being inaccurate, but unless your faggosaurosis levels are extremely high and you drew a circle instead, these will be negligible.  Now you apply the grid and start tweaking the rotations (\frx and \fry). What I've tried was usually somewhere in the range of 3-8 degrees in any direction. Here you can see the grid partly aligned, pretty much as good as I could make it with the rotation tool.  After that, I had to type decimal values in the Subtitle Edit Box. Here's the final alignment. I didn't touch the \org after it was calculated, so you see this worked out pretty well. The result: \org(631,1183)\frx3.4\fry355.6 If the origin point happens to be really far away, using the rotation tool may be pretty difficult, so you might be better off changing the rotations by typing. The only problem I'm having is that Aegisub tends to crash when messing with the grid, like when I type the rotation values. It's pretty random and the same thing will cause a crash once but not another time, and I don't know where the problem is (Aegisub? vsfilter?), but it seems like messing with larger drawings is a bit unstable, so just make sure you save a lot when you do this, and maybe keep the grid from being larger than you need.  Anyway, here's the grid on the more relevant frames... 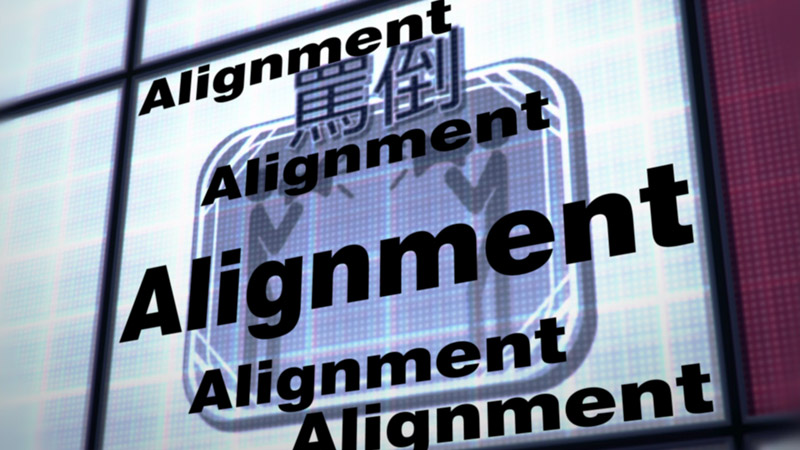 ...and here are a few signs with the data applied. The only thing different in all these lines is \pos. Rotations and \org are all the same. Edit: found some bugs and probably fixed them in v1.62. Aligning Signs Using an Alignment Grid2013-11-26So yeah, I had another idea for what to waste my time on. This is probably gonna be very random, but whatever. I'm pretty sure that only very few people have any idea what most of my automation scripts (can) do. So every now and then, I'm gonna explain some stuff or post some updates. Let's start by mentioning that I just added a new video to the video section of the TS guide. It explains everything about the Hyperdimensional Relocator. Not like the script doesn't have a long-as-fuck section with instructions, but how many of you actually read that shit, huh? Moving on to the current issue - aligning signs, in this case with \frx\fry\org. In most cases, you can do things better with \frz\fax, but sometimes that just doesn't cut it. So, since the inbuilt grid in Aegi is kinda useless, I used ASSDraw to make a better one, and I added it to the list of masks in Masquerade, as you can see below.  There are two grids to choose from. The only difference is that the second one has more lines. So you just run this on the line that you need to align, it creates another line with the grid, and you can mess with the grid to get the right alignment.  This is what the grid (2) looks like. It's pretty large, but you can use the scaling tool to scale it down for smaller signs. The rectangle in the middle should give you a rough idea where the text will be. If you create the mask from a line that already has rotations or \org, they will be copied to the mask. (Need Masquerade v1.41.) Here you can see the default. The grid has some transparency so that you can see the picture well enough. If you start rotating it, the grid may disappear in some positions. I don't know if it's vsfilter's fault or what, but apparently, if it's too large, it becomes invisible, so just scale it down if needed. Now, you can either select both the sign and the grid and move/rotate them at the same time, or you can just mess with the grid and later use Relocator to copy all the needed tags to the sign. This is probably better because you can't move the \org point of both lines with the rotation tool selected (as of now, at least).  Once you get all the stuff right, it should look something like this. For the record, the origin is at 895,800 (720p res). Aligning may still take a while, but at least you can clearly see whether you got it right or not, and the whole process is faster than with a sign because you can immediately see whether you're going in the right direction, etc. Once you set it up like this, the grid should be aligned no matter where you move it. In other words, as long as the \org stays where it is, you can drag the anchor, and the grid will still be aligned in any part of the screen.  Here's the top left part.  And here's top right. One trick for moving the \org point when it's off the screen: Select drag mode. Let's say you want the \org go about 50 pixels to the right. Sure, you can type it, but there's another way. Double-click 50 pixels to the right from the anchor. This will move both the anchor (\pos) and the \org point by the same amount. Now, drag the anchor back, and you have the anchor in the same place as before, while the \org point has moved 50 pixels to the right. It has less precision, but it's not like you know where the \org needs to be exactly anyway, and it's a bit faster.  So, now you have the grid aligned, and you need to align the actual sign. Use Hyperdimensional Relocator / Cloning Laboratory with "copyrot" checked. (Requires HR v1.55.)  In case you don't know how this works — the first line has to be the grid, the second the sign, you select both, and it copies the checked things from line 1 to all other selected lines, in this case line 2.  And here's your aligned sign, looking all perfect. Same as with the grid, you can now move it, and as long as the \org point stays in place, the sign will be aligned perfectly well wherever you move it.  (This is resized to be larger than in the previous screenshot.)  Useful advice in case you have faggosaurosis: don't forget to delete the grid when you're done. |