|
written by lyger | ||||||||||||||||||||||||||||||||||||||||||||||||||||||||||||||||||||||||||||||||||||||||||||||||||||||||||||||||||||||||||||||||||||||||||||||||||||||||||||||||||||||||||||||||||||||||||||||||||||||||||||||||||||||||||||||||||||||||||||||||||||||||||||||||||||||||||||||||||||||||||||||||||||||||||||||||||||||||||||||||||||||||||||||||||||||||||||||||||||||||||||||||||||||||||||||||||||||||||
Introduction(last revision: 2013-06-05)This tutorial is meant to serve as a basic guide to creating Lua automations for use in Aegisub. If youĺve worked on an advanced substation alpha script, especially if youĺre a typesetter, youĺve probably encountered tasks that are tedious, repetitive, and/or require more calculations than youĺre willing to do. In most cases, these tasks can be automated using macros written in Lua code, and often quite easily. This tutorial is based on my own knowledge and experience. There are many features of the Lua language and the Aegisub API that I've never used and won't cover. This tutorial should provide a solid starting point, but advanced users will have to do their own research. The next section will cover basic programming concepts for people who have never programmed before. If you already know a programming language (HTML doesnĺt count), you can skip to "Lua for Experienced Programmers". If you already know Lua, or if you'd rather start writing macros right away and learn Lua as you go, then you can skip to "The Aegisub Environment". I recommend frequently referencing the documentation provided in the Aegisub user manual. Programming for BeginnersThis section will briefly introduce basic programming concepts using Lua. On the advice of some people who helped proofread this tutorial, I've vastly condensed this section, as it is not the main focus. You can find many good resources for learning Lua on the lua-users.org page.Variables, data types, arithmetic, and logicA variable is the name of the place where you store data. They behave similarly to the variables in algebra, but can store any kind of data, not just numbers.
x=5
Another simple data type in addition to numbers is the string, which represents text and is defined with quotes. In Lua, you can join one string to another using the .. operator.
first_name="John"
Note that the backslash ( \) is an "escape character" (more info here). If you want to type a normal backslash, type "\\".
Another data type is the Boolean, which can only have two values: true or false. You can use Booleans to evaluate if conditions or loops.
is_happy=true
In most cases, you will be using Boolean expressions that can be true or false depending on the situation. The following are examples of boolean expressions.
x > y
The greater than and less than sign mean what you expect. "<=" and ">=" mean "less than or equal to" and "greater than or equal to", respectively. "~=" means "not equal to". Conditions can be combined using and and or.
Note the double equals sign. In many programming languages, including Lua, the single equals sign does not mean "is equal to". Instead, the single equals sign represents assignment. That is, it is a command that means "store this value in this variable". The expression count = 5 means "store the value 5 in count", which is not what we want here. To check for equality, use count == 5, which means "count is equal to 5".
If you are working with number variables, you can perform arithmetic on them normally. In Lua, multiplication is *, division is /, and exponentiation is ^. The modulo operation is %.
x=21
Keeping in mind that the equals sign is the assignment operator, note that at runtime, the expressions on the right are evaluated and their numeric results are stored in the variables. Changing the value of x on line 4 does not affect y or z.
Lua has a special value called nil that can be stored in any variable. It means "nothing". This is not the same as the number 0, nor is it the same as a string with no text in it. If a variable is nil, it means "no valid data is stored in this variable". Uninitiated variables and failed function calls will generally result in nil.
You might think having nil values is an error that should be avoided, but nil values can be very useful. For example, you can see whether tonumber(foo) returns nil (i.e. "failed to covert to number") to determine whether foo is a valid number or not.
The last thing I have to say about variables concerns naming them. A variable name can contain letters, numbers, and the underscore, but no spaces. The first character in a variable name must be a letter or the underscore. Also, you cannot use any Lua keywords as variable names. For example, you cannot name your variables end, if, for, or in, because all of these serve other purposes in Lua.
Control structures and loopsNow we can start doing some more complicated tasks than arithmetic. I already briefly touched on theif statement. An if statement checks whether a condition is true, and if it is, it performs all of the code until end. Otherwise, it skips the code and continues after the end.
x=5
Here, because x is less than y, the code inside the if statement executes. z is set to 50, and "Foobar" is printed out to the console. Afterwards, "The value of z is 50" is printed to the console as well.
You can extend an if statement using elseif and else.
if command=="quit" then
Next up are loops. Loops will execute the code inside them over and over until some condition is met. Two basic loops are while... do and repeat... until. These should be self-explanatory, so I'll just show some examples and move on.
x=100
One very important kind of loop, and one that many beginners find hard to understand, is the for loop. The for loop will cycle a variable or variables through a set of values, and execute the code in the loop once each time. The simplest use of a for loop is as a counter, to cycle a variable from a starting value to an ending value. For example, to count from 1 to 10, we simply do:
for x=1,10,1 do
This for statement says "define a variable named x, which will start at 1, end at 10, and count by 1." The third number is optional; if you put for x=1,10 do Lua will count by 1 by default. If you want to count by 2, then use for x=0,10,2 do, and if you want to count down, use a negative number. The commands inside the for statement (in this case, a print) will be executed for each value of x.
As a simple example, let's use for to calculate the factorial of 10.
result=1
The variable num stores values from 1 to 10, and the code inside the loop is executed once for each of those numbers, thus multiplying result by all the numbers from 1 through 10.
Arrays and other data structuresSo far, we've covered three simple data types: numbers, strings, and Booleans. Now we can move on to compound data types, the most basic of which is the array, which exists in all programming languages. An array is an ordered list of values. Because it's ordered, each value has an associated index: 1 for the first value in the list, 2 for the second value, and so on. You use this value to access specific elements in the array.
my_array={8, 6, 7, 5, 3, 0, 9}
In the above code, my_array[3] refers to the third value in the array. 7 is at the third position in the list, so the output of this code is 7.
We can use a for loop to perform operations on every item in an array. By placing a # in front of the name of the array, we can get the size of the array (the number of items in the list). We can use this as the upper bound for our for loop.
my_array={8, 6, 7, 5, 3, 0, 9}
Since arrays are used so often in Lua (they're actually a part of a bigger data type, known as tables), a special function is provided that lets you cycle through an array more easily. This is the ipairs function. The i presumably stands for indexed, meaning this function gives the elements of an array in order based on their index. The "pairs" is because it returns index-value pairs. You use ipairs like this:
my_array={"Never", "gonna", "give", "you", "up"}
Any data type can be stored in an array: numbers, strings, and even other arrays. If you have an array of arrays, then you can, for example, access the third element in the second array using array[2][3]. Unlike many programming languages, Lua allows you to have different kinds of values stored in the same array. You can thus have a list of mixed numbers, strings, booleans, and tables.
The other main compound data type in Lua is the hash table (again, this is actually a part of the table data type; more on this later). Instead of storing an ordered list of values, a hash table can be thought of as a dictionary or a lookup table. A hash table stores pairs of "keys" and associated "values". You use the key to look up the corresponding value in the table. The key is usually a string. The example below shows how to define a hash table to store data on a person. person={
To access the person's first name, simply use person["fname"]. Lua also allows you to access the data in a way that looks more "object-oriented" (if you don't know what this is, don't worry about it). The code person.fname means the exact same thing as person["fname"].
Note that you cannot compare arrays and hash tables using == and other similar operators. Well, you can, but it probably won't do what you want it to.
An important caveat! When you want to make a copy of a simple data type, you can simply create a new variable and set it equal to the old one. This doesn't work for compound data types like tables, because the variable is a reference to the table data, and not the data itself. Aegisub comes with a function to copy tables. See the "Utils" section for more details. FunctionsFunctions are similar to the functions you learn about in pre-algebra. You give the function some parameters, it does some work on the parameters, and it usually gives you a result. If you have a function like f(x)=4x+2 and you ask for the value of f(6), then 6 is your "parameter" or "argument" and 26 is your result or, in programming terms, your "return value". You can have a function with multiple parameters, such as g(x,y)=x+y-4.The below code defines a function that acts like g(x,y) above.
function add_and_minus_four(num1, num2)
This function takes two parameters, does some math using them, and returns the result to us. You can use this function elsewhere in the program like this:
x=12
The resulting value of the function, 24, will be stored in z. For reference, the above code can be written in one line as:
print(add_and_minus_four(12,15))
A function does not need to have a return value, because unlike math functions, a function in a program can do tasks other than calculating a result. Functions also need not have any parameters, but when you use the function, you always need the parentheses, even if there is nothing in them.
Also, unlike math functions, a Lua function can return multiple values, separated by commas. To return multiple values, just write return value1, value2, ... at the end of your function. Then, when you use the function, store the multiple returns in variables separated by commas: x1, x2, ... = ....
It's important to note that a function immediately ends once it gets to a return statement. Any code after the return statement will not execute. Thus, if you have a return inside an if statement, there is no need to put an else.
function greater_of_two(num1, num2)
Lua for Experienced ProgrammersThis section will give a quick overview of what you need to know about Lua if you already have programming experience. If you're a beginner programmer who has just finished reading the previous section, I still recommend reading this section in full, especially the "Useful libraries" section. You might not recognize all of the terms, but there's a lot of essential information. I'll also repeat a lot of what I covered in the previous section, but with higher-level explanation.Writing Lua codeFirst things first: what program should you use to write Lua code? Personally, I use Notepad++, which comes with syntax highlighting for Lua and many other languages. If you download Lua for Windows, it comes with an editor specifically designed for Lua. Otherwise, I'm sure you can just google "Lua editors" and find something to your liking.Keep in mind that macros you write will only run in the Aegisub environment and can only be tested within Aegisub. However, you can test out code snippets outside of Aegisub so long as they don't use to the Aegisub API. Basic syntax and featuresLua is a lightweight, weakly typed, interpreted (sort of) programming language designed as a scripting language (yes, this was paraphrased from Wikipedia). You can define variables on the fly without having to specify what data type they store, and the same variable can be used to store any kind of data.There are only three simple data types (that I can think of): number, string, and Boolean. All numbers are double-precision floating point numbers. Lua arrays start counting at 1, not 0, so be careful. The size operator for arrays and strings is the prefix #.
The end of a control structure or function's scope is marked by the end keyword. There is no begin keyword; the function definition or the head of the control structure serves to begin the scope. An exception is repeat... until, where the two keywords define the scope and no end is needed.
Lua supports the local keyword for variables and functions, if you need to control the scope. Generally you don't need to worry about this if there's no chance of confusion, but it's still good practice. Variables not declared local are global.
Uninitiated variables or array entries are set to nil. This is more or less equivalent to the null value in Java. Failed function calls often return nil. This can be used, for example, to detect if a string does not contain a certain substring: string.match(str, substr) == nil (incidentally, = is assignment and == is equality).
Lua supports multiple return values and arbitrary numbers of function parameters. If you pass a function more parameters than it uses, the extra parameters are ignored. If you pass the function too few parameters, the remaining parameters are nil. A function can receive an arbitrary number of parameters using ... (look it up).
Lua does not have a full regular expression implementation. Lua uses a bare-bones kind of regex known as "patterns". This tutorial and Google should teach you all you need to know. Patterns will come up again later when I introduce the string library. For strings, the escape character is the backslash ( \). Remember to escape slashes when writing .ass override tags.
In Lua, functions are "first-class citizens". That means you can toss around a function as if it were a variable. Pass a function as a parameter, store a function in an arrayŚgo wild. Boolean operators are and and or. "Not equals to" is ~=. String concatenation is ... You don't need semicolons at the ends of lines, and superfluous whitespace is ignored.
Comments are defined as follows:
--This is a single line comment
The table data structureThe table is the only native compound data structure in Lua. It can be used like an array, a hash table, or both. Multiple data types can be stored in the same table. Fundamentally, a table is a collection of key-value pairs. If the keys are all numbers, then the table behaves like an array. If the keys are all strings, then the table behaves like a hash table. If you have both at the same time, then welcome to the joys of Lua tables!The iterator function pairs returns all the key-value pairs in a table, in both the array part and the hash table part. The pairs function does not guarantee any order to the values it returns, not even for the array part of the table. You use the function like this:
for key, value in pairs(my_table) do
You might be familiar with "for each" loops in other programming languages; this is basically that. If you want to iterate through only the array part of the table, in order, then replace pairs with ipairs.
Object-oriented LuaAs you may have realized, tables are pretty similar to objects. Indeed, Lua allows you to extend tables to use them like objects using metatables. I've never used them personally, but if you are interested, you can find more information online.But insofar as a table can be a hash table, the keys are a lot like an object's fields. Defining a table can look a lot like defining an object; scroll up to see an example. Lua even allows you to write my_table["key1"] as my_table.key1.
Useful librariesIn addition to thepairs and ipairs functions, Lua also provides the useful tonumber and tostring functions.
The table library is worth looking into, but the only functions from it that I regularly use are table.insert and table.remove.
The string libraryI could just link to the string library tutorial and the patterns tutorial on the Lua users wiki and call it a day, and honestly, you should find most of what you need on there. But I'll go through it in a bit more detail anyway.First, it's worth noting that you can call string library functions on strings in an object-oriented-like way. For example, if you have a string named str and a pattern named pat that you want to match, you can use either string.match(str, pat) or str:match(pat). This is a bit shorter and somewhat more intuitive, especially if you're used to object-oriented.
The functions I use most frequently when writing Aegisub automations are string.match, string.format, string.gmatch, and string.gsub. I used to use string.find, but I found that in most cases, string.match is a better option.
These functions are, in general, pretty well explained on the Lua users wiki. Note that string.match returns the section of the string that matches the pattern, or the captures if the pattern contained any (these are returned as multiple return values). If you've used format strings in C before, string.format is basically the same thing. You can often get the same functionality just by concatenating strings (since numbers are automatically converted to string when concatenated), but it's often neater and more convenient to use string.format.
The real workhorse, though, is string.gsub. This is the bread and butter of most automation scripts that I've written, because most Aegisub automation involves modifying the text of your subtitle script. There's no better or more versatile way to modify text in Lua than string.gsub. Its many capabilities can be overwhelming for some, so I've written an example script that should walk you through what you can do with it.
You can download the example script here. The math libraryHere's the math library tutorial. There's not much I can add to this. The math functions you'll use depend heavily on the sort of automation you're writing, so it's best to look them up as you need them. However, I will mention a couple things.First off, be aware that all trig functions in the math library use radians! I cannot stress this enough. As you're probably aware, advanced substation alpha angles are always in degrees, so if you want to do any math involving angles, it is imperative that you use math.rad and math.deg to convert from degrees to radians and vice versa. Many a time I have been stymied by misbehaving code, only to realize I'd forgotten to convert. Also note that the math library includes the constant math.pi.
Another thing to note is Lua's pseudorandom number generator. The seed is always the same, so if you run your automation multiple times, math.random will produce the exact same sequence of pseudorandom numbers. If you want to get a different pseudorandom number sequence, use math.randomseed to seed the random number generator with a different number. A good solution is to use your constantly-changing system time as a seed: math.randomseed(os.time()). This will produce a new sequence of numbers each time you run the automation... so long as you wait a second. Sadly, Lua doesn't do milliseconds.
The Aegisub EnvironmentFinally, it's time to see how we can put Lua to work in Aegisub's automation environment. All this information and more is on the official user manual on the Aegisub website, but I'll be presenting it here step-by-step, with explanations and examples. Nonetheless, I strongly encourage you to read the manual thoroughly on your own time.Writing a macro functionThe most basic skeleton of an automation script should look something like this:
--[[
To view this skeleton script with syntax highlighting, you can download it here and open it up in your Lua editor of choice. When you run the automation from Aegisub, it will call macro_function (or whatever you choose to name your function) and execute the contents of the function. The function is given three parameters: the subtitle object, a list of selected lines, and the line number of the currently active line. Most scripts only use the first two. If that's the case, feel free to not include the active parameter. Also, to save typing, I usually abbreviate the parameter names to sub, sel, act. You can name the parameters whatever you want. Much like in math, f(x)=2x+3 is exactly the same as f(y)=2y+3.
For convenience, I will use my preferred variable names sub, sel, act to stand in for the three parameters in code examples.
The subtitles object is the only object that contains data about your .ass script. It's a table, but it's a pretty special one. The array part of the table stores all the header, style, and dialogue lines in the script. To get line 5, you simply type sub[5].
Now this is important: if you want to modify lines, you never modify the subtitles object directly. Not only is it a pain to type, I don't think it actually works (like I said, the subtitles object is a special table). You have to first read out the line using something like line=sub[line_number]. Then you modify the line, and put it back in the subtitles object with sub[line_number]=line. Incidentally, these lines that you read out are line data tables, which I'll cover later.
I'm going to be honest: to this day, the subtitles object is something of a black box to me. It's pretty complicated, but all you really need to know is how to retrieve dialogue lines. Aegisub comes with some very useful functions that do the rest of the work for you (I'll cover them in the section on karaskel). Next up is the list of selected lines, which I usually call sel. To reiterate: only the subtitles object contains data about the script. You won't find the selected lines in sel. Instead, you'll find a list of the line numbers of the selected lines. In other words, sel is a list of indices for the subtitles object. To get the first selected line, you have to write sub[sel[1]]. This can be a bit confusing, especially if you use ipairs on sel, as I will show you how to do later. You'll end up with two indices: one that refers to a position in sel and one that refers to a position in sub. Don't get confused.
The final parameter is the line number of the currently active line. I've never used it, but you can access the relevant line using sub[act].
Use these parameters to do all sorts of fancy stuff to the subtitles in the body of the function. At the end, you should set an undo point. Aegisub 3.0 now automatically does this even if you forget, but it's good practice to do so anyway. The return value of the function is optional, but if you return an array of line numbers, then the selection will be set to those lines once the macro finishes running. With this in mind, here's a skeleton for a processing function that will allow you to modify every line in the user's selection.
function do_for_selected(sub, sel, act)
Download this skeleton here. The dialogue line tableRead this. Just do it. Be aware that without using karaskel, you only have access to the "basic fields".The dialogue line data table stores all the information you will need about a line in your script, all in a nice, convenient table. You can access the actor and effect fields, you can get the start and end time in milliseconds, you can tell whether the line has been commented out (and you can change a line to a comment or vice versa), and most importantly, you can access and modify the text of a line. There are a plethora of useful macross that you can write using nothing but the skeletons I provided above, the string library, the math library, and line.text. If you just want to take care of some simple text modifications such as adding italics, or even some basic math like shifting position, then you have all you need to know. You can stop reading after the following two example scripts.
For those who want to get the most out of the Aegisub automation API, continue on to the Guided Example: Add Italics to Selected Lines[Download example script]This is one of the simplest examples I can provide. I've only added one line of code (line 25) to the skeleton scripts I've provided above. In this script, I use the string concatenation operator to add an italics tag to the start of each selected line's text. Note that there are two backslashes. As mentioned in the variables section, the backslash is a special character. To type an actual backslash, we need to "escape" it. When using the skeleton scripts, don't forget to fully delete pieces of code that you are not using, and make sure you reflect name changes across the entire script. Here I've named the processing function "italicize", so I also have to use "italicize" when I register the macro. Furthermore, I did not need a validation function since this script can be run on any selection of lines, so I deleted the validation function and removed it from the macro registration at the bottom. Finally, remember to set your script properties at the top, and write a readme. Guided Example: Modify Font Size for Mocha[Download example script]Nowadays xy-vsfilter, which supports non-whole-number scaling, is becoming standard, so this trick is no longer quite as useful. Nonetheless, it makes for a good example automation script that involves both the string library and the math library. This script decreases the font size (\fs) by a factor of ten and increases the scaling (\fscx and \fscy) by a factor of ten. At the end, the size of the text still looks the same, but the scaling is ten times more precise. For font sizes that are not evenly divisible by ten, the script will round down to the nearest whole number. Then it divides the original font size by the new font size to determine how much it needs to increase \fscx and \fscy to balance it out. All this math takes place in lines 40 to 48 of the example script, so you can see it for yourself. math.floor is the function that rounds down to the nearest whole number (the opposite is math.ceil).
The script makes use of string.gsub with an anonymous function. If you're having trouble with understanding this use of string.gsub, you can check out the example script I wrote, or the string library tutorial on the Lua users wiki. The pattern "\\fs(%d+)" looks for the string "\fs" followed by a number, and the parentheses around %d+ will "capture" the number and send it to the anonymous function (another reminder that you have to escape backslashes).
The script also shows how to use string.format to insert values into a format string. The formatted string is then returned by the function, and substituted into the original string.
Unlike the previous script, this one has a validation function that makes sure the selected lines all contain "\fs". Note that I do not read out a line table, but directly access the subtitles object. Since I'm not going to be modifying the lines, I'm not going to bother reading the line into a full line data table. Validation functions run every time you open the automations menu, so they should be as short and as fast as possible. The Aegisub Environment - AdvancedBefore you go off writing your own functions to do useful subroutines, make sure that you're not reinventing the wheel. Aegisub comes with two libraries that will vastly extend the capabilities of your automation scripts and make common tasks much easier. Later in this section, I'll also introduce the API for creating simple GUIs that allow the user to configure the behavior of the automation script.karaskel.luaThe full documentation for this library can be found here. To use karaskel functions in your script, put this at the top:
include("karaskel.lua")
Remember all the extra fields that you might have seen when reading about the dialogue line data tables? Well, karaskel will give you access to all of that. You'll also be able to access style data about a line, so you can detect its style defaults, which is huge if you're writing an advanced script. Since my scripts are typesetting-focused, I only use two functions from karaskel. If you want to write an automation that actually deals with karaoke, then you'll probably find the numerous other features of karaskel quite useful. The first essential function is karaskel.collect_head, which collects the meta and style data that other karaskel functions use. You'll need a line at the top of your processing function that looks something like this:
local meta, styles = karaskel.collect_head(sub,false)
You probably want false, because true will generate a lot of mysterious extra styles in your script. That's not where the magic happens, though. After you've read in your line to process it, you can do this:
karaskel.preproc_line(sub,meta,styles,line)
This gives you access to all the extra dialogue line fields that you saw earlier. In particular, it gives you access to line.styleref, which is exciting. Seriously. Be excited.
Because now you can do things like line.styleref.color1 to figure out what the default main color of your line is. You can check the default font size using line.styleref.fontsize. Need to know the border weight? line.styleref.outline is your friend.
Be warned that the color codes extracted from the style are not ready to use in \c tags just yet. Color codes in style definitions contain both color and alpha data, and look a bit different from in-line override codes. You'll need a function from utils.lua to extract properly formatted color and alpha codes for use in override tags.
As a side note: a function that isn't part of karaskel but can be very useful is the aegisub.text_extents function, found in the miscellaneous APIs. You'll need to use karaskel.collect_head before you can use this function, which is why I mention it here. This function takes a style table and a bit of text and calculates the pixel height and width of the text. If you pass it line.styleref, then it will give you the size of the text in the line's default style. But you can do more.
If the user overrides the default font properties in-line, you can use the strings library to detect the changes. Now make a copy of the line's style table, modify it until it matches the user's override tags, and pass it to aegisub.text_extents. You can determine the size of any typeset that the user makes, even if he changes the font or font size in the line. That opens up a lot of possibilities.
utils.luaThe full documentation for this library can be found here. To use utils functions in your script, put this at the top:
include("utils.lua")
This library defines the essential table.copy function. If you want to create new lines in your subtitle script, you're going to need this function. As mentioned in an earlier section, copying a table is more involved than copying a number or a string. To create a new line, you're going to have to make a proper copy of your original line data table, and you'll need this function to do that.
In addition, utils contains lots of useful functions for working with .ass color and alpha codes. There are functions to extract colors and alphas from styles, to convert to and from RGB values and HSV values, to transition smoothly between colors and alphas, and so on. If you're stuck working with colors or alpha, odds are one of the functions here will help you out. Creating GUIsFor those who don't already know, GUI stands for Graphical User Interface. Anything that has a pretty window with buttons you can click is a GUI, and we can create simple GUIs to allow users to set options for your automation before it is run.The GUI documentation is here, and if you're anything like me, you're going to want an example so you can see how this thing works, because it's a little hard to grasp just reading the documentation. Let's work backwards. The function that actually displays your dialog box is aegisub.dialog.display. This function takes two parameters, both of which are tables. The second table is easy enough. It's just a list of the buttons you want at the bottom of the table. Something like {"Run", "Options", "Cancel"} would work. The function's first return value is the button that was pressed.
The first parameter is the real meat of the GUI. This is the dialog definition table, which will describe how your GUI is laid out, what options the user has, and what their default values are. You can see all the options available to you here. You position components using a grid of rows and columns. Imagine each component is a cell in a spreadsheet. The top left corner is (0,0). To the right of it is (1,0), and below is (0,1). If you want a component to occupy more than one cell, then set its coordinates to the top left cell, and use "width" and "height" to tell it how many columns and rows it takes up. You can make your GUI as many columns wide and as many rows tall as you want, and the window will stretch to fitŚbut keep it within reason. The type of component is defined by the "class" property. You can have labels, which simply provide instruction text, you can have checkboxes, dropdowns, color selectors, text fields, and so forth. Components that take user input also need a "name" so that your automation can retrieve the results later on. Additional properties will depend on the class of the component. Checkboxes can be set to "true" or "false" by default, and can also have their own labels. Dropdowns will contain a list of the options to include in the dropdown menu, and so forth. All right, enough of that. You want to see an example. So here we go. Let's say we want to add some options to our italics script. We want a dropdown box to let the user select "Apply to selected lines" or "Apply to all lines". This will be set to "Apply to selected lines" by default. Also, perhaps the user wants to unitalicize lines that are italic already. So we should have a checkbox for "Unitalicize already italic lines", but this will be off by default. Also, maybe the normal italic isn't slanted enough, so we can provide a text box to let the user define a \fax value, to tilt the text more (humor me here). We'll need to label this text box so the user knows what it does, and let's set its default value to zero. Here's what our dialog configuration table looks like:
dialog_config=
When we call aegisub.dialog.display(dialog_config), we see this:

Well okay, the arrangement could use a bit of work. Let's see if we can't make this look better by modifying the x, y, and width properties. Let's make the dropdown and the checkbox two columns wide, and we'll move the checkbox to (0,1), below the dropdown. The label and the float edit box will still be one column wide, and we'll move them down a row. 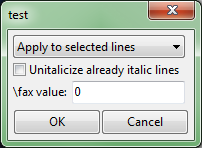
There! Much nicer. We've created our first GUI. If you want to change the default OK and Cancel buttons, just add a second parameter containing a list of desired buttons and you'll be set. Now that we know how to display GUIs, we need to know how to use the results of the user input. These results are stored as a hash table and are the second return value of aegisub.dialog.display. The keys in this hash table are the names of the components that we defined in the dialog configuration table. If, in our example, we store our results in a table named results, then to access the selected option in the dropdown box we use results["lineselect"]. To see whether the checkbox was checked, we'll see if results["unitalic"] is true or false. To get the value we should use in the "\fax" tag, simply take a look at the number in results["faxvalue"].
So, to summarize:
buttons={"Italicize","Cancel"}
MiscellaneousI'll add to this section as I think of miscellaneous things worth mentioning. If you've followed the tutorial so far, you should be set for the most part.The automation progress bar can be controlled using functions found on this page. The functions are entirely self-explanatory. It's mostly aesthetic, but can also help in debugging by giving you a rough idea of where in the processing your script encounters an error. Speaking of debugging, further down on the same page are a few debug output functions. The miscellaneous APIs page I mentioned earlier also has some great functions for getting information about the video. Furthermore, there's the aegisub.decode_path function that's very useful if you want to save and load files. Aegisub defines several helpful path specifiers that let you access directories such as the application data folder or the location of the video file.
Lua patterns are powerful enough for the most part, but still limited. Aegisub's documentation includes the re module which is supposed to allow for more robust regular expressions. I tried to use it once and ended up ragequitting. Perhaps I was doing something basic wrong and the module will give you no problems, but consider yourself warned. I, for one, will stick to patterns. My point of view when writing this tutorial was mainly that of a typesetter, but if you're a kfxer, you'll find tons more good stuff in the karaskel library that I didn't even mention here. Knowing all the capabilities of Aegisub's Lua environment more in depth will help you pull off more advanced karaoke. Guided Example: Modify Font Size Revisited[Download example script]Remember the long list of exceptions in the "simple" version of this macro? It was only really useful in a specific set of cases, and relied heavily on the typesetter not doing anything that the macro did not expect. I really hate writing macros like this, and your users will be frustrated too. This is a bit of a tangent, but truly useful automations should be robust. They should behave as the user expects them to behave in the vast majority of cases. The previous version of this script couldn't handle relatively common situations like having a \fscx or \fscy tag in the line. Well, we can fix that. Off the top of my head, the only thing this version of the macro doesn't handle is \t transforms (and if you're going to motion-track it, you shouldn't need to use \t). The comments do most of the explaining, but I'll still walk through the script here. First up, we see our first use of karaskel, using the two functions explained in the karaskel section. Here karaskel is necessary to allow us to access style defaults. After that come some basic string manipulations to set up the text of our line for later. It's important that the line start with an override block, and that the first override block contain an \fs tag. After that comes the first somewhat tricky part. I parse the line's text into a table, separating text from override blocks, structured in such a way that I can easily see what part of the line each override block affects. I can easily manipulate this table and use it to reconstruct the line at the end. I don't have a proper name for this data structure, but let's call it a tag-text table. Here I've named the variable "tt_table". If you're having trouble telling how tt_table parses the line, I've drawn up a diagram. If our original line is: {\fscx120\fs40}Never {\c&H0000FF&}gonna {\fs80}give {\fscy50}you {\fs69\fscx40\fscy115}up
Then once we've parsed it, our table looks something like this:
This means tt_table[3].text is "give", while tt_table[2].tag is "{\c&H0000FF&}". Plus, since an override tag affects everything to the right of it until it gets overridden again, we know that the contents of tt_table[2].tag are going to affect all the text stored in tt_table[3] through tt_table[5]. In other words, we can start at the left side of the table and move to the right, and at any point in the table we'll know exactly how the text will be rendered, based on all the override tags we've seen so far.
This data structure is the key to several of my most powerful macros, including fbf-transform and gradient-everything, and is what makes them so robust. With this, someone writing a macro can tell what the typesetter is doing at any point in the line. It is worth noting that this relies on there being an override block at the beginning of the line. It's easy to check if an override block exists at the beginning, and simply append an empty one ("{}") if it doesn't. Now, we make use of this data structure to help us properly refactor the font size. First, we'll store the state before the start of the line using style defaults. Let's say the default font size is 20, while the default x and y scales are 100.
Then we enter the for loop and begin looking at the first override tag. We'll detect the \fscx and \fs values defined in tt_table[1].tag, and use them to update our state variables. Since there is no \fscy tag, cur_fscy remains unchanged.
Using these values, we can calculate that the new font size should be 4. In the previous version of the macro, \fscx and \fscy were simply set to 100 times the scale factor. This time, we'll use the scale values parsed from the line, so \fscx and \fscy values will become 1200 and 1000, respectively. The macro then removes the old tags, adds the new ones, and moves on to the next element in the table.
This time, there are no font size or scale tags in this override block. The text here inherets the font size and scale changes we added to the previous tag block, so there's no need to add any more tags. We move on to tt_table[3].
The macro detects the font size change, adds the relevant tags, and moves on.
And we're left with our final converted line: {\fs40\fscx1200\fscy1000}Never {\c&H0000FF&}gonna {\fs8\fscx1200\fscy1000}give {\fscy500}you {\fs6\fscx460\fscy1322}up
Our macro handled all the crazy font size and scale variations in this line like a boss. That being said, there's room for improvement in this example. Note that several redundant scale tags were inserted, when our script should be capable of detecting which scale tags are necessary to insert and which are not. I leave it as an exercise for the reader to come up with a way to fix this (hint: handle \fscx and \fscy the same way \fs is handled, and guarantee that \fscx and \fscy appear in the first override block). I've shared more or less everything important about making automations that I know. Any other Lua libraries or techniques you might need will have to be researched on a case-by-case basis. Hopefully you found this tutorial useful in automating your own tasks. Happy coding! | ||||||||||||||||||||||||||||||||||||||||||||||||||||||||||||||||||||||||||||||||||||||||||||||||||||||||||||||||||||||||||||||||||||||||||||||||||||||||||||||||||||||||||||||||||||||||||||||||||||||||||||||||||||||||||||||||||||||||||||||||||||||||||||||||||||||||||||||||||||||||||||||||||||||||||||||||||||||||||||||||||||||||||||||||||||||||||||||||||||||||||||||||||||||||||||||||||||||||||