| Manuals for All Reanimated Scripts |
|
This page contains detailed descriptions for all my scripts. Basic descriptions are included at the top of each script, or within special "help" or similar functions. The ones here are meant to be more detailed, in case the basic ones aren't clear enough for you. Some global rules for all scripts: The Esc key almost(?) always works like the 'cancel' function. The Enter key in most cases works as whatever the default button is. (If Enter makes line breaks inside a textbox, you can use Ctrl+Enter instead.) Some possibly unclear terms that I use, just in case: tag block - a set of tags between curly brackets, e.g. {\blur0.6\bord2\pos(640,300)} start tags / initial tags - the tag block at the beginning of a line inline tags - tags that aren't in the first tag block but somewhere within the text of the line: like {\i1}these{\i0} italics fbf - "frame by frame", referring mostly to mocha-tracked signs, or any signs that have a new line for each new frame of video mocha - software used for tracking signs, in case you don't know gbc - "gradient by character", i.e. text with tags for each character, with values gradually changing (original script written by lyger) |
Cycles(Blur Cycle, Border Cycle, Shadow Cycle, Alpha Cycle, Alignment Cycle, FontSpacing Cycle)Purpose: Quick application of blur/border/shadow/alpha, etc. Supports: Ignoring transforms, reversing the sequence These scripts are meant to be hotkeyed (wouldn't really make sense otherwise) and used as the quickest way to apply blur, etc. Each of these functions contains a sequence. For example blur contains this: sequence={"0.6","0.8","1","1.2","1.5","2","2.5","3","4","5","6","8","10","0.4","0.5"} You can change the sequence in the script. (Edit the .lua in notepad. Make sure not to screw up the quotation marks and commas.) The first value is the default. That means if the line has no blur, this value will be applied. Pressing the hotkey again will switch the value for the next one in the sequence. So the first run gives you blur0.6, second gives you blur0.8, and so on. When it reaches the last value in the sequence, it goes to the start again. If your current blur is not in the sequence, it will give you the first value in the sequence that is higher than the current blur. For example, if your blur is 1.4, you will get 1.5 with the sequence above. However, if it's 0.3, you won't get 0.4 but 0.6 instead, because 0.6 is before 0.4 in the sequence. In other words, the first value, 0.6, is higher than 0.3, so it gets applied, and the process stops there. So if you wanted 0.3 to go to 0.4, then 0.4 would have to be before 0.6 in the sequence. (Yep, a problem with sequences that aren't sequential.) This doesn't mess with transforms and only applies to the first block of tags. Additionally, if you comment out the line, the sequence will go backwards. This is so that you don't have to cycle through the whole thing in order to decrease the value a little. And as I wasn't content with that, because you can't see the commented line on the video screen, I added an extra macro... SwitchThis adds a {switch} comment to the end of the line, which then has the same effect for Cycles as commenting the line, i.e. the sequence goes backwards. If you press the hotkey for Switch again, the comment disappears (as long as it's still at the end of the line).As this made it unnecessary to cycle through the whole sequence, I made the sequences a bit more detailed and thus longer. The Switch function can now be used for plenty of other things, as it's a quick way to change the state of the line in an on/off manner with just one key. Masquerade already uses it to switch from shifting tags forward to shifting backward. Others who write scripts can make use of this as well. As I implemented the use of this into several other scripts, I had to change my original Ctrl+key shortcut to just that key alone. If you want to make good use of this, it really needs quick access. The Switch is currently used by: • Cycles for reversing sequences • Masquerade's Shift Tags to shift in opposite direction • Bell Shifter and Wave Shifter to shift by one character instead of word • Arrow Shifter to shift backwards |
iBus (Italy Bold Under Strike)Purpose: Quick application of Italics / Bold / Underline / StrikeoutSupports: Handling of all subsequent inline tags A script for hotkeying that applies italics* to your line. This reads values from style and goes through all italics tags in the line. If the style is in italics and there is no \i tag, you'll get \i0, not \i1. For every italics tag in the line, it switches to the other one (1 vs 0). Example: Before: This {\i1}is{\i0} a test After: {\i1}This {\i0}is{\i1} a test If the style is italics, though, you will get this: {\i0}This {\i1}is{\i0} a test Because the style is italics, the first tag becomes \i0. The other tags, however, don't change in this case, because the script corrects a wrong sequence at the beginning, that is two consecutive italics tags with the same value. In other words, since the style here was italics, the first tag became \i0, and thus the second one had to be \i1. This correction system only checks the first already existing italics tag and doesn't check \r, so not everything gets "corrected". * This explanation is for Italics, but it works the same for Bold. Underline and Strikeout is probably useless, but it was really trivial to add. |
Line BreakerPurpose: Use a hotkey to insert a line break at the estimated most appropriate place in the lineSupports: Properly only English language (Rules for others will be significantly simplified) This is mainly targeted at editing (i.e. dialogue), but it's useful for typesetters too. If your line has any line breaks, the script will remove them all. If it doesn't, the script will insert a line break. Where it gets inserted is a result of rather exptensive and complex mechanisms, so I will only explain part of them. The primary places for line breaks are after punctuation marks, namely . ! ? , : ; ... Example: Before: Beyond that sky over there, there are people waiting for you. After: Beyond that sky over there, \Nthere are people waiting for you. This line breaks naturally after the second "there". If you care about where line breaks are, you obviously want it after that comma, and that's what you get, in this case very easily, by pressing a hotkey. Now, let's look at another example: Before: However, one must exercise caution when synchronizing with the other side. After: However, one must exercise caution \Nwhen synchronizing with the other side. You have a comma there too, but the script sees that the length of the two parts would be extremely disproportionate, so it looks for another solution. In this case, it finds a conjunction that's roughly in the middle of the line and thus is a good place to start the second "line", so the break goes before "when". (The line normally breaks after "when".) Before: the place you belong is the place where people are waiting for you. After: the place you belong is the place \Nwhere people are waiting for you. This line normally breaks after "where". So there's punctuation and conjunctions. After each attempted line break, the script checks the length of the two parts. If the length ratio is too high, it doesn't use that line break and tries something else. If it can't find a grammatically suitable place, the line break goes in the middle of the line. This, however, depends on some settings, so as a last resort, the scripts opens this GUI: 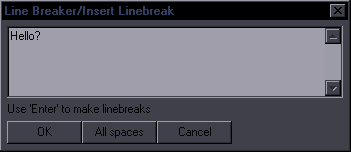 Obviously there's no logical place for a line break with just one word, so it asks you where you want that break. Let's use a meaningful example: 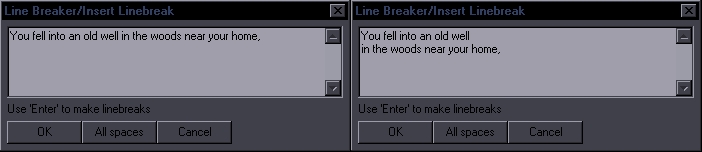 What you do is simply split the line like this (with Enter), and you'll get "You fell into an old well \Nin the woods near your home,". You can see there's also an All spaces button. This will insert line breaks at all spaces, i.e. after each word. As this can sometimes be useful for typesetting, there's a trick to bring up this GUI: type "n" in the Effect field, and the GUI will appear. This script has a number of settings that the user can change to suit his needs better. The setup GUI shows up when you run the script for the first time (that is, a version that has it). To change the settings later, type "setup" in Effect before running the script. You'll see this: 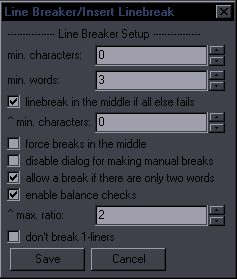 If 50, lines with fewer than 50 characters will be ignored. min. words - Minimum words required to place a line break. linebreak in the middle if all else fails - This can be turned off if you want only grammatical/manual breaks. ^ min. characters - Minimum characters required for line breaks in the middle of a line. force breaks in the middle - Force breaks in the middle of the line rather than after commas etc., if you prefer that. (It's dumb.) disable dialog for making manual breaks - Disables the option to insert manual breaks. allow a break if there are only two words - This overrides 'min. words' and allows a break between just 2 words. Useful for typesetting. enable balance checks - Enables checking the length ratio before/after the line break. ^ max. ratio - Maximum ratio allowed. don't break 1-liners - Won't place a line break if the line doesn't break naturally. These settings can be tuned in various ways. You can for example set it up so that you can just run it on all dialogue, and it will only break lines you want to break. With the default settings, you should only run it for lines you actually want to break. If you want it applied to all dialogue, you should disable breaking for 2 words, probably not break 1-liners, set minimum characters/words to something higher, and possibly disable manual breaking since you might have that popping up for multiple lines. As for the ratio, 2 may seem like a lot, but this is ratio 2.875 counting by characters and 2.2 counting by pixels:  Looks perfectly fine, in my opinion. Certainly better than breaking the line anywhere else (if you have to break it). It could be a problem with longer lines, though, so when the length crosses a certain limit, the ratio is lowered. (This is not optionable.) Making this work well is pretty challenging, but I've spent a lot of time testing it and changing it (there were probably 50-100 unreleased versions), and I think it works reasonably well most of the time. Teaching the script complex grammar is pretty much impossible, so there will always be cases where the break has to be changed, which gets us to the other 2 functions of the script. The Script has 3 macros registered - 'Insert Linebreak' (that's all of the above), 'Shift Linebreak', and 'Shift Linebreak Back'. Shift Linebreak - Shifts line break by one word to the right. Shift Linebreak Back - Shifts line break by one word to the left. This allows you to fix breaks that were placed weirdly by using a hotkey. By combining these 3 functions, you can always get the line breaks where you want them pretty quickly. |
JoinPurpose: Join selected lines or a single selected line with the one after itThis is a combination of "Join (concatenate)" and "Join (keep first)". My goal was to make it reasonably estimate which of the two you need, so that there can be one hotkey for both. If the text (without tags/comments) is the same on all lines, then it's "keep first". If the text is different, it's "concatenate". 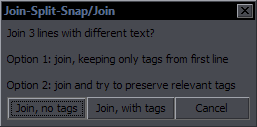 If it's more than 2 lines, you get to choose whether you want tags from lines 2+ or not. If you decide to keep tags, it will still nuke ones that should only be in a line once from lines 2+.
This means tags with parentheses, \an, and \q will only be kept from the first line. If start tags in line 1 and 2 don't have transforms, tags that are the same for both are nuked from line 2. This works well enough if only 2 lines are selected, but with a larger selection, as start tags become inline tags, it gets too chaotic to sort out (without making the code several times longer), so you'll have a bunch of redundant tags or maybe some missing. Then again, if you're joining 10 lines with different text and tags, you probably don't know what you're doing anyway. The script also nukes a {join} comment at the end of line 1, "- " at the start of line 2, all line breaks, and ellipses if they're at the end of line 1 and start of line 2 (which would otherwise make "... ..."). Note: This description is valid for the version that comes with Split and Snap. The older versions (without Snap) worked differently. SplitPurpose: Split a line at the estimated most appropriate placeThis is mainly for timers, as it splits both text and timing. It's similar to Aegisub's "Split at cursor (estimate times)", but it doesn't use cursor. Line is split at (in priority order): 1. line break (first one if there are more) 2. {split} or {SPLIT} marker (those can be thus placed where needed by the editor) 3. "- " (dash+space) This is for shitty subs with 2 speakers in one line "Hello. - Hi." 4. period 5. ! or ? 6. comma If none of the above is found, nothing happens. In such a case, you use Line Breaker to place a line break first, and then you can split at the break. This is supposed to be hotkeyed, and if you learn to use it right, it makes splitting lines during timing very fast. For example if you have 2 sentences in 1 line, you just press the hotkey, it splits the line between the sentences, and you use ctrl+mouse to shift the end of line1 and start of line2 on audio if needed. An extra function is a sort of auto-correction of crunchyroll stupidity. For some reason, they like to place extremely awkward words at the end of a line, like conjunctions and prepositions. So if a line ends with one of these words, they get automatically moved to the start of the next line: that, and, but, so, to, when, with, the. (not when there's a comma after, mind you) One more addition is that if the line has only one word (or rather, no space), it gets split into two lines with that same text. If you're timing text where somebody calls someone's name repeatedly, and there's more instances in the audio than in the subtitles, you can duplicate the line this way. Of course the script gets rid of leading/trailing spaces, and it nukes the {split} tag too. As for the timing part, there's a mechanism for estimating the times, which I won't explain because it's slightly complicated. It works a bit better than the one inbuilt in Aegisub, but there's really no way to always estimate correctly where the line should be split timing-wise. SnapPurpose: Quickly snap a line to nearby keyframes using a hotkeyThis is a very simple script, the point of which is to have a hotkey for TPP's snapping to keyframes. At the top of the script you have these settings: kfsb=6 -- starts before kfeb=10 -- ends before kfsa=8 -- starts after kfea=15 -- ends after This should be self-explanatory. It's just like TPP's settings (when it was in frames, not milliseconds), or like ShiftCut's settings. If you type "gui" in the first selected line's effect field, you'll get a GUI where you can temporarily change the settings. You can select a number of lines, press the hotkey for this, and any line that's within the distances determined by the settings from a keyframe will get snapped to it. If the script doesn't find suitable keyframes to snap to, it checks if it can snap to adjacent/overlapping lines, with the same settings. |
Jump to NextPurpose: Go to the line that comes after all the lines of your current multi-line "sign" (mocha, gradient, etc.)This is easier to show than explain: 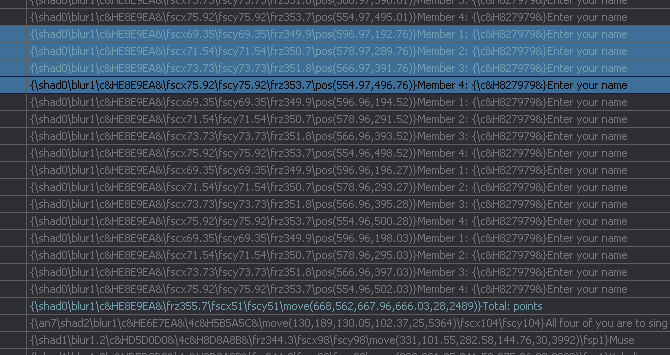 Here you have some mocha-tracked signs. Each frame has 4 lines, so you have 4 different texts. For this example, I'm showing only a small part, but let's say the sign has 200 lines, and you're at the beginning. What you want is to go to the next sign, in this case the one that says "Total: points". (Which it shouldn't really say, but fortunately somebody nuked that colon in time.) So what you do is you select all the lines belonging to the current sign, i.e. all 4 different lines, and press the hotkey for the script. What happens is that the script goes forward line by line and only stops when the text (without tags) of the line is different from all lines in your selection. So you end up with the line with 'Total points' selected. This is very helpful with heavy typesetting when you need to find the next sign and scrolling in thousands of lines is too chaotic. This is the "Text" mode. You can also go by Style, Actor, Effect, Layer, and Commented Line. Each of those can have a separate hotkey, as well as one for Jump to Previous for each, so use whatever you prefer. As an extra option, there's also a GUI version with all the other options in one place, if you prefer that.  |
Aladin's LampPurpose: Solve some problems with right-to-left text when typesetting in ArabicThe script has 3 macros. (All can be hotkeyed.) Fix inline tags When you set an inline tag, Aegisub switches the text that's left and right of the tag. With each new tag, the text around it gets switched. This script switches the parts back into thir correct places. {tags1}text1{tags2}text2{tags3}text3 will be changed to {tags3}text3{tags2}text2{tags1}text1, but the start tags will be kept on the left, and all the required tags for the first part (on the right) will be filled in, including from style. You should be able to input any number of inline tags, run the script, and get back the correct sentence order. You must set all tags first and then run the script, not after each tag. Running the script twice should revert the line to the original state. So you're switching between two states - LTR and RTL. If you want to add another tag to an already fixed line, run the script (this will revert the order), add the new tag(s), and run the script again. You my see it as "working" order and "display" order. When you want to add more inline tags, use the script to switch to "working" order, add the tags, and switch back to "display" order. Fix line breaks Without inline tags, line breaks work fine, but when there are inline tags, line breaks mess up the lines just as much as the tags. This switches the top and bottom parts of the line and sorts out the tags. This doesn't use styles, so if some tags like colours are only defined for the part after line break, you should set them for the first part as well (though you can do it just as easily after). It may or may not work correctly with transforms. The fact that placing a line break in a line with already existing inline tags switches the text around the \N, between the closest tags, is another issue. ({tags1}text1{tags2}text2a text2b{tags3}text3 - putting a line break between text2a and text2b switches those parts) This I cannot fix because it's way too complex and it would require understanding the language. So the script only switches the top and bottom parts, whatever they are. If you get text2a and b switched, you have to fix that yourself. (I wrote code to switch them, but it only made sense when they were about the same length. In most cases it only made things worse.) It also works only for one line break. If you need more, you should probably just split the line. Fix punctuation Since Aegisub puts punctuation on the wrong end of the line, this tries to fix it. It moves a punctuation mark from the right end of the line to the left, or if there's a line break, after the line break. This way the punctuation -should- always end up at the end of the sentence. Fix English text If you put English text in the middle of Arabic text, the order of the parts before and after it gets switched. This should, again, switch the parts back correctly. This detects only ordinary Latin characters and won't work with things like "ä". All of this will need some testing, which can't be done by me because I can't into Arabic, so report your problems to me. Note: Regarding issues with editing text, it seems that while Aegisub's Edit Box doesn't have RTL support, the lua interface has some, so using the Multi-line Editor should be helpful. |
Script Cleanup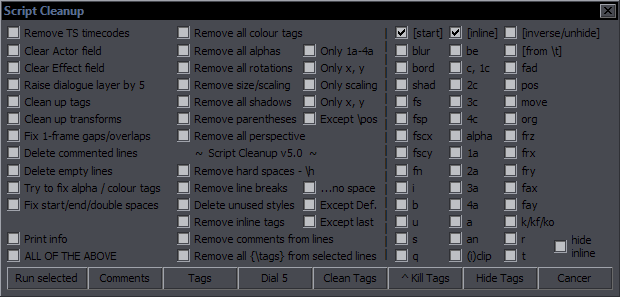 Purpose: Clean up your script by removing all kinds of unwanted and redundant things from lines (or whole lines) (Almost) Everything works for selected lines. There are two parts. The left one does more varied things; the right one just removes specified tags. Left part: Remove TS timecodes - removes comments starting with "TS", like {TS 5:36} Clear Actor field - obvious Clear Effect field - obvious Raise dialogue layer by 5 - raises a dialogue line's layer by 5 if it's 4 or lower (Dial 5 button is a shortcut) Clean up tags - joins neighbouring tags - {\tag1}{\tag2}; removes anything detected as redundant (duplicate tags in the same block, tags at the end of a line, \frx0\fry0 in start tags, multiple \fad tags, \fad with 0 times, {\\k0}, \r at the start of a line); rounds values of tags to 2 decimals (Clean Tags button is a shortcut) Clean up transforms - places transforms at the end of the tag block; joins ones that have no time codes / accel Delete commented lines - deletes lines that are commented out (not visible on screen) Delete empty lines - deletes lines with no text Try to fix alpha / colour tags - fixes some malformed tags like alpha00 Fix start/end/double spaces - removes leading, trailing, and double spaces Print info - tells you how many lines were changed in the Text field ALL OF THE ABOVE - applies all the functions above, checked or not Remove all colour tags - obvious Remove all alpha tags - obvious Only 1a-4a - removes \1a, \2a, \3a, \4a, but not \alpha Remove all rotations - obvious Only x, y - removes \frx & \fry Remove size/scaling - removes \fscx, \fscy, and \fs tags Only scaling - removes \fscx & \fscy Remove all shadows - removes \shad, \xshad, \yshad Only x, y - removes \xshad & \yshad Remove parentheses - removes \fad(e), \(i)clip, \pos, \move, \org (but not \org) Except \pos - same as above, but leaves \pos Remove all perspective - removes all rotations, \fax, \fay, and \org Remove hard spaces - \h - obvious Remove line breaks - removes line breaks, leaving one space between the words before and after the \N ...no space - raw line break removal - simply deletes "\N" Delete unused styles - deletes styles not used in any lines (this always applies to the whole script) Except Def. - same but doesn't delete styles containing "Defa" or "Alt" Remove inline tags - obvious Except last - deletes all blocks of tags except the first and last Remove comments from lines - removes all comments (Comments button is a shortcut) Remove all {\tags} from selected lines - removes all tags (Tags button is a shortcut) Run selected will apply anything checked on the left side. Right part: Kill Tags button will remove any tags you check in the list above it. The one distinction is that you can choose start and/or inline tags. Just in case you don't know what that means: {\blur0.6}How does {\i1}this{\i0} work? The blur is a 'start' tag; the italics are 'inline' tags. The checked tags will only be removed from the checked sections. By default, both are checked, so all tags of the checked kind get removed. In this case here, checking 'blur' but not checking 'start' (only 'inline') would not do anything. Hide Tags will hide selected tags (only from start tags) in comments. These can be returned with 'unhide'. 'shad' includes xshad+yshad. xbord+ybord are ignored because nobody uses them anyway, and so is kara. 'from \t' doesn't work here. hide inline - hide ALL inline tags (with Hide Tags) inverse/unhide - with Kill Tags: remove all except checked tags; with Hide Tags: unhide hidden tags ([start]/[inline] checkboxes apply here; inline ones go to their original positions) from \t - remove only from within transforms (Kill Tags) If you press Cancer, you might get cancer, so don't ever do that unless you want cancer. |
Blur and Glow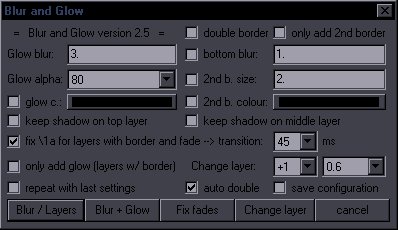 Purpose: Apply blur correctly to signs with border / create a 'glow' effect Features: double border with its own properties; adjustment for fades; add only new layer for signs that already have layers change layer; repeat with last settings; save configuration Supports: Getting info from styles, handling of transforms, alphas, fades, \r What is 'correct' blur?  Left is wrong. Right is right. No pun intended. "Blur / Layers" creates layers with blur, and usually doesn't require messing with the other options. If you want double border, you have a number of options.  You can check 2nd b. size and set the size of the 2nd border. You set what you want it to look like counting from the first border. In other words, the default would be 2. If you set it to 4, the outer border will be twice as thick as the first one, and the tag will be \bord6. You can also check 2nd b. colour, which in the case above was changed to light blue / cyan. You should check double border if you want the default double border. If you have auto double checked, then checking 2nd b. size or 2nd b. colour automatically turns the double border mode on, so you don't have to check double border. bottom blur is for whichever layer is the bottom and not glow, so regular border with 1 border, and 2nd border with double. "Blur + Glow" creates glow. This is what we call glow:  Left is no glow, middle is glow with default settings, right is with glow blur 8 and glow alpha 30. glow blur is the size of the glow (value of \blur). glow alpha is transparency - 00 is most visible, F0 would be very faint. If 00 is not as strong as you need it to be (usually with larger blur values), you can duplicate the glow layer. Here's an example of a real sign with glow:  It's mostly useful for signs with no border but can be used with border too, but then you have to be careful to not have too much blur compared to the border size. Normally shadow from the original sign gets applied to bottom layer with border and to glow layer. keep shadow on top layer leaves shadow on the top layer, like this:  keep shadow on middle layer does the same on middle layer if you have double border. If you check both, you'll have a shadow on both. The bottom layer will still have a shadow in any case, so you have to nuke it later if you don't want it. That's easy to do with Script Cleaner, but if there are rotations involved, you'll have to use \4a&HFF& instead of nuking the shadow. fix \1a for layers with border and fade is for use with fades.  Left is when you don't use it. Right is when you do. You can see the difference in primary colour. What it does is that it applies \1a&HFF& during the fade and only transforms into colour when the fade ends. transition is the time it takes to transform from that \1a&HFF& to full colour. 0 is instantaneous, i.e. alpha will be there for the whole fade, and the first frame after fade will have full colour. The higher the number, the longer the transition. I use the default 99% of the time, but some cases may require tweaking. Fix fades button either adds those alpha transforms if they're missing, or recalculates them based on \fad. Recalculating is useful when you shift a sign like episode title into another episode, but while the fades are the same, the length of the sign is different, so you need different timecodes for the ending transform. only add glow will only add glow to layer with border, instead of creating a layer for the border too. only add 2nd border will only add second border, instead of creating a layer for the first border too. If you add glow or borders when you already have a layered sign, you'll have to shift layers for the top lines. For this you can use Change layer. repeat with last settings will use whatever settings you used last time (unless you rescanned automation directory or restarted Aegisub). save configuration saves the current configuration of your GUI as the default settings. If there's no blur, default blur is used. It's set to 0.6, but you can change it in the GUI. The script supports xbord, ybord, xshad, and yshad, and has basic support for transforms and \r. |
HYDRA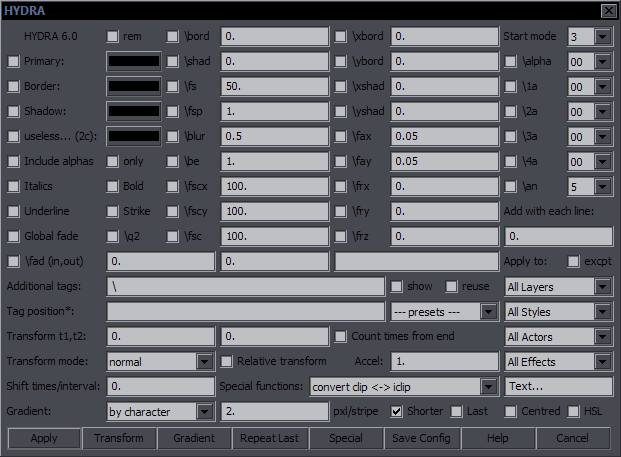 Purpose: Easily add tags to multiple lines Features: transforms with several modes; inline tags with several presets; gradients; a number of special functions; modification of tags line by line; options for what lines to apply things to; 3 GUI modes; repeat with last settings; save config Supports: Non-standard characters in Gradient Contents This is like the old "add tags" script, except 1. you don't have to type the tags, 2. you don't get duplicate tags, 3. you can easily do transforms, 4. you can apply the tags to specific layers, styles, etc., 5. you can make inline tags in several different ways, 6. you can make gradients, and 7. you have a bunch of extra useful functions. In other words, anyone still using "add tags" should be ashamed. The basic functionality is extremely simple. Let's say you want \bord3 and \shad2. 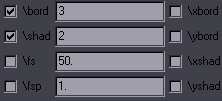 You check the checkboxes, type the values, and click Apply. If you still find the GUI confusing, you can set the Start mode at the top right to "1". 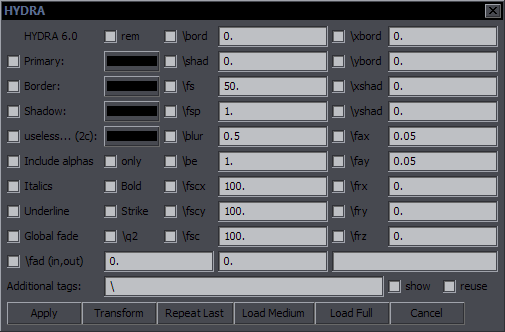 This pretty much limits it to adding tags, without anything extra or confusing. It also loads instantly while the full GUI loads in anywhere between 1 and 3 seconds for me. There's also the Medium mode: 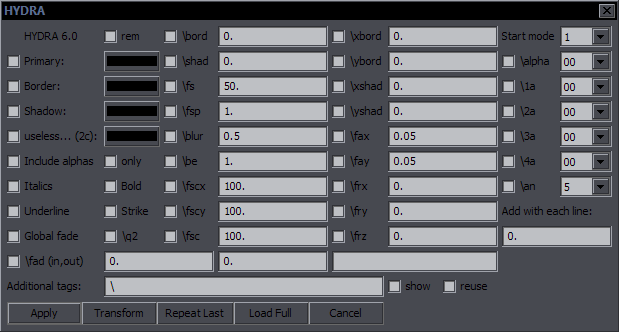 This adds the other alphas, \an, additional tags, and already lets you adding values by line. We'll get to that in a bit. Additional tags lets you type some extra tags, should there be a need to add something non-standard, or \fn, or things like \pos. When you load the full GUI, you can do transforms, which is just as easy as adding regular tags. If you want to transform to \bord3 and \shad2, like in the previous example, you do the same except you click on Transform. That will give you \t(\bord3\shad2). If you want times, you set them in the Transform t1, t2 fields. Accel is there as well. That's pretty much all you need without going into specialized functions, so it's really easy. While the basic functions are powerful enough and pretty much a must for anyone who wants to typeset without being slow as hell, HYDRA has much more to offer to advanced typesetters used to dealing with dozens of lines at a time and huge, chaotic scripts. First let me explain some additional notes to the basic tags. There are two ways here to do \[number]a tags, or alphas for colours. One is on the right where it's pretty obvious. The other is using the colour pickers. These have both the colour and its alpha value, and you can apply either the colour, or the alpha, or both. By default it uses only the colour. If you want the alpha too, you check Include alphas. If you want only the alpha and not the colour (so an alternative to those dropdown alphas that only have a limited set of values), you check the only checkbox next to it. Note: on older versions of Aegisub this doesn't work. (Minimum Aegisub r7993 required.) Italics, Bold, Underline and Strikeout work only for start tags (not inline tags). They're being kept separate from the "transformable" tags for reasons that will become clear shortly. (From version 6, you can make them inline, but only with value 1, not 0.) Global fade lets you apply the fade not to each line, but to the selection as a whole, so that the first selected line will have the fade in, and the last selected line will have the fade out. (You can do much more with fades using FadeWorkS.) Transformable Tags Let me explain something here before we get into transfomrs, as this will be relevant for a number of functions. Transformable tags are tags you can put into a transform, In other words, tags that can change value in one line. At the same time, these are also gradientable tags, except clip, but HYDRA doesn't do clips anyway. They are those you can see in Start mode 1, except Italics & Co., fade, and q2. Specifically, they are: colours, alphas, bord + shad including x/y versions, fs, fsp, fscx, fscy, blur, be, fax, fay, frx, fry, frz. Clip is the last one, but it doesn't apply here, so we'll exclude it for HYDRA. This category of tags has some special uses in HYDRA, which is why I'm explaining this. Now, on to transforms... Transforms  For simple ones, you don't have to do anything other than select the tags and press the correct button. t1, t2, Accel - These are the regular \t times and acceleration. Count times from end - This will count transform times from the end of the line, so values 500,200 will mean that the transform will start 500ms before the end of the line and end 200ms before the end of the line. Transform mode - normal - This is a regular transform. Transform mode - add2first - This will not create a new transform, but instead will add the tags to the first existing transform in the line, assuming there is one. If there isn't, nothing happens. Times don't apply here. Transform mode - add2all - This will add the tags to all transforms found in the line. Times don't apply. Transform mode - all tag blocks - This will add the transform to each tag block, i.e. this: {\tags\here} This can be useful with gradient by character, for example if you have gradiented colour and want to transform all letters to black. Even more fun, you can have frz gradiented by character and apply a relative transform! Relative transform changes the mechanism so that tags don't transform TO the given value, but BY the given value. This means that when given frz30, you won't get \t(\frz30) unless your curernt frz is 0, but whatever is needed to rotate each line BY 30 degrees. The point of this is that when you have several lines with different rotation values, you can rotate them in sync this way. Or for example you may have a sign with two borders and you want both borders to grow by the same amount. (Default settings would transform both to the same value, thus basically making one of the lines invisible.) So if you have \bord3 and \bord5 and transform by 2, you'll have the first line transform to 5 and the second to 7. Shift times/interval has several functions. With 'normal' transforms, it shifts \t times by this amount each line. (0,300 + shift by "200" -> 0,300 - 200,500 - 400,700...) With 'all tag blocks', it shifts \t times by this amount each tag block, transforming the blocks (letters?) in sequence. With Back and Forth Transform, it's the interval (explained later). You can do a lot of things if you combine all these options, and more if you combine them with some of the options below. Tag position  This allows you to make inline tags. In that text field, you have the clean text of your first selected line. You place an asterisk there, like you see in the example above, and the tags you select will go there, so in this case before the word "here". It will work for any line that has such text, while lines that don't contain it will remain unchanged. This also works with transforms in normal mode, while the presets don't. --- presets --- before last char. - This will place the tags before the last character of visible text, no matter what the text is. This is very useful for mass gradienting lines with different text. If you want to style a song so that it's gradiented by character from green to blue, for example, you first set the green at the beginning of the line, and then set blue before the last character this way. Then you run gradient-by-character, and all lines will be gradiented whatever the text is. in the middle - This will count characters and place the tags in the middle of the line. (If odd number, it goes before middle letter.) 1/4 of text - Similarly, this counts the characters and places tags at 1/4 of the line. (If 20 characters, it goes after the first 5.) Obviously this works in the same manner for the other presets with this pattern. custom pattern - This uses an asterisk, just like the basic mode, but it can use shorter patterns, as opposed to the whole text of the line. For example you can use the pattern *and, and tags will be placed before the word "and" in any line that contains that word, no matter what the rest of the text is and however many times that word is in the line. Note that this doesn't recognize "words" but only patterns of characters, so you'd also get the tags before "android". It's also case-sensitive, and there can't be tags/comments inside the pattern. section - This lets you put tags before a given pattern and then changes the tags back after it!  So as you may have seen in the screenshot in the Blur and Glow section, here the word "one" needs to be red.  So what you do is select section from the preset menu, and leave only the word "one" in the Tag position text field. Then you select red colour from the tags and apply.  The word "one" becomes red, and the tags after it return back to white. As with the previous option, there can't be any tags/comments inside the section. You can apply it to several words, as long as there are no {} in the pattern in the actual line. replace \N / replace {~} / replace {•} In trying to figure out how to put inline tags before specific words even more easily, I realized that Line Breaker shifts the breaks word by word. This seemed like an efficient system to quickly mark a word by just pressing one key (a few times). I could then have HYDRA replace the line break with the selected tags. Of course the flaw is that line breaks are actually useful for something else, so I needed a variation on that that wouldn't be needed for other things. So I wrote two extra macros, Bell Shifter and Wave Shifter (explained below), which shift {•} and {~} the same way the line breaks are shifted - always to the end of the next space. One would have been enough, but I couldn't decide which one, and adding both was simple and only required a few extra lines, and I figured I could find some use for both, which I did in Masquerade. I did the preset for line breaks as well, because it was super easy. So these presets work kind of like the thing with asterisks, except the markers should already be in the lines, and they can be at different places in different lines. The selected tags simply replace the line break or ~ or •. Since the shifters always put the stuff after spaces and thus potentially before line breaks and tags, the presets move the {~} after line breaks and any sets of {} first. If there are tags present there, the new ones are merged and replace values in the old ones if needed. You can use both the shifters at the same time, so you can mark two places. After trying this for a while, I find this to be the most efficient way to create inline tags in specific places.  It's the same tag(s), so it's not that useful on its own, but you can gradient them with Recalculator. You can also for example set \bord2 for each character and then apply those shifted transforms for all blocks with \bord5, and the border will grow letter by letter in a karaoke-ish effect. every word - Same as previous but with every word. text position - With this option, you type a number in the Tag position field, and tags will be set at that position. 0 is the start of the line, and it counts visible characters (as in not tags/comments) including punctuation and spaces. So if you type 12, the tags will go after first 12 characters in all selected lines, whatever the text. If the line has 12 or fewer characters, nothing happens to it. To make it more fun, you can enter negative numbers and count from the end, so "-1" will go before last character. But it doesn't stop there. You can shift the position for each line. Let's say you want to start at the beginning and shift by 3 characters for each subsequent line. In that case, you would type 0+3. It can look like this... 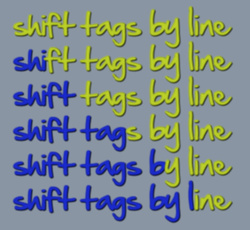 ...or you can apply it to fbf lines and create a sort of animation. You can make all kinds of combinations, and you can run this multiple times with different settings, and it will all be merged. What you have to be careful about is that you don't screw up the pattern. We're counting letters, so only whole numbers apply. The first can be a number or - and number. The second has to be - or + and a number. The first has to be at the beginning of the field. (If anyone cares, it detects "^%-?%d+" and ".([%+%-]%d+)". Add with each line This is sort of related to the previous, as it also shifts for each line, but in a different way. 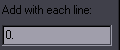 So if you start with \bord2 and type 3 into this field, line by line, you get 2, 5, 8, 11, etc. This works in transforms as well. It should be obvious which tags it can apply to, but let's list them here: (x/y)bord, (x/y)shad, fs, fsp, blur, be, fscx, fscy, fax, fay, frx, fry, frz These are transformable tags with number values, i.e. excluding colours and alphas. You can use negative values here as well. It applies to all the tags from that list that you check, so of course it doesn't make sense to use it for \fax and \fs at the same time. Again, you can get more effects by combining this with other functions. Gradient  I felt like the GUI had space for another button, so after thinking about what else I could do with HYDRA, I decided on gradients.
Vertical Gradient
There was no reason not to do all three versions - vertical, horizontal, and by character. Horizontal Gradient  Gradient by Character  Centred Gradient  Centred Gradient, accel 3  Centred GBC, 'hydradi*ent'  GBC + Vertical  GBC modified  You may ask what's the point in the light of lyger's gradients existing. I had to make sure there was some point in it, so I had to come up with something extra. There is not that much point in the vertical/horizontal ones, and they have a clear disadvantage against lyger's, because as this works the same for each selected line and utilizes only one set of given tags, it can't handle inline tags. Or at least not the way lyger's script does. There is, however, the Centred gradient, as well as the fact that you can gradient several lines at the same time - as long as the same settings are suitable. You can also use floating point for the clip stripes, so the clips can be for example 2.3px wide. The winner here, though, is the gradient by character, which can also be centred, can use accel, and doesn't mind other inline tags present. Plus all of this just works a bit differently due to the nature of different GUI, so sometimes lyger's scripts may be more suitable while other times this one may. Now about how it all works here. The vertical and horizontal ones require a clip, like lyger's. Rather than gradienting between two lines, the transition here is made between the current state of the line and the given tags. Current state of the line includes style. So what the line looks like is what you're gradienting from, and the tags you select in HYDRA are what you're gradienting to. On the right, you can see examples of each gradient mode. Aside from the obvious - colours, the vertical one was also given \shad, \blur, and \fscx, the horizontal one got \bord, \shad, and \fscy, and the one by character got \xshad and \frz. All of these are easily made in one run. As I already mentioned, accel can be used for all three. Shorter rotations is the same thing lyger has. It means that if your \frz is 350 and you check \frz10, it won't rotate the whole circle but instead go from -10 to 10. It's probably the logical thing to do 99% of the time, so it's on by default. Centred gradient is one that transforms to the centre and then back. It's pretty common in anime, so there should be some use for it. As you can see on the right, though, and as you may have experienced at some point, due to the nature of fonts, you get too much of the orange and too little of the purple. This is where the accel setting is really useful. Here's an example of the same gradient with accel 3. This is probably closer to what you'd want to get. As you may need a few attempts to get it exactly right, note the section on the reuse function further down. This works with GBC as well, with an additional bouns. The same way you use asterisks in the Tag position field for inline tags, you can use it to give a GBC an alternative "centre". So you can get a gradient that's centred anywhere in the line. Of course if you apply it to multiple lines with different texts, it will only work for the one(s) that match the text of the first one. The other ones will be centred normally. Here's an example with the pattern 'hydradi*ent'. The gradient is centred between 'i' and 'e'. Now what happens with those inline tags when you run a vertical gradient on this? If you select black colour, everything will get gradiented to black, whatever the original colour is. You can't gradient each letter to a different colour (like you can with lyger's, which is its main advantage), but the colours do get interpolated separately. As already implied, when you have a GBC line, you can add gradients for other tags and they will be merged with the existing ones. On the other hand, you're always doing a gradient across the whole line. You can still use some tricks when working with one line, though. For example, for the image above with gradiented rotation, let's say you want to gradient border to 5, but only for the 'hydra' part, and leave it at 5 for 'dient'. You would simply copy the 'dient' part from the Edit Box, delete it, apply GBC to \bord5, and paste back what you copied. Or copy+delete the 'hyd' part, apply gradient to \frx50 to 'radient', paste pack, and you get this: The 'hyd' part didn't change, but the rest has a gradient for \frx. You can also do a gradient by several characters, if you type a number in the Tag position field. The field has to contain only 1 digit and nothing else. If the number is too large, nothing happens. In the end I also added Gradient by line, which is a simple fbf transform. It has little advantage over lyger's script, but it was really easy to add once I had the other gradients done. The differences from lyger's fbf-transform are: 1. the way the GUI works 2. only works for start tags 3. doesn't care about the text (though lyger's has that option too now) 4. you can restrict use by layer, etc. (so for multi-layered fbf lines, you don't have to change the selection if you want to fbf 1 layer) 5. Centred gradient works for this as well If you check Last in the GUI, end values for GBL will be taken from the start tags of the last selected line if available. This makes it work more similarly to fbf-transform, so if the values in the last line are already set correctly, you don't have to type values in the GUI (but you do have to check the tags you want). There are plenty of things that can be done with this and combined with other functions/scripts. Note: If you forget clip for V/H gradient, add the clip and use the Repeat Last button. Special functions This is all for the Special button. 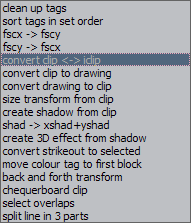 sort tags in set order - This sorts tags in each tag block based on the order in settings. fscx -> fscy - Applies the value of fscx to fscy, making them the same. fscy -> fscx - Same but the other way round. convert clip <-> iclip - Changes clips to iclips and vice versa. convert clip to drawing - Uses coordinates from a clip to create a drawing. convert drawing to clip - Same but the other way round. size transform from clip - Creates \t(\fscx\fscy) based on a vectorial clip. The distance between the first 2 points of the clip mark the original size; distance between points 3 and 4 mark the final size. This way you can theoretically match linear zoom in the video without Mocha. It may be useful to duplicate the line if you need to see the text while drawing. Pick something in the video, match the size of it with 2 clip points on the first frame and with another 2 points on the last frame. create shadow from clip - To get correct shadow orientation, make 2 points with a vectorial clip in the direction of the shadow. Distance will be used from current shadow. Shadow is creaqted with \xshad\yshad. shad -> xshad+yshad - Changes \shadX to \xshadX\yshadX. create 3D effect from shadow - This is one of the more useful things in this menu.  It's the difference between these two. Left is ordinary shadow. Right is the 3D effect. You can best see it on the top part of the last letter. The space between the letter and the shadow gets "filled". (Or you can scroll down to NecrosCopy which has this more easily accessible and a better picture.) convert strikeout to selected - Converts \s1 to the tags you select, and \s0 back to the original state. This allows you to use a quick on/off trigger for multiple tags at the same time. You apply \s to a word or section of text in the Edit Box, and then you can convert it to whatever tags you want. move colour tag to first block - If you use hotkeys for colour pickers, the colour gets sometimes applied somewhere in the middle of the line or at the end because that's where the cursor is in the textbox area. This moves a colour tag that isn't at the start of the line to the start. If it finds more, it deletes them all and uses the last one in the line. This is a lot more useful if hotkeyed or at least if it's set to be the default choice, but if you need to set colours to a bunch of lines and don't want to make sure the cursor is always at the beginning of the line, you can just set the colours wherever and then run this. back and forth transform - This will transform back and forth between the current state of the line and tags you select. So for example, you select \bord 10 and \frz 20 and run the script. It will read the current bord and frz from the line or from style and create transforms based on given interval. Interval is the Shift times/interval field. A value of 500 means that it will take 500ms to transform to \bord10\frz20, then 500ms to transform back, another 500 forward again, etc. for the whole duration of the line. This way you can create wobbling effects and such. chequerboard clip - This creates a checkerboard clip. Not too useful, but you can convert it with the above tool to drawing. This also allows you to resize it with the scaling tool and convert back, so you can get various sizes. select overlaps - This used to be shipped with Aegisub. I don't know if it still is, but somebody wanted that included in HYDRA, so here it is. It selects lines that overlap with other lines. split line in 3 parts - Use the fields for 'Transform times' to set duration of line 1 and 3. If you set for example 200 and 300, your line will be triplicated, with the first one being 200ms long, the last one 300ms, and the middle one whatever is left of the original duration. If you set either of the two to 0, you'll only have 2 lines. This can be useful for song styling when you want to apply some transforms to the first or last 500ms, for example, because applying the transforms to the lines with the whole duration can be much more laggy, and lines with too many transforms can look too chaotic to work with them. Apply to 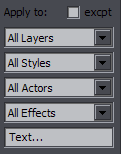 You can choose to which of the selected lines you want to apply the changes based on the 4 restrictions. When dealing with multi-layered signs, you may need different tags for different layers, so this can make it easy. This way you don't have to change the selection each time. The last one with "Text..." in it restricts by any text pattern you type. This is literal and can include tags and comments, so for example you can apply tags only to lines with \frz in them. (The "Text..." one doesn't work.) excpt - apply to all except selected. The "All" default values will still apply to all, but if you select layer 0, tags will be applied only to lines on other layers. It should be noted that when adding a larger value each line, it counts only lines where it's applied, not all selection lines. Same goes for Shift times and the text position preset. Repeat Last will run the last used function with the last used settings. show / reuse This is what works for transformable tags, explained above. It doesn't include Additional tags. If you check show, once you apply the tags, you will be shown a textbox with the tags in the applied form, like "\bord2\shad3\fs50". Not extremely useful, but you can copy and save it for later in case you want to use the same set of tags again - in which case you'd just paste it into Additional tags without having to check boxes and type values again. This is basically useless now, as the tags will be shown right above this checkbox now anyway, but I felt no need to remove it. Instead, I added another function to it. Checking "show" will also show you some information in case some lines are unaffected by what you did. This will display how many lines were unaffected and usually some clues about why that might be. So if you're wondering, "Why isn't this doing anything?", use this option. The bigger point here is the reuse function. Unlike Repeat Last, this only remembers the tags (the transformable ones), but it lets you use a different function and restrictions. If you simply applied tags before, you can now reuse the tags for other lines, to make transforms or gradients, or to apply to different layers, etc. For example, you may have 5 layers and want to apply things to layers 3 and 4. If you don't remember what tags you used last time and whether they're the ones you'd like to reuse, checking show at the same time will tell you. reuse can be very useful if you do transforms or gradients, you get the tags right, but you mess up the other settings. You can fix the settings and reuse the tags. The field above show/reuse will display the last used tags in the next run. This, aside from being somewhat informative, allows for reusing them with some slight modifications. Id you used 5 different tags and got one of them wrong (and didn't use 'remember last settings' - see below), you can change it, say rewrite \3c to \4c, and copy the whole set of tags to 'Additional tags'. Now you can reuse them with the correction without having to select them all again. rem - remember last settings. Save Config saves the current configuration to a file named "hydra4.conf" in your APPDATA folder. Help button loads an extra part of the GUI with some basic usage instructions. Bell Shifter / Wave ShifterThese two macros were made primarily for assisting with creating inline tags. Bell Shifter uses the bell symbol, {•}, and Wave Shifter a tilde, {~}. Other than that, they're exactly the same.Bind them to hotkeys, and you can shift these symbols word by word and then use the associated presets for turning these into tags. Here's how they work. First line is the starting point; each next line is after pressing the hotkey for Bell Shifter once.
{\blur0.6}This is {\i1}only{\i0} \Na test.
{\blur0.6}This {•}is {\i1}only{\i0} \Na test.
{\blur0.6}This is {•}{\i1}only{\i0} \Na test.
{\blur0.6}This is {\i1}only{\i0} {•}\Na test.
{\blur0.6}This is {\i1}only{\i0} \Na {•}test.
{\blur0.6}This is {\i1}only{\i0} \Na test.
The Tag Position preset replace {•} then replaces the • with selected tags.They're wrapped in curly brackets, so they don't show up in video should you leave them in the line, and you can get rid of them by deleting comments with Script Cleaner. (Of course you can just keep pressing the hotkey to make them go to the end of the line and disappear, but if you want them gone faster from a long line...) As you can see in the example, they always end up after spaces. Aside from using the HYDRA presets to replace them with tags, you can also use Masquerade to replace them with some predefined and some user-defined things, and you can use the regular replace function to replace them with anything. Thus you can get anything somewhere specific in the middle of lines. An extra option is to move by just one character. This is done by commenting the line. Then they move by character instead of a word. There's just one small caveat. I wrote that in lua, because it's way easier, but also because the re module keeps returning wrong matches about 20% of the time on my end, so I'm trying to avoid using it. The issue with that is that for lua, something like "ä" is two characters, and something like "て" is three. So the Bell will end up literally in the middle of the character, splitting it into some codes. That's unacceptable with other functions, but here you're shifting one by one, and by continuing, you get out of the character just as easily as in, and nothing gets broken in the process, so I didn't see it as a problem. Plus, when this happens, you see the codes in the Edit Box, but in the Subtitle Grid, the whole text of the line disappears, so it's pretty noticeable. Switching from word to character mode can also be done by having • or ~ (depending on which one you're shifting) in Effect, or by having the {switch} comment at the end of the line. (See Cycles for more on that.) As I've said above, I created both macros because I couldn't decide which one was better, and in Masquerade I ended up making use of both. They could probably be used in all kinds of ways I haven't even thought of yet. Arrow ShifterThis one is similar in principle, but marks tags, or more precisely backslashes. Same example as above:
{\bord0\blur0.6\c&H8AAD25&}This is {\i1}only{\i0} \Na test.
{>\bord0\blur0.6\c&H8AAD25&}This is {\i1}only{\i0} \Na test.
{\bord0>\blur0.6\c&H8AAD25&}This is {\i1}only{\i0} \Na test.
{\bord0\blur0.6>\c&H8AAD25&}This is {\i1}only{\i0} \Na test.
{\bord0\blur0.6\c&H8AAD25&}This is {>\i1}only{\i0} \Na test.
{\bord0\blur0.6\c&H8AAD25&}This is {\i1}only{>\i0} \Na test.
{\bord0\blur0.6\c&H8AAD25&}This is {\i1}only{\i0} \Na test.
It jumps from one backslash to another, but skips tags in transforms and in \N. This has no use in HYDRA itself, but it's used by Shift Tags in Masquerade, for shifting thus marked tags to a different position in the text. It's possible that I will get to writing more functions that can make use of this. Comment on-offThis comments/uncomments lines, the difference from the built-in function being that while that one always either comments or uncomments all selected lines, this flips their state. The benefit of that is that when you have for example two versions of a typeset that you want to compare, you comment one, select both, and then the hotkey for this will hide the visible one and unhide the other one at the same time. |
Hyperdimensional Relocator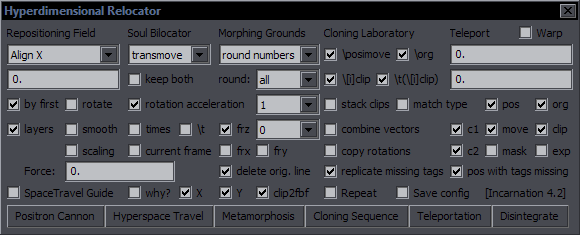 Purpose: Do all kinds of things involving mainly \pos, \move, \org, \clip, rotations, and masks Check SpaceTravel Guide and click on Positron Cannon, and you'll have all the information you need. Check why?, and you'll be provided with extra information about the success/failure of operations. This will be useful when you run something and feel like nothing happened when it should have, and you wonder why. It mainly informs whether a line was changed or not, and tries to provide reasons for why not. Some more complex functions have their own GUI with more detailed explanations. Some simpler functions have their own macros that you can hotkey. From v4.2 on, there are 4 macros for Teleporting 1 px in each direction. Another addition is Spin Doctor. This consists of settings in the Morphing Grounds and two macros for hotkeying. The settings let you choose a tag (frz, frx, fry, fax, fay, xshad, yshad, fsp) and a step by which they will be changed (default 0.01 for fax/fay and 1 for everything else). The macros then add (Positive Spin) and subtract (Negative Spin) that much to/from the current value of the selected tag. This was mainly intended for fine-tuning frx and fry, which is often difficult with the inbuilt tool, if you want to change the x value by 1 and not touch the y value. So if you select 'fry' and 1 as a step, then the Positive macro adds 1 to the current \fry. If the tag is missing, it's added.  Adding frz was obvious, and I figured why not fax/fay too. After playng with it for a bit, I realised that adding more tags that allow negative values is super trivial, so I threw in the shadows and spacing as well. If you want to go from tweaking 'fry' to 'frx', you open the Spin Doctor from Relocator's main GUI and switch to 'frx'.
As I've been working on increased interaction of multiple scripts, I made use of HYDRA's Arrow Shifter, so additionally you can trigger which tag gets affected by marking it with the Arrow Shifter. (Check HYDRA for info.) If some other tag is marked (colours, blur), the macros default to whatever was last selected in the GUI or to frz. Reloading automation always resets this to frz. To expand the options a little, if a \frz tag is marked with the Arrow (>\frz), only that one will be "spinned". Otherwise all \frz tags in the line will change. In general, functions in Repositioning Field change position or orientation, things in Soul Bilocator are related to \move, and the ones in Morphing Grounds are for clips and all kinds of transformations and stuff that doesn't fit in the other two, so when you're looking for a function to do something specific, this should give you an idea where to look for it. A quick list of dropdown menu functions here: "Align X" - same pos x for selected lines "Align Y" - same pos y for selected lines "org to fax" - creates \fax from \pos and \org "clip to fax" - creates \fax from 2 (or 4) clip points "clip to frz" - creates \frz from 2 (or 4) clip points "clip to reposition" - changes \pos based on a clip "clip2pos fbf" - changes \pos based on clips in fbf lines (manual tracking) "horizontal mirror" - mirrors a sign horizontally across the screen "vertical mirror" - mirrors a sign vertically "numbers" - shows \pos differences between lines "shake" - 'shakes' a sign by slightly changing \pos fbf "shake rotation" - shaking effect for rotations "shadow layer" - creates shadow as a new layer "shadow repos." - offsets position by half a shadow's length "space out letters" - new lines for each letter, spaced out by a given distance "fbf X <--> Y" - flips pos x and pos y difference in fbf lines "replicate" - creates replicas of selected lines "fbf retrack" - adjusts \pos for fbf lines (see below) "track by clip" - adjusts \pos for fbf lines based on clip points "transmove" - merges two lines into one, creating \move from \pos and transforms "horizontal" - \move y2 = \move y1 "vertical" - \move x2 = \move x1 "multimove" - creates \move from \pos based on first line's \move "clip2move" - creates \move from 2 clip points "rvrs. move" - reverses \move coordinates "shiftstart" - shifts \move x1 and y1 by Teleport input "shiftmove" - shifts \move x2 and y2 by Teleport input "move to" - sets \move x2 and y2 to Teleport input "move clip" - moves rectangular clip along with \move using \t\clip "randomove" - changes \move coordinates and times within a given range "kill times" - kills move or \t timecodes "full times" - sets move or \t timecodes to start/end frames "set times" - sets move or \t timecodes to given values "round numbers" - rounds coordinates for pos, move, org and clip "line2fbf" - splits a line into one for each frame, handling \move and \t "join fbf lines" - joins fbf lines into one (or more but fewer than originally) "move v. clip" - moves vectorial clip on fbf lines based on \pos tags "set origin" - sets \org based on Teleport input "calculate origin" - calculates \org from a tetragonal vectorial clip "transform clip" - creates a transform for a rectangular clip "set rotation" - sets rotations to some round numbers "rotate 180" - rotates by 180 degrees for given rotation types (x, y, z) "negative rot" - keeps the same rotation, but changes to negative number (350 -> -10) "vector2rect." - converts vectorial clip to rectangular "rect.2vector" - converts rectangular clip to vectorial "clip scale" - recalculates clip scale (the "clip(2,m" thing) "clip2scale fbf" - adjusts \fscx and/or \fscy based on clips in fbf lines (see below for details) "find centre" - sets \pos in the centre of a rectangular clip "extend mask" - extends a mask in either or both directions "flip mask" - flips a mask so that when used with its non-flipped counterpart, they create hollow space "adjust drawing" - lets you adjust a drawing using a vectorial clip "randomask" - moves points in a drawing, each in a random direction "randomise..." - randomises values of given tags "letterbreak" - puts line breaks between all letters (vertical text) "wordbreak" - puts line breaks between all words "clip info" - gives info about a 4-point vectorial clip for text scaling purposes "[un]hide clip" - hides/unhides a clip    
FBF Retrack (Repositioning Field) As is explained in the Guide, this has two modes - simple, and smoothening. Simple mode is like fbf transform for \pos, but you can do layered signs in one go, and you can use different accel for X/Y. That would hardly be interesting enough, though. If you check smooth, you can smoothen some tracking data. Normally you do it for FBF lines, but here I've set them all to the same frame so that you can see what's happening. (This is possible when you uncheck layers.) So on the right, you can see two 'tracked' signs. The first one is really messed up in some places; the other has just small 'glitches'. A smoothening factor is applied in the Force Field. It can range from 0 to 100%, so settings beyond those values get reset to 0 or 100. 0 does nothing, but with a setting of 2, you'd already see some small effects. In the second image, I used a fairly low value of '20'. You can see the blue track didn't change much. Only the two lines on the bottom left edge aren't standing out that much anymore, which is pretty much the whole point. If your tracking in Mocha does something weird in one random frame, this may help, though it is yet to be seen how practical this actually is. On the yellowish track, which was a lot more messy, the differences are more obvious. Not that this would likely happen with Mocha data, but there can be other uses. For example if you use a shaking effect for something, and later decide that it's shaking too much, this can smoothen it without your having to redo the whole thing. This is pretty much the opposite of a 'shake' effect. So that was 20%. This next one is with '50'. If the blue one was real tracking data and the few odd frames were really glitches, this actually looks close to what might be a 'fixed' track. The yellow one is not really a realistic example of anything, but you can see what the setting of '50' does to a track, which is all I'm trying to show here. I haven't tried it on many examples, so it will require some experiments to find out how useful this can be for different kinds of tracks. The last image is with the strongest smooth setting - 100. The first half of the blue track is pretty smooth, but the second part, where you have bigger changes of direction, is probably already overdone, as the track is shifted towards the centre of the curve. You can apply this to only part of the track, though. The yellow track shows the overal effect on random short glitches. There's actually another setting - reference lines. You can enter a number in the Repositioning Field for that. Anything below 1 is defaulted to 1. With that basic setting, each line is compared with 1 line before and 1 line after. With '2', it's also compared against 2 steps back and forward (where applicable), and so on. Some of the yellow track may look worse with '100' than with '50' because a line may be getting 'corrected' more strongly by referencing two frames that are messed up too. The higher you go with the reference lines, the less power that reference has, so there's no point going too high. Which of the two settings is more useful will depend on the track. While the highest setting for smoothening is 100, there's nothing stopping you from running it again, as many times as you want. With enough repetition, you would reach a straight track in the end. clip2scale fbf (Morphing Grounds)  
You can see one example on the right. The two images are the first and last frames. Somebody's holding a bag of salt vertically and then turns it halfway to being horizontal. The main issue here is that while the width stays pretty much the same, the height is decreased by some 30-40%. So \fscx changes differently from \fscy, and Mocha can't track that. This tool is for adjusting \fscx + \fscy frame by frame. You have to time the lines to the frames first, however you do it. You can try tracking the sign or just time it by hand. The you make a 2-point clip on each line. The clip must match something in the image diagonally. This gives you a sense of the width and height in each frame. You can see below how it's done.  Once you've done that, select the relevant lines and apply this. The first line will be the reference frame. On the other lines, any change in the width or height of the clip will be translated into change in \fscx and \fscy. It requires some precision, so the larger the thing you measure with the clip, the better it will go. In this case here, it might be better to include more than just one of the kanji. It would certainly improve the \fscx accuracy. There's not much else to be done about the height, since the red part gets deformed as the bag bends. So in a case like this, if you're confident the x is pretty much the same the whole time, you can uncheck X in the GUI and track only Y (height), and thus draw the clip onto whatever is the tallest, like the 'double' kanji on the left. This way you can also track X and Y separately if needed, though it means drawing the clips twice. You can also use this on already tracked lines where either the width or height isn't right and fix just that. clip info (Morphing Grounds) is explained with images in the alignment section of the TS guide. |
Recalculator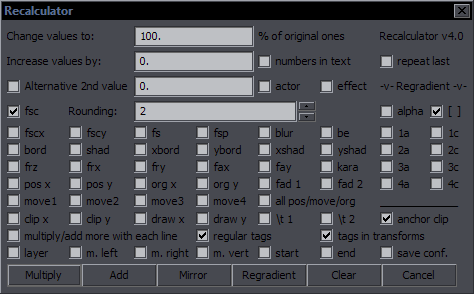 Purpose: Recalculate values of tags by multiplying or adding Features: Recalculation of values for all applicable tags, drawings, \t times; supply 2 different values where applicable; modify values line by line; distinguish between regular tags and tags in transforms; Regradient; repeat last This part is relevant to Multiply/Add: 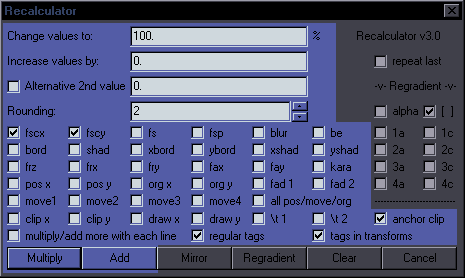 Multiply Change values to - This will increase/lower values of selected tags based on given percentage. With a value of 120%, you will get a 20% increase in value of checked tags, so fscx100 will become fscx120, fs60 will become fs72, etc. With multiply/add more with each line and fscx100, you'll get 120, 140, 160, 180, etc. for consecutive lines. Add Increase values by - This will increase/lower values of selected tags based on a given number. With a value of 5, the value of checked tags will increase by 5, so fscx100 will become fscx105, fax0.05 will become fax5.05, etc. With multiply/add more with each line and fscx100, you'll get 105, 110, 115, 120, etc. for consecutive lines. Alternative 2nd value allows for a different value for all Y things (fscY, Ybord, Yshad, frY, faY, all Y coordinates) + fad2 and t2. It will be used as Multiply or Add depending on the button you press. Example: Checked fscx, fscy, pos x, pos y; tags are \fscx100\fscy100\pos(300,200) -> Change values to 150%; Alternative 2nd value 250%. Multiply. -> Result: \fscx150\fscy250\pos(450,500) -> Increase values by 20; Alternative 2nd value -10. Add. -> Result: \fscx120\fscy90\pos(320,190) fsc is a shortcut for triggering both fscx and fscy, as you usually use those together. anchor clip - This makes sure that multiplying values for clip coordinates won't send your clip somewhere off the screen. Rectangular ones are anchored in the middle, vectorial ones at the first point of the clip. all pos/move/org - This is like checking all 8 pos/move/org checkboxes, so that you don't have to click on all of them. Rounding - How many decimals are allowed for recalculated values. regular tags / tags in transforms - Results are applied only to tags outside transforms, or only to tags inside transforms, or all if both are checked (default). This function only applies to top 3 rows of tags except kara, and to clips. layer / margins - This allows you to recalculate values in those columns. Not very useful for fansubbing, but I use Aegisub for a ton of things. start / end - Same for start/end times. For Adding, values must be in milliseconds. Multiply works like framerate conversion, if you can figure out the right ratio. numbers in text - Recalculates numbers found in visible text. actor / effect - Same as above, for actor and effect. Mirror - This is intended for mirroring mocha data. Applied to fbf lines with pos going from 200 to 260, it will go from 200 to 140. Works with position, origin, rotations, and rectangular clip. If clip changes size/shape, results will be weird. Also works with move (though that makes pretty much no sense to use) and fax/fay. (I'm not sure how it's useful, but Hdr wanted it.) Regradient 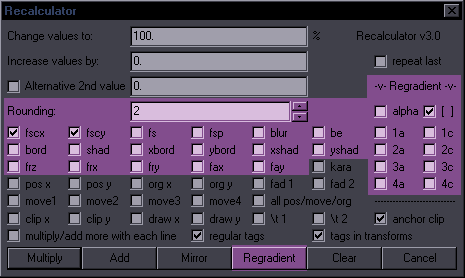 This will recalculate gradients that already exist but need to change values. If you change the first or last value of the gradient, this will recalculate the values in between. It can be used for a specific tag in lines with multiple gradient, as it won't touch the other tags (and bypasses transforms). Conditions: 1. you must check the tags you want to regradient, 2. there must be at least 3 instances in the line (outside \t). Example:
{\frz1}This {\frz2}is {\frz3}an {\frz4}example {\frz5}of {\frz6}regradient
Change the first \frz:
{\frz16}This {\frz2}is {\frz3}an {\frz4}example {\frz5}of {\frz6}regradient
Check frz, press Regradient:
{\frz16}This {\frz14}is {\frz12}an {\frz10}example {\frz8}of {\frz6}regradient
[ ] - This is a workaround for spaces with full-line GBC. (It won't do anything in the example above.)GBC counts values for spaces, but the tags get removed because they're useless. Regradient would count values without them since the tags for spaces aren't there, so this temporarily adds fake tags for the spaces. It's only applied if the number of the tags in question matches the number of characters in text, which should mean it's a full-line GBC. It should thus be safe to have it always enabled, but if something behaves weirdly, you can try disabling it. repeat last - Repeats Multiply/Add/Regradient with last settings. save conf - Saves settings to a file. |
Colourise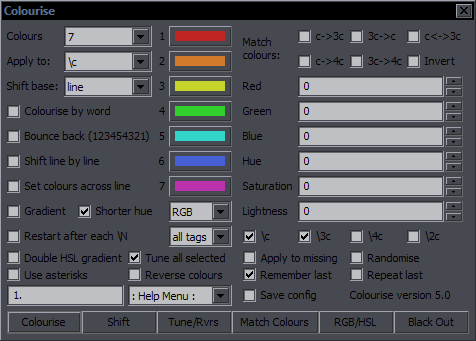 Purpose: Operations with colours Features: colourise by letter; match colours; gradient; adjust RGB/HSL; remember last settings; repeat with last settings; save config Supports: Non-standard characters for all functions; handling of line breaks, transforms, and inline tags; getting info from styles Contents The images highlight options and the button relevant to the functions described. Colourise by Letter / Word 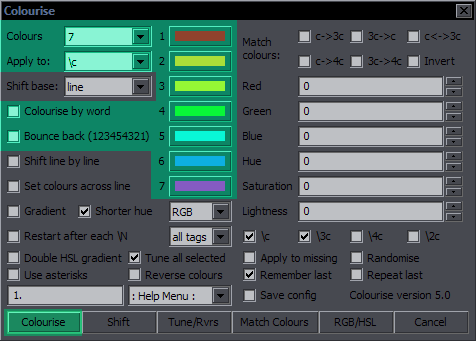 This is the default function for the Colourise button. The green area is what settings it uses. What you do with this is pick a number of colours (2-7) and set them letter by letter to the whole line. (Spaces don't count.)  Colours is where you set how many colours you want. The 7 colour pickers are where you select the colours. Apply to is where you select the colour type you want this applied to. Only one type can be thus used at a time, but this has full support for inline tags and comments, so you can run it again for another type. Colourise by word will switch colours after each word rather than character.  The definition of 'word' here is whatever is between two spaces. So basically it puts tags after each space (and at the beginning). Bounce back uses the colours you pick and then goes back from the last to the first, and so on, so instead of 123451234512345, you will have 12345432123454321... 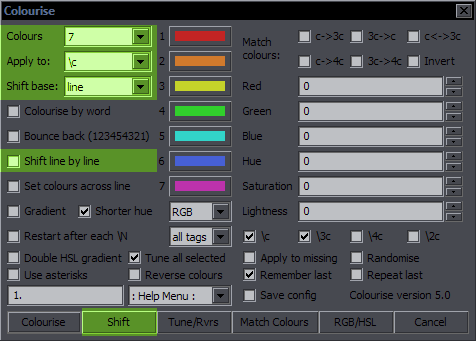 The Shift function is closely related to this. It simply shifts all the colour tags to the right, and the last colour goes to the beginning. It works for the selected type (Apply to), and it doesn't matter how many tags of that type there are in the line. (Well, there must be at least two.) The value from each tag will simply be transferred to the next one.
If Shift base is # of colours, you have to select the number of Colours so that the script knows which colour the first letter should be. (If there are 6 colours, then the 6th colour in the line will go to the beginning.) This is how it should be used for a line colourised the way described above. If, however, you have for example a gradient and want to shift the colours of the whole line around, you set Shift base to line, and the first letter will be the colour that was previously the last letter. Shift line by line is what really makes this interesting. You use it on fbf lines, and the colours get shifted by another character with each line. You may have a different colour for only one letter, shift by line, and the effect will be that colour running across the text.  These are unrelated to the other shifting. The last of them is the same as "move colour tag to first block" in HYDRA, but it's applied only to the type in "Apply to", as are the other two. 1st2start will only move the 1st inline colour tag of the selected type, and last2start will move the last one. This is probably not very useful for most people, but I actually somehow use it pretty often, so there it is. Set colours across line This is like a preparation for gradient-by-character. Select number of colours, colour type, and the colours. For 3 colours, it'll place one at the start, one in the middle, and one before the last character. For 2 colours, it'll be the first and last characters. The colours are set evenly (as much as possible) across the line. This can help with some irregular GBC. 
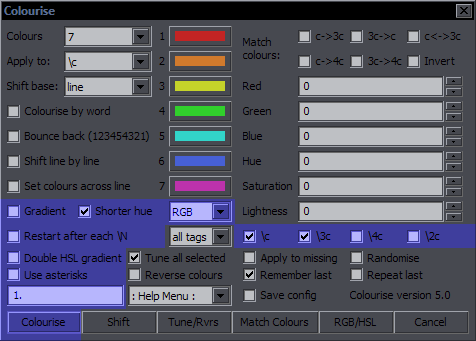 Gradient - Creates a gradient by character. There are two modes: RGB and HSL. RGB is the standard, like lyger's GBC; HSL interpolates Hue, Saturation, and Lightness separately. Use the \c, \3c, \4c, \2c checkboxes on the right to choose which colour to gradient. Shorter hue makes sure that hue is interpolated in the shorter direction. Unchecking it will give you a different gradient in 50% cases. Double HSL gradient will make an extra round through Hue. Note that neither of these 2 options applies to RGB. Restart after each \N will create the full gradient for each 'line' if there are line breaks. Use asterisks places asterisks like lyger's GBC so that you can ungradient the line with his script. The edit box below that is for acceleration. You can still use accel the old way, ie. by typing it in Effect in this form: accel0.8 This takes precedence before the edit box, so that you can have different values for different lines if you need. There are several differences from lyger's GBC: - RGB / HSL option - You can choose which types of colour you want to gradient - Other tags don't interfere with the colour gradients - You can use accel - Asterisks are optional If both 'Set colours' and 'Gradient' are checked, Gradient will run.  Here's the difference between the RGB and HSL gradients. From version 5, there are also two extra macros for hotkeying, one for each gradient type. These run with \c and \3c checked, and 'shorter hue' for HSL. 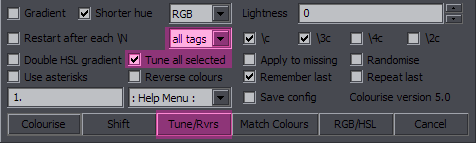 Tune colours - Loads all colours from a line into a GUI and lets you change them from there. For more info, check this. You can select all tags/regular/transf to load colours only from transforms, only those not from transforms, or all. All selected loads unique colours from all selected lines, instead of all colours line by line. While without this checked, you affect each colour separately when there are multiple same ones, this will only load each colour once for each type (\c, \3c), and replace it in all its instances. So for a selection of lines where you need to change the shade of a particular colour in all lines, you would use this. It's like ctrl+h, but it allows you to use the eyedropper tool to pick the colour. The Tune/Rvrs button runs this by default, unless 'Reverse colours' is checked, in which case the following will happen... Reverse Colours  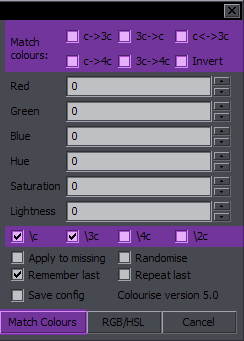 This is a simple thing that reverses the order of colours for each selected type.
It only applies to existing colour tags (not to style) and ignores transforms. So if you have colour tags for black-red-green-blue for \3c, and select \3c, they will now be in blue-green-red-black order. This means that a full gradient will get reversed completely. Match Colours This should apply to all colour tags of selected types in the line. c->3c: outline colour is changed to match primary 3c->c: primary colour is changed to match outline c->4c: shadow colour is changed to match primary 3c->4c: shadow colour is changed to match outline c<->3c: primary and outline are switched Invert: all colours are inverted (red->green, yellow->blue, black->white) Invert uses those 4 checkboxes below, so you can use it on one type or several. As you can check several boxes at the same time, multiple functions can be run in sequence. They run in the order I listed them above, but it's probably best to run one at a time. In any case, you'll get a warning if you have more of them checked, to prevent weird results due to selecting more (or forgetting to unselect some) by mistake.  RGB / HSL
Rather obviously, this adjusts Red/Green/Blue or Hue/Saturation/Lightness for all colour tags of selected type in all selected lines. As colour values are hexadecimal, one step is 1/255th of the colour scale, and thus -255/255 are the limit values. Apply to missing means it will be applied to the colour in Style if there's no tag in the line. Randomise - Example: if you set Lightness (or any RGB/HSL) to 20, the resulting colour will have anywhere between -20 and +20 of the original Lightness. Again, all tags/regular/transf allows you to set restriction for which tags you want to use this - non-transforming, in transforms, or all. The RGB and HSL parts run separately, RGB first, so HSL values are applied only after the RGB ones had been. General Settings  Remember last - Remembers last settings. (Until reloading automation directory, or you can just uncheck it and cancel, and loading the GUI again will give you the saved/default values.) Repeat last - Whichever button you press, the settings from the last opening of the GUI will be used. Help - Loads help menu for the section selected from the dropdown menu. Save config - Saves current settings as defaults. |
Multi-line Editor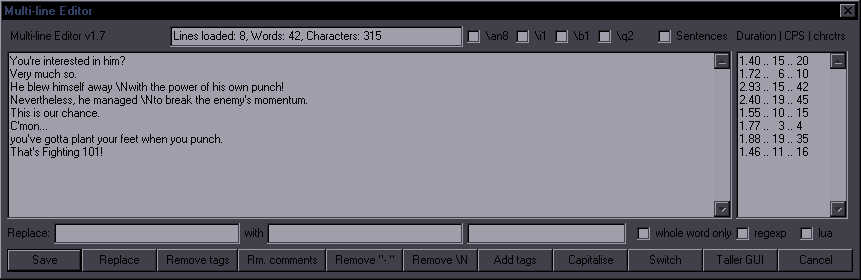 Purpose: Edit multiple lines like on a pad Features: Edit text, style, actor, and effect; replacer with regexp; remove tags/comments/line breaks; capitalisation Supports: Capitalisation for non-standard characters (ä, è, ø) (from v1.7) This was written so that you can edit multiple lines without having to jump between them. Also if you're editing a sentence that extends over 3 lines, you can easily see the whole sentence here and move words among all the lines. Your selected lines get loaded in the editor, as you see above, and the GUI expands based on how much text you load, up to a certain limit. You can still go beyond that limit if you use the Taller GUI button, though. When you edit the lines, you click on Save, and they get saved back to the subtitle script. Line breaks in the editor determine what one line in the script is, so you can't change the line count - save for one exception. If you load only one line and make line breaks in the editor, these become \N when you save it. This is useful when you're typesetting for example a cell phone sign with long text and need to make line breaks manually in many places. In the textbox on the right, you can see some useful information: duration, characters per second, and character count for each line. The content of this box is only informative and doesn't save anywhere, so it doesn't matter what you do with it. You have a number of tools at your disposal. There are 4 buttons to remove things: tags, comments, line breaks, and leading dash+space. This last one is for removing this garbage from subtitles that have two speakers in one line. The Add tags button adds the tags you check at the top of the GUI. The Capitalise button cycles through 3 modes of capitalisation for the whole text: lowercase, uppercase, and titles. For sentence-style capitalisation, there's a Sentences checkbox at the top. It capitalises the first word of the line, first word after ./?/!, days of the week, months, Mr., Dr., and a few languages like "English". It may work well for fixing some mistakes in a text that's supposed to be capitalised correctly, and it may be helpful for text you get all in lowercase or uppercase in the first place, but changing first to lowercase or uppercase and then capitalising like sentences is likely to miss a lot of things, like acronyms, etc. I added some limited support for characters from mostly Germanic languages and French, but it's only about 30 characters. Lua can only replace these one at a time (or at least I don't know of an easier way), and once you go down the road of adding more characters, it never ends. Too many languages, too many weird characters. But it's really easy to add your own if you need, so look for the UP and LO tables in the script. Then there is a Replace function that has improved a lot in the latest versions. It's quite similar to ctrl+h, but applies to the text loaded in the Editor. I generally use ctrl+h for the whole script and this one for selections. It has a mode for whole word only without requiring that you know regexp. This means replacing "and" won't replace the "and" in "android". It has both standard regexp and lua pattern matching. (If you check both, lua applies.) A recent addition is the Switch button that switches to another mode.  In this mode, you can see Style, Actor, and Effect the same way as Text, and you can edit all of them the same way. Replacer can also be used on all of them. The checkboxes at the top determine what the Replacer will affect. You must always maintain the original line count for each of the 4, or you won't be able to save the results. Re-SplitPurpose: Move last word to the start of the next line or the other way roundSupports: Handling of line breaks, start tags, and end comments This exists as a stand-alone script, but it has now been merged into Multi-Line Editor (separate macros) and will be updated only there. Example (two lines in script): Those who are exposed to lots of them often go through what you went through. Press hotkey for 'ReSplit - Forward'. Those who are exposed to lots of them often go through what you went through. So as you can see, this is for re-splitting weird lines, mainly ones produced by the infamous Crunchyroll, because they really like their awkward splits. It applies to active line, so no use selecting more lines. One key moves the last word to the next line, the other moves it back. This supports start tags and end comments, but not inline tags and possibly other weird stuff. Once a line break gets to one end, it gets nuked (and not transferred to the other line). You won't get it back by shifting the word back. ReversePurpose: Reverse the order of text, effect, etc. in selected linesThis is very simple. You just select which column you want to reverse, and value from last line will go to first line, etc. If lines are numbered in Effect, reversing Effect will number them backwards. Works for all columns. |
MultiCopy Purpose: Copy specified things from selected lines / paste things to selected lines Features: copy any tags; copy between columns; many modes of pasting The main idea is to copy something from X lines and paste it to another X lines. Copy tags - start tags text - text AFTER start tags (will include inline tags) visible text - text without any tags or comments all - tags+text, i.e. everything in the Text field text pattern - checks in visible text for a given regexp pattern, like "\d\d:\d\d". (Used lua before v3.5) any tag - copies whatever tag(s) you specify by typing in the textbox, like "org", "fad", "t", or "blur,c,alpha" export CR for pad - copies the text of the whole script in a way suitable for pasting on a pad signs go to top with {TS} timecodes; nukes line breaks and other CR garbage, fixes styles, etc. colour(s) / alpha - copies colours / alphas selected by checkboxes above comments - copies all comments in the line, but if you type a pattern in the top textbox, it will only copy comments with that pattern. Other copy options should be obvious. Copy from / to is a quick copy function between columns. Switch switches text in the selected columns. Copying strings to number fields does nothing. Attach attaches data from one column to another. For example if you have "01" in effect, and "Text" in text, and use the settings below, you will get "01 - Text" in text. (Effect remains unchanged.) Checking After would make it "Text - 01". If effect was empty, you'd be just attaching the text you type in "Link". Delete orig. deletes the content of the column you're copying from. So instead of copy from-to, it's move from-to. 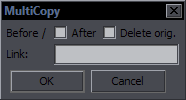 Once you get your data, click on Copy to clipboard, select the lines you want to paste to, load the GUI again, and click on Paste from clipboard. This will load the saved text in the textbox. You could use ctrl+c / ctrl+v instead of the buttons, but Windows has limits on the length of that, and the buttons bypass that restriction. Now you use one of the three paste buttons, depending on what you're pasting. Paste tags pastes start tags. Paste text pastes text after start tags. If orig. text has inline tags and pasted text doesn't, the script tries to preserve the tags in 2 ways: 1. It takes the words in orig. text with tags before them and looks for the words in the new text, and if that fails (all would have to match), 2. it counts by words and applies tags to the appropriate place in the line by word count. Some examples (original text --> pasted text --> result): one two {\bord2}three four --> two three four --> two {\bord2}three four one {\bord2}two three {\bord3}four --> one seven two five four six --> one seven {\bord2}two five {\bord3}four six one {\bord2}two three {\bord3}four --> four three two one --> {\bord3}four three {\bord2}two one one {\bord2}two three {\bord3}four --> two three five six --> two {\bord2}three five {\bord3}six (no 'four', so it counts words) one {\bord2}two three {\bord3}four --> what is this --> what {\bord2}is this one {\bord2}two three {\bord3}four --> what is this i don't even --> what {\bord2}is this {\bord3}i don't even one {\bord2}two {\bord3}three --> one two three two one --> one {\bord2}two {\bord3}three {\bord2}two one As you see in the last line, the downside is that if it matches the word multiple times, the tags go to each instance. If pasted text has inline tags, it gets pasted as is. Paste extra all - This is like regular paste over from a pad, but with checks to help identify where stuff breaks if the line count is different or shifted somewhere. If you're pasting over a script that has different line splitting than it should, this will show you pretty reliably where the discrepancies are. pasteover+ - Apparently the previous function wasn't enough. Lack of communication between the editor and timer can go pretty far. The other day I ran the function above and got this: "The pasted data is 42 lines longer than your selection". A day later I got a discrepancy of 59 lines or so. It took fucking 40 minutes to fix, which is ridiculous because had I expected that, it would have taken me 20 minutes to retime the whole episode. So I had to write something even more insane, and this is it. It still took maybe 10 minutes to fix the above-mentioned script, but it's the fastest solution that I have. Here I would like to point out that pasting over a very line-mismatched text is the most annoying part of fansubbing. So here's the monstrosity in its full glory: 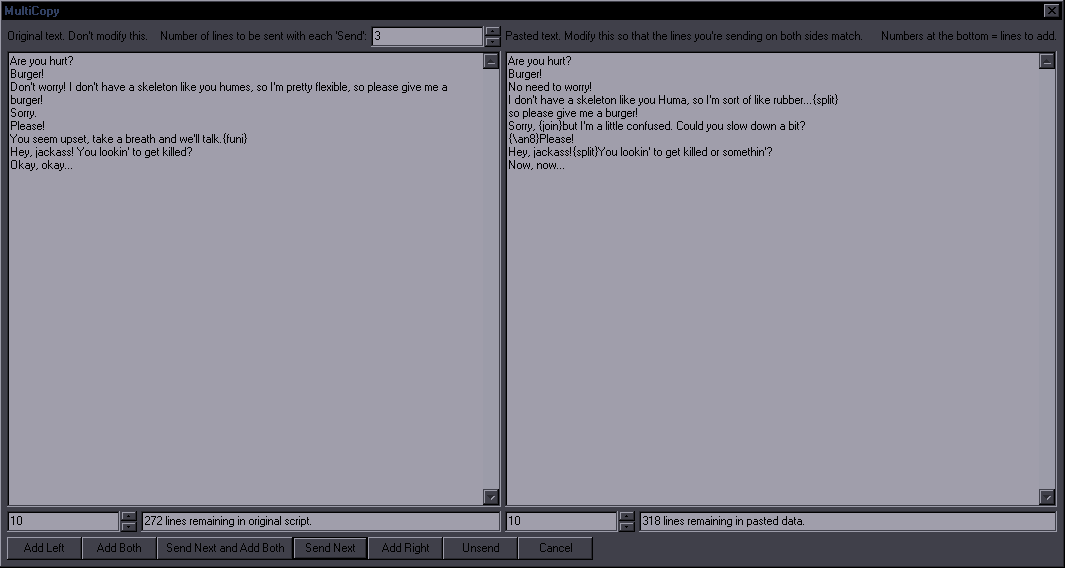 On the left is the text of the original script, loaded from Aegisub. On the right is the text being pasted over. You shouldn't touch the text on the left because the line count in Aegisub has to stay the same. Text changes will be ignored too. The left side is for reference so that you can fix the right side. 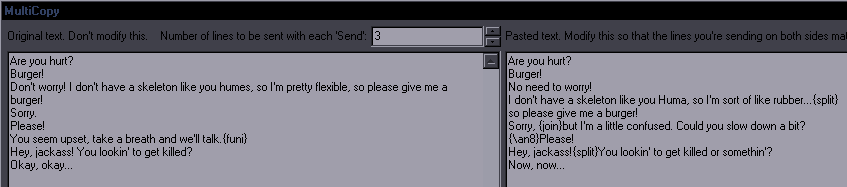 Here you can see how the two sides don't match at all. (That's part of the script I had to deal with.) I already joined the jackass line, so out of these 8-10 (depending on the side) lines, only 3 are in the same place. What needs to be done is resplitting the lines on the right so that they match the lines on the left. 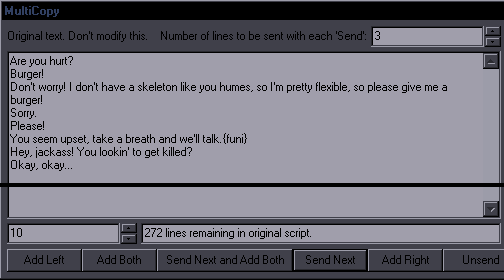 First you get a bunch of lines loaded from both texts. The number at the top is how many lines you'll be sending as checked or fixed. So for this image, when you press Send Next, 3 lines from the top of each side will be "sent". The left is just for reference; the lines from the right get saved for the final pasteover. You can change the number of sent lines for each turn. More is faster, but when the script is really chaotic, sending by 2-3 makes it clearer what's going on. And even if the text is clear enough, you can just send 3 lines over and over pretty fast. Add Left will add more lines to the text on the left, based on the number at the bottom left (10).  Send Next and Add Both does the sending and adding all at once - as long as there are enough lines to send. There are info/log fields on each side, normally telling you how many lines remain on each side. You can again see how close 272 and 318 are... These fields are important because they also report errors, mainly when you're trying to send more lines than you have loaded. The other error is when you reach the end of data on either side and you have different line counts loaded in each box. When you press the Send button and nothing seems to be happening (nothing was sent), check those fields for the error message. The last thing here is the Unsend button which will be a life-saver when you fuck up and send something you shouldn't have. This will load the sent lines back (again by the number at the top), and you can correct whatever you had done. You can modify the numbers depending on how messed up your script is. You can load all lines at once if you feel like, though having only a few more lines than you're sending may look neater and less confusing. You will still have to deal with the actual line splitting after this, but with really fucked up pasteovers, this has the huge advantage of not having to constantly switch between Aegisub and your browser and scroll all over the place looking for something that looks similar to something in the other window. Basically I put the browser and Aegisub next to each other. It hasn't been extensively tested yet, but I've done a few successful runs, so hopefully it'll work. any tag - This is for pasting tags, in the "\tag1\tag2" format. Doesn't matter whether you copied or typed them. superpasta - This allows copying columns from one selection to another. Just copy several whole lines with ctrl+c, select new lines, paste the whole thing in the GUI, select superpasta, and you'll get this:  You can paste for example Effect from some lines to Effect in other lines, but also to another field in those other lines, like Actor. You can also apply this to the same lines you copied from and copy things between columns. As copying between columns has now been added directly to the main GUI, this is pretty much redundant, but it can do several of those operations at the same time. Checkboxes determine which column should be copied, and dropdown menus determine where it should be copied to. text mod. - This pastes over text while keeping inline tags. If your line is {\t1}a{\t2}b{\t3}c and you paste "def", you will get {\t1}d{\t2}e{\t3}f. This simply counts characters, so if you paste "defgh", you get {\t1}d{\t2}e{\t3}fgh, and for "d", you get {\t1}d. Comments get nuked. gbc text - This is for pasting over lines with gradient by character. You get this: [start tags][pasted text without last character][tag that was before last character][last character of pasted text] For colours, the gradient should be replicated in full. de-irc: paste straight from irc with timecodes and nicknames, and stuff gets parsed correctly. [12:30:24] <nickname> Dialogue: 0,0:00:00.00,0:00:00.00,Default,,0,0,0,,Text Timecode and nickname gets nuked, and the rest is applied like regular paste over. If pasted data doesn't match line count of selection, you get choices for what you want to do.  If you have more lines selected than you're pasting, you can either Loop paste or Paste only copied lines. In the case above, Loop will paste that one line into all 4 selected, while the other option only pastes that one saved line, and the remaining 3 stay the same. If you had 3 lines copied and 8 lines selected, Loop would paste lines 1 2 3 1 2 3 1 2 into the 8 selected.  If you have more lines copied than selected, you can Paste only what you have copied, or Paste all lines. The former will paste whatever fits into your current selection. The latter will keep pasting to lines after the selection until the clipboard is empty. You can use Replacer on pasted data. This applies to what you have pasted in that large textbox and allows you to modify the data you're pasting. You can, for example, copy values from one type of tag and paste as another type of tag. Example: copy 'bord', replace 'bord' with 'shad', and paste border values as shadow values. Another example would be copying primary colour, replacing \c with \3c, and pasting as border colour. Repeat Last - Repeat last action with the same settings. You should press the same button, obviously, or weird things might happen, though in some cases it may be applicable. |
FadeWorkS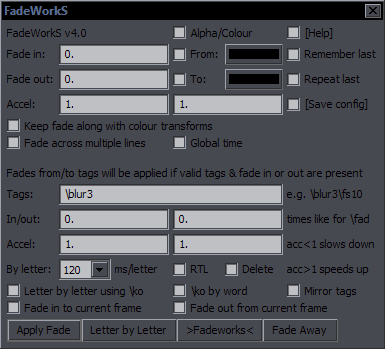 (It was one of the few remaining superboring names, OK?) Purpose: Create an ordinary fade as well as other fading effects Features: fades with accel; fade letter by letter; fade in using \ko; fade across multiple lines; fade to/from current frame; remember last settings; repeat last; save config Supports: Non-standard characters in Letter by Letter (like ö); merging of fade by letter with existing inline tags For a regular fade, type only Fade in / Fade out values. Checking Alpha/Colour will use alpha transform instead, with the Fade in/out values and accel. Checking From/To colours will do colour transforms (with accel). If only one checked, the other will be alpha transform. Keep fade along with colour transforms - when using colour transforms, the \fad tag will be kept as well. Fade across multiple lines creates a set of alpha transforms across lines. This can be used if you want to fade out a whole part of a conversation. Like people walking away and talking, sound gets quieter... This nukes all present alpha tags. It supports shadow alpha (\4a). Global time will use times relative to video, rather than of each individual line. This makes a difference with gaps between lines. Letter by Letter This fades each letter separately, in a sequence. The dropdown menu is the fading time for each letter, while Fade in/out are for the overall fades. So if you have 10 characters and use 120ms/letter and 1200ms Fade in, the fades will follow perfectly one after another. If the Fade in is 1000 ms, they will overlap a little. If 500ms, you'll have about 3 letters fading at a time. RTL fades right to left. Delete removes a letter-by-letter fade (by removing all alphas and alpha transforms). Letter by letter using \ko uses {\ko#} tags instead of transforms for fade in. If the Fade in is under 40, it's used as \ko[value]; if it's 40+, it's considered to be the overall fade, i.e. when the last letter appears. \ko by word fades in by word instead of by letter. (Inline tags are supported, but if you fade by word and have tags in the middle of a word, it won't work as you want it to. Also, \ko actually works with decimal values, like \ko4.6.) Fade in to current frame - sets fade in to current video frame. Fade out from current frame - sets fade out from current video frame. These are for setting fades very easily without requiring any numbers. The current frame will be the first/last fully visible, so for Fade in, set to the first frame after the fade, not the last frame of the fade. Tags This is from transforms from and to given tags. The difference from just using HYDRA for transforms is that this allows you to do it in a "fade" approach for the times, which is convenient mainly for the end transforms. Plus you can combine this with alpha/colour transforms with different settings in one run. (This was previously implemented for blur only, in a different manner.) You must input valid transformable tags, with values. Example: "\blur5\fs10\fsp4\fax0.2" Tags are used for both In and Out (if those values aren't "0"), but if you check Mirror tags, the values for Fade out will be mirrored for frz, fry, fax, and xshad, meaning they will be the opposite of Fade in. This allows for keeping some symmetry. But you can always run it once for Fade in and once for Fade out, if you want different tags. This is activated by the Apply Fade button and can run along with alpha/colour transforms. What determines what runs and what doesn't is whether the in/out times are both zero or not. [Help] - shows Help, which is basically the same thing you're reading here. Remember last settings - the GUI will remember your last used values (until automation reload). Repeat last - runs with values used last time. [Save config] - saves your current settings as defaults. Extra functionality: Fade between 0 and 1 gives you that fraction of the line's duration, so Fade in 0.2 with 1 second is \fad(200,0). Fade value of 1 is the duration of the whole line. Negative fade gives you the inverse with respect to duration, so if dur=3000 and fade in is -500, you get \fad(2500,0), i.e. 500 from end. FadeWorks This was created for various fbf fade effects that focus more on replicating lines than alpha fade. The idea was to add lines before start time and after end time and do things you can't do with transforms. The main part is shifting position, which includes acceleration, so you can create linear movement with accel or all kinds of other moves. 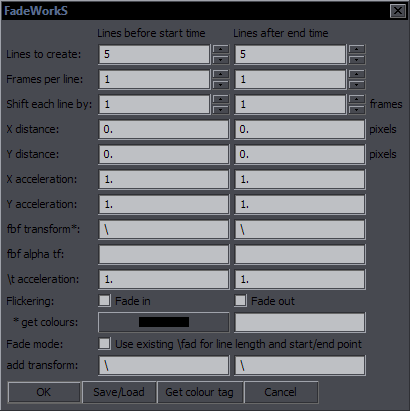 Save/Load: 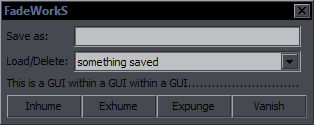 Lines to create is how many lines will be created before and after the current line. If set to '0', the effect for that side is disabled. Frames per line is the duration of each created line. Shift each line by is the timing difference between the lines. This is generally best to leave the same as the setting above it. With values of '1', you get regular fbf lines. Values of '2' would make consecutive 2-frame lines. If the duration is larger than this setting, lines will overlap (which may be used as a special effect). If this setting is larger than the duration, there will be time gaps between the lines (which probably isn't too useful). X/Y distance is where the starting/ending point will be relative to current \pos. If X is -100 and 100 respectively, the line will start 100 pixels to the left of where it is now and end 100 to the right, no matter how many lines you put in between. Acceleration is separate for each element, as that allows for more effects. In fact, the accel on the X/Y movement is one of the main points of this. Due to how this is written, using the same accel on the left and right kind of mirrors it in the result, which is what you'll usually want. (If left starts slow, right ends slow.) fbf transform - you can type some tags, like \bord10, and border will be 10 on the outer lines (first of fade in, last of fade out) and transform frame by frame to whatever value you have on the main line. The main line should always remain unchanged. fbf alpha tf is just an extra field to enter alpha values for the above (in hexadecimal, like "FF") to avoid having to type out the whole thing. The fbf transform field can actually handle even colours, but you have to type them. You can use the get colours tool. Set a colour, click on Get colour tag, and you'll get the tag in the field next to the colour picker. Copypaste from there. Change \c to whichever one you need. This has its own accel. Fade mode is pretty weird and hard to explain, but it should be used on lines that have fades. The replicated lines will use those fades, and the idea is to create fading lines that overlap with one another in different positions. This mode disables Frames per line. You can add transforms to this, but just like the fades, these will reset on each line, and the effect is kind of bizarre and requires some experimentation to get something useful out of it. It does work combined with the fbf transforms, but the results may be a bit unpredictable and bad, and they will look different for fade in and fade out. All of this is much better to show than explain, so I have made this file with some examples. Load it up and see what can be done with this. Then you'll have to experiment a bit to figure it out. Each of those examples is made from the one middle line. Of course none of this is useful for regular typesetting but rather as special effects for song styling and such. If you find an effect you want to keep for later, there's a mini GUI for saving the settings. You can Save, Load, and Delete presets. |
Selectricks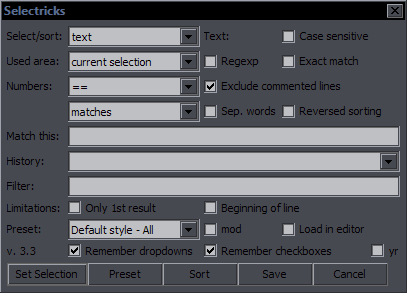 This is explained in detail in this blog post, so I will only address what has been added since then. If you're selecting by Numbers and use ==, you can set ranges. This means that selecting layers with ==, you can match 4-6, and layers 4, 5, and 6 will be selected. "<= [non-zero]" will select values lower than the given one but not zero, thus selecting only lines where a value is actually set. regexp has been updated to be real regexp and not lua. Note that [A-Z] will match [a-z] unless you check Case sensitive. Filter - Lines including this pattern will be excluded. For example, you can search for "well" but filter out "dwell". Should work with regexp. Doesn't work with number fields. Makes no sense with "exact match". Only 1st result - Will select only the first matching line found. Beginning of line - Will match only if the searched string is at the beginning of a line. start time / end time - Select by time in various formats, like: 1:20:05 (= 1h20m5s), 5:50 (= 5m50s), 1h20m, 1h30, 1h6s, 10min, 20sec, 1:20:30.5 (= 1:20:30.500), 1h5 (= 1h05m), 1.5h, 136m, 10m-20m All of these should work. Most usable with ">=" and "<=". Sep. words - Matches words separately, kind of like a web search engine, but matches them as strings, not "words". "one two three" will match only lines that contain all those three words, in any order, but the "one" part will also match "alone", "abandoned", etc. Used area: add to selection - Keeps the current selection and adds matched lines to it. Presets lines w/ comments 1/2 - This selects lines that have comments in {these} brackets - mode 1 from all lines, mode 2 from selected lines. same text (contin.) - This reads clean text (no tags/comments) of selected lines and then goes line by line checking if they have the same text as any of the selected ones, adding them to selection. It stops at a line that has a different text from all the selected ones. In other words, it selects all following, continuous lines that match the text of the selected lines. Effectively, this is mainly useful to select a whole mocha-tracked sign or a gradiented sign. same text (all lines) - Same as previous, but applies to the whole script. same style/actor/effect - Same as previous (all lines), but for the other three fields. its/id/ill/were/wont - Selects lines containing these words so that you can make sure they weren't supposed to be it's/i'd/i'll/we're/won't. range of lines - Selects a range of lines based on numbers you see in subtitle grid. Type something like "500-600" in the Match this field. move sel. up - Moves your selection up by 1 line, so if lines 5-8 are selected, lines 4-7 will be selected. move sel. down - Opposite of previous. For both presets, you can move by more lines if you type the number in Match this. move sel. to the top - Moves selected lines to the top of the script. With mod checked, active line/selection doesn't go to the top but stays where it is. move sel. to the bottom - Same as previous (including the mod part) but for bottom of the script. sel: first to bottom - Shifts lines in selection, moving the first selected line to the bottom of the selection. (1-2-3-4 -> 2-3-4-1) sel: last to top - Opposite of previous - last line in selection goes to the top of selection. any/more+some/time - selects lines with "anymore", "any more", "sometime(s)", "some time(s)" (useful for editors) The mod checkbox works with two more things. With sort by time it sorts by end time. With OP/ED in style it selects not only by style name, but also all lines that appear (timing-wise) between the start of the first OP or ED line and the end of the last OP/ED line. The purpose is to also select signs that are part of OP/ED but don't have OP/ED in style name. History - This shows a history of last 30 searches. If you select one of those, the regular search box is ignored. Remember dropdowns - remembers last state of dropdown menus Remember checkboxes - remembers last state of checkboxes Save - saves config Compatibility of functions Case sensitive should work with everything. Regexp disables/ignores 'Exact match', 'Sep. words', and 'Beginning of line'. Exact match disables/ignores 'Sep. words' and 'Beginning of line'. Sep. words disables/ignores 'Beginning of line'. (It just so happens that whatever's higher in the GUI takes precedence.) Only 1st result should be compatible with everything. |
ShiftCut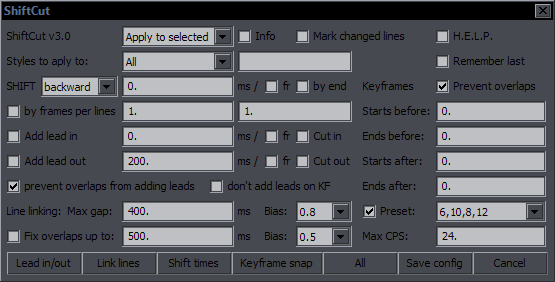 Purpose: Timing operations Features: add/cut lead in/out; prevent overlaps; fix overlaps; apply to selected styles; shift by frames; custom presets for keyframe snapping; save config This started with some things the TPP didn't do and ended up as a complete replacement of TPP, including functions of the shifting tool. For clarity, let's divide this by colours again. 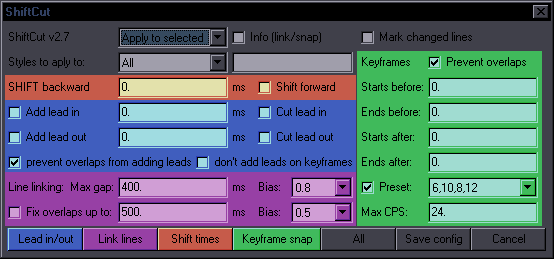 The top part is general settings. Apply to selected / Apply to all lines - This should be obvious. Sel. + onward - Apply to selected and everything after. Styles to apply to - There are 3 presets: All, All Default, Default+Alt. All Default applies to all styles with "Defa" in the name. Default+Alt applies to styles with "Defa" or "Alt" in the name, so this will match stuff like "Default Flashback" or "Alternative". Below that, the dropdown menu shows all styles present in selected lines. The box next to it lets you type an additional style you want to include. This may be useful if one of your dialogue styles has an odd naming pattern. Info (link/snap) - For linking and keyframe snapping, this gives you information about how many lines were affected. This can be useful when applying something to the whole script, unsure whether your settings are a good idea. If you find no lines were changed, your settings were useless. If too many lines were changed, maybe you did something wrong, etc. Mark changed lines - Same purpose as the Info above, but this marks the lines in Effect so that you can check the changes. Lead in/out Simple. Check which of the two you want (or both), set values in milliseconds, go. fr - Shift by frames instead of ms. Cut in/out - Make leads smaller rather than larger. (Line gets shorter.) Cut overrides Add, so it doesn't matter whether Add is checked or not. You can also cut by using Add and negative values. Prevent overlaps from adding leads - This makes sure that applying lead in/out won't create overlaps with adjacent lines. Don't add leads on keyframes - This is useful when you're fixing a script that's already snapped to keyframes. For example if your timer makes short lead outs, you can add 150ms lead out to all dialogue lines with these 2 checkboxes checked pretty safely (and then Link Lines). Link lines Max gap - Maximum gap between lines to be linked. If the gap is longer, no linking. Bias - Where the lines will be linked. 0.5 is in the middle of the gap. 0.8 means 80% of the gap goes to the first line, 20% to the second. Fix overlaps - This allows you to fix what would be unwanted overlaps. If two consecutive lines overlap by less than this number, they will be made not to, based on the Bias, which works like the one for linking. You can for example set this to only 50 if you want to just fix accidental 1-frame overlaps. (Assuming "normal" frame rates.) If you want to only fix overlaps, set linking gap to 0. Keyframes This is really just like TPP, so there isn't much to explain. Keyframe settings are in frames, not ms. Preset numbers are in the same order the GUI shows above it. Preventing overlaps is something TPP doesn't have, afaik. Overlaps would happen when lines are linked before a keyframe and your Ends before number is higher than Starts before, for instance. Max CPS - If snapping to a keyframe would result in a CPS higher than the given value, the line won't be snapped. "0" disables this. (Or you can just set a high number.) This setting will allow bleeds if the lines would otherwise be hard to read. However, it only applies if the bleed is over 3 frames because 1/2/3-frame bleeds are just never good and hardly make much difference for readability. Shift backward/forward - This is as straightforward as it gets. Shift backward or forward by milliseconds. fr - Shift by frames instead of milliseconds. by end - Similar to Aegisub's "shift selection so that the active line starts at current frame", except the active line will end there. by frames per lines - Shifts by a given amount of frames each line (or several lines). With 1/1 and lines with the same timecodes, each new line will be one frame further. With 3/1, each line will be 3 frames further. With 1/2, each two lines will be a frame further. (When this is on, the previous line in the GUI is ignored.) All - This button applies Lead in/out, Link lines, and Keyframe snap. Save config - Saves your current configuration. This also lets you modify (add/remove) the keyframe presets. Macro: Shift End Link Forward - Shifts end time by 3 frames forward, along with start time of the following line if linked. Macro: Shift End Link Backward - Same but backward. Macro: Shift Start Link Forward - Same but start time + end time of previous line. Macro: Shift Start Link Backward - You get the idea... These 4 macros are hotkey equivalents of Ctrl+mouse drag. They can be useful for quick-adjusting the point of linking if for whatever reason you prefer the keyboard over the mouse. More useful for checking/correcting timing rather than timing itself. |
Time Signs Features: shift times; snap to keyframes; fill in times for lines without timecodes; use multiple timecodes; add blur; save settings This checks for timecodes like {TS 5:36} in your line and uses them to set start and end times for the line. It can use a bunch of different formats of the timecode, but it's best to stick to this. Shift timecodes by ... sec - If your translator uses a different raw than the one you typeset to, you can use this to shift the times. For lines without timecodes... - For multi-line signs with timecode only on the first line. Automatically remove {TS ...} comments - Removes coments starting with 'TS', i.e. the timecodes it used for timing. Automatically add blur - You should do that for every sign anyway, so why not now. Snapping to keyframes - Snaps start/end of the sign to nearby keyframes. Set how far it should look for keyframes. Save current settings - Saves a config file. You can have multiple timecodes for the same sign, like {TS 5:36, 5:47, 6:52}, and the script will create a line for each sign. |
Change Case Purpose: Change case of text Supports: Non-standard characters (é, è, ï) This is as simple as it gets, and the GUI explains it, but I added some modifications. When you check 'mod': Words: This will leave words that are already uppercase, so it won't change CIA to Cia. Not that those assholes deserve such nice treatment, but this is about grammar. Lines: This won't capitalize "i", which it normally does, so this can help in other languages. Sentences: This will run lowercase first. It will mess up names and other stuff, so normally you shouldn't use it, but in case you get text in uppercase, this will save you the trouble of running the GUI twice. Lowercase: This will lowercase only words that are in uppercase. If you have weird text that has random uppercase words for emphasis, or those shitty subs with signs in uppercase, this may help. |
Significance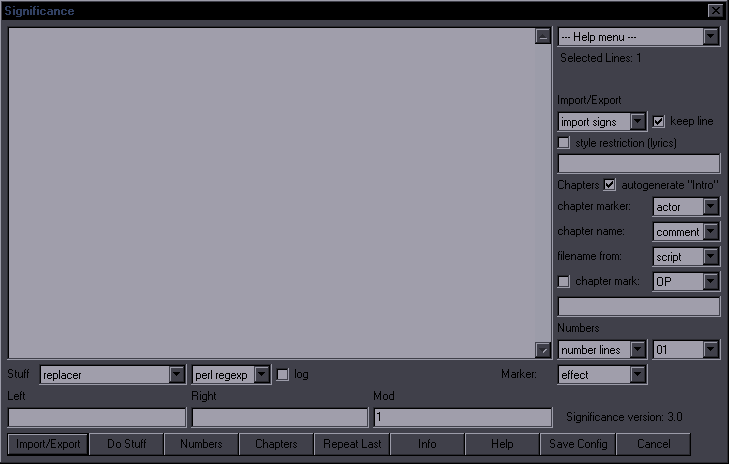 Purpose: Do a shitload of things that the other scripts don't do Features: import/export signs; make chapters; number lines; motion blur; merge inline tags; reverse text; fake capitals; clone clip; convert \k to \t\alpha; convert framerate; many special effects for styling; info about line; save config Supports: Non-standard characters for letter-by-letter operations (Note: Formerly called 'Unimportant', but that name made it seem much less significant than it is. Also, 'Significance' has 'Sign' in it, so it seemed appropriate.) This is by far my largest script. The only one over 100 KB, abour 20% larger than Relocator. (Not anymore.) It has a Help button and Help menu, so use those. It's also explained in more detail in this blog post. I might put some more descriptions for some functions here later, but for now, just a brief overview of the sections. Import/Export part  
The whole Import/Export section is just this small part on the left.
import signs / export sign are the main functions. The purpose is to save signs/templates that you're going to use often, and then load them up when you need them, usually replacing the text with text of the new sign. An imported sign can have any number of lines. When imported, the lines can either be shifted to the start of the current line, or you can match the times of all lines to the current line. You can keep the original text or replace with the curent text, or replace only certain lines and keep text of the others. You can also combine tags of the original and the current lines, with either of them overriding the other if there are the same types of tags.  You can either create lines with chapters or export chapters as xml (or txt).
To create a chapter on the current line, check chapter mark and either select one from the dropdown menu, or if none of them suit your needs, type the name in the edit box below. The same edit box can be used to enter language for the exported chapters if you don't want the default "eng". Numbers part  Do Stuff part   Some of the functions are simple and rarely useful, and they're there 'just in case somebody ever needs them'. Others are very powerful and create complex effects. They belong in the same category only because it's the "didn't fit anywhere else" category, so this whole section is pretty random. The only way to get an idea of what's there is to read the whole help for that section, and for some of the more complex ones there's help in their own GUI that you get to when you activate the function. If you're looking for something unusual and you don't know if it exists, there's a pretty good chance it might be here. Some of the functions use the Left/Right fields or the Marker, so if you just try them out without reading the help, they may do nothing. Or possibly, they may break something. |
Activ8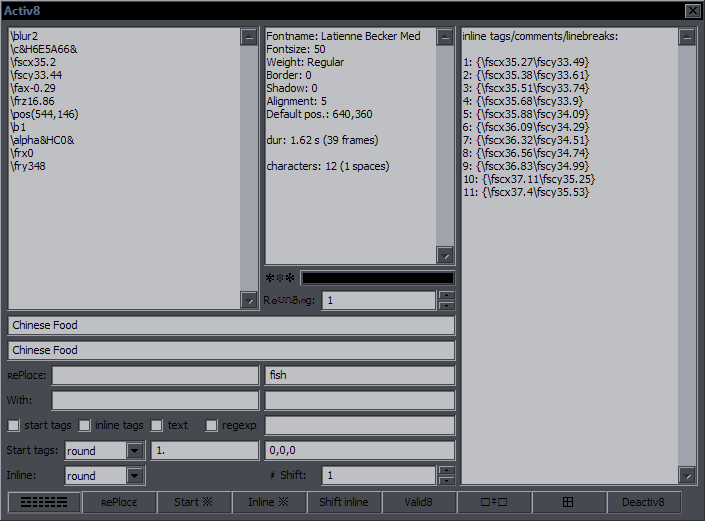 Purpose: Easily edit a complex active line Features: separate editing for start tags, inline tags, text, etc.; round values; sort tags; shift inline tags; replacer The idea for this came from editing lines like this one: {\blur2\c&H6E5A66&\fscx35.2\fscy33.44\fax-0.29\frz16.86\pos(544,146)\b1\alpha&HC0&\frx0\fry348}C{\fscx35.27\fscy33.49}h{\fscx35.38\fscy33.61}i{\fscx35.51\fscy33.74}n{\fscx35.68\fscy33.9}e{\fscx35.88\fscy34.09}s{\fscx36.09\fscy34.29}e{\fscx36.32\fscy34.51} {\fscx36.56\fscy34.74}F{\fscx36.83\fscy34.99}o{\fscx37.11\fscy35.25}o{\fscx37.4\fscy35.53}d When you look at that, you have no idea what the fuck is going on there, and if you need to find that goddamn \frx tag because you want to edit it, it can take a while. What you see in the image above is the same line loaded in Avtiv8. Everything is much clearer. The top left part is start tags. This script is useful even just for seeing the tags this way. You can edit them, delete them, add new ones, reorder them, etc. When you save this, line breaks will be nuked from the tags, and brackets added. Which means that if you add some line breaks, it doesn't matter. The part on the right is for inline tags, comments, and line breaks. The numbers are positions of the tags in the line. You can change them and thus effectively shift the tag blocks in question, but also, if you edit text, the tags will go back to their original positions with the text changed. The top mid part is not for editing but provides some information about the line and its style. The box with "fish" is style, and below it are actor, effect, margins, and then layer to the left. Tooltips will tell you what's what. All these can be edited.  In the start tags window, transforms are broken down by tags, to make things even more readable. As I've said, the line breaks don't matter.
In the middle window, you can now see some extra information. There's \move in the tags, so it now shows you by how much the line is moving, in this case 1 pixel to the left and 9 pixels down. There's also a transform with \fscx, which means the text changes size. The "scale x" in the middle window tells you how much the size changes. In this case, the size after the transform is 1.11 times the size before it. This can be considered the zoom, if that's what the sign is doing. These values can sometimes be useful information. 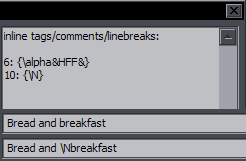 You may be wondering why there are two lines with text. The image on the right shows the difference. The second one includes line breaks. That one's only informative; the first one can be edited. In the "inline" window, you can see the line break at position 10. It's treated more or less as a tag, so you can edit the line's clean text, and the line break will return to position 10. If you change "Bread" to "Bed" and thus remove 2 characters, you could change the 10 to 8 and have the line break in the correct place, or you can just nuke the whole \N line from the inline window and re-add the break later. If you make the text shorter, tags that would end up beyond the end of text will disappear.  You can also shift all inline tags with the tool at the bottom.
This changes the numbers in the inline window and reloads the GUI with the result.  The Replacer is pretty straightforward.
You can check whether to replace in start tags, inline tags, or text, and you can use regexp.  The last part is some extra options for start tags and inline tags.
You can round values of tags based on the Rounding menu in the middle of the GUI. For start tags, you can also sort them in a fixed order. (Same as in the sort function in HYDRA.) The Valid8 button checks all tags in the active line, and if it finds some that don't seem to have the correct format, they will be listed in the middle top window. Assuming that you don't regularly produce fucked up tags, this will do nothing apparent most of the time. I think the main strong points of this script are two: 1. Editing start tags is easier when they're displayed one tag per line instead of all in one line. 2. You can easily edit text with inline tags. ModiFire Purpose: Modify existing tags Bundled with Activ8 is this tool for easily modifying existing tags. It makes use of Activ8's way of listing one tag per line, but this works for all selected lines. What you see above is 15 lines of TS loaded. Loaded in 3 groups are all tags from selected lines except: 1. No duplicates in each window. Only unique tag-value pairs. 2. No colours. (Tune Colours does that.) 3. No alphas. (SvartAlfa does that.) 4. No transforms as such, though tags from the transforms are loaded. How ModiFire works: You edit what you want, and items from the original list get replaced with corresponding items from the modified list in all selected lines. If you change that "\fscx51" to "\fscx54", every instance of "\fscx51" will be replaced with "\fscx54" - in start tags. If you happen to have the same values in start tags and inline tags, only the one you modify will be replaced. Obviously, if you change the line count, like if you delete a whole line, things will get bad. On the other hand, there are some extra options available here, because the replacer doesn't check for integrity of the tags, so not only can you edit values, but you can for example replace \blur1 with \be1, and you could even add new tags if you replaced \blur1 with \blur1\shad3\fs55. Not that this is particularly useful, but it works, and who knows, it may happen to be useful sometimes. CodiFire uses the options in the last line of the GUI. Select a tag, type a value, and all tags of that type in the selected lines will get that value, based on two sets of options from the dropdown menus:  - not in transforms / in transforms / both
- start tags / inline tags / both That list loaded in the GUI shows you exactly what tags will be affected. While Recalculator multiplies and adds values, this sets a fixed one. And while you can set fixed tags with HYDRA, this only modifies existing tags, doesn't create new ones, and uses the dropdown options for what tags to apply this to. It also has separate values for each half (fourth) of pos, org, fad, and move. PuriFire rounds values of tags to one decimal place, except for fax and fay to two decimal places. There are no options here. I had space for a few more buttons, so I came up with some more tweaks of questionable usefulness, but they're here if you need them. Negator changes positive values to negative ones and vice versa for a selected tag. Use the dropdown for CodiFire, but only these tags will be affected: frx, fry, frz, fsp, fax, fay, xshad, yshad. The menu for inside/outside transforms works for this. The one for start/inline tags doesn't, because that's unlikely to ever be useful. Just for clarity, if you select frz, then \frz5 will become \frz-5, and \frz-5 will become \frz5. Accelerator will set accel for all transforms in the selection. An edit box for the accel value will pop up, so don't look for it in the main GUI. Isolator will "isolate" a tag of your choice by putting it at the beginning of each tag block in which it is present. Aside from that, it also sorts tags like the function in HYDRA. You'll get a menu with tags to choose from. The menu is in the order the tags get sorted, so if you leave it as it is, tags just get sorted. If you pick, say, fsp, tags get sorted the same way except that fsp will be first and then the rest in the usual order. This can come in handy if you need to see a particular tag clearly in the subtitle grid. 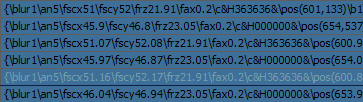 Isolator with "blur" selected. 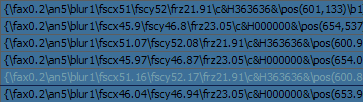 Isolator with "fax" selected. |
Masquerade Purpose: Multipurpose Features: save/load masks; shift tags in line; apply \an or \q2 tags; alpha time signs; make various replacements Masquerade Creates a mask with the selected shape. from clip takes the shape of the mask from a clip in your line. See here. create mask on a new line does the obvious and raises the layer of the current line by 1. If you select a secondary colour (\2c), this will be then used as primary colour for the mask on new layer. remask only changes an existing mask for another shape without changing tags. Save/delete mask lets you save a mask from active line or delete one of your custom masks. To save a mask, type a name and the mask from your active line will be saved (appdata/masquerade.masks). To delete a mask, type its name or type 'del' and select the name from the menu on the left. Merge Tags Select lines with the SAME TEXT but different tags, and they will be merged into one line with tags from all of them. For example:
{\bord2}AB{\shad3}C
A{\fs55}BC
-> {\bord2}A{\fs55}B{\shad3}C
If 2 lines have the same tag in the same place, the value of the later line overrides the earlier one.
an8 / q2 - Applies selected tags. q2 also gets removed when it's present. Motion Blur 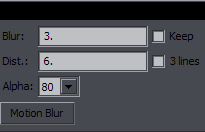 Creates motion blur by duplicating the line and using some Alpha. You can set a value for Blur or keep the existing blur for each line (Keep). Dist is the distance between the \pos coordinates of the resulting 2 lines. If you use 3 lines, the 3rd one will be in the original position, i.e. in the middle. The direction is determined from the first 2 points of a vectorial clip (like with clip2frz/clip2fax). Shift Tags The original version was only for the active line. Now there's functionality for a larger selection too, but things work a bit differently. For active line, you can shift tags by character(s) or by word(s). For the first block, single tags can be moved right. For inline tags, each block can be moved left or right.  This mini GUI has start tags on the left and inline tags on the right. Check those you want to shift. Click on Shift Left or Shift Right. Check word if you want to shift by words instead of letters, and set how many letters/words to shift by. remove selected tags deletes them instead of shifting. All Inline Tags checks the checkboxes above it. You can create regular start tags quickly and use this to shift them to become inline tags. If a tag is marked by an "arrow" - > - a different GUI is loaded. (See HYDRA for Arrow Shifter.) Here we had >\i1 in start tags. That \i1 will be shifted to where you place >. You see it's being put before "on", so the result will be {\i1}on?. The tag is removed from the original location. Of course this is pointless with \i, as that can be put inline by the inbuilt tools, but it works for any tag. For \t, it moves the whole transform. You can't move tags from inside a transform. (HYDRA won't put an arrow there anyway.) Additionally, if there's {•} in the line, the tag is automatically moved in place of •, without any GUI. (See HYDRA for Bell Shifter.) This way you're shifting tags to any place just by pressing hotkeys, without any typing.
before:	{>\shad3\blur0.6\bord0\pos(45,322)}This is a {•}test.
after:	{\blur0.6\bord0\pos(45,322)}This is a {\shad3}test.
For a selection of more than one line, things go in this order:1. If any line contains >\ and {•}, then the arrow-marked tag replaces the bell, as shown above. Lines in the selection that don't meet the criteria are simply ignored. 2. If any line contains >\ and all lines have the same text (and no {•}), you get to choose where the tag goes. Different lines can have different tags marked by the arrow. Lines with no arrow are ignored. 3. If none of the above applies, all inline tags are shifted by one character to the right. If the line ends with {switch} comment, tags shift by 1 character to the left. The Shift by option lets you shift by more than 1 character. See Cycles script for the macro that adds/removes the {switch} comment. Alpha Shift 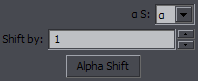 Makes text appear letter by letter on frame-by-frame lines using alpha&HFF& like this:
{alpha&HFF&}text
t{alpha&HFF&}ext
te{alpha&HFF&}xt
tex{alpha&HFF&}t
text
The original lines must all have the alpha tag at the beginning.The Shift by option works here too. Not that it's very useful, but making it work when it was added for Shift Tags was easy. If you switch from α to 1a in the GUI, \alpha tags will be changed to \1a tags. Alpha Time Either select lines that are already timed for alpha timing and need alpha tags, or just one line that needs to be alpha timed. 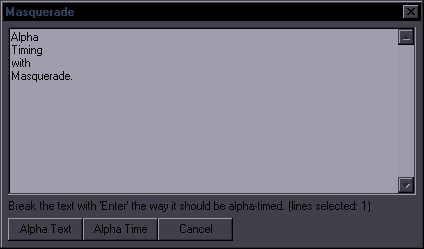 In the GUI, split the line by hitting Enter where you want the alpha tags. If you make no line breaks, text will be split by spaces. Alpha Text is for when you have the lines already timed and just need the tags. Alpha Time is for one line. It will be split to equally long lines with alpha tags added. If you add "@" to your line first, alpha tags will replace the @, and no GUI will pop up. Example text: This @is @a @test. Strikealpha Replaces strikeout or underline tags with \alpha&H00& or \alpha&HFF&. Also @.
{\s0}	->	{\alpha&HFF&}
{\s1}	->	{\alpha&H00&}
{\u1}	->	{\alpha&HFF&}
{\u0}	->	{\alpha&H00&}
@		->	{\alpha&HFF&}
@0		->	{\alpha&H00&}
@E3@	->	{\alpha&HE3&}
1@		->	{\1a&HFF&}
3@0		->	{\3a&H00&}
4@50@	->	{\4a&H50&}
If no replacement is made, it will reorder alpha tags in each block so that all 1a-4a go after alpha.It can also use the Bell Shifter and Wave Shifter to do a few things. 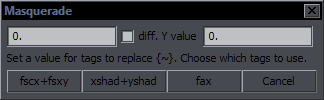 If there's {~} in the line, this 'menu' will pop up.
If you type 80 in the first edit box and hit fscx+fscy, you'll get {\fscx80\fscy80} in place of that {~}. The same way, you can get {\xshad5\yshad5} if you type 5 or {\fax0.1} if you type 0.1 and use the other buttons. It's a quick way to create some inline tags. I chose the scaling and shadows because they are combos usually used together, so this way you add both at once, and fax because that seemed to be the most commonly used inline tag aside from colours. If you want fscy to differ from fscx or yshad from xshad, use the checkbox and the other edit box for the second value. With the Bell, something completely different happens.
You can comment out parts of this {•}line with Strikealpha and Bell Shifter.
You can comment out parts of this {•line }with Strikealpha and Bell Shifter.
You can comment out parts of this {•line with Strikealpha and Bell Shifter.}
You can comment out parts of this line with Strikealpha and Bell Shifter.

You can comment out parts of this {•}line with Strikealpha and {\i1}Bell Shifter{\i0}.
You can comment out parts of this {•line }with Strikealpha and {\i1}Bell Shifter{\i0}.
You can comment out parts of this {•line with Strikealpha and }{\i1}Bell Shifter{\i0}.
You can comment out parts of this line with Strikealpha and {\i1}Bell Shifter{\i0}.
If you place the Bell somewhere, Strikealpha will comment out the word after it. With another go, it will extend that comment untill it hits another {tag} or {comment} or the end of the line. Round 3 will uncomment that part, returning the text back to normal.
SvartAlfa 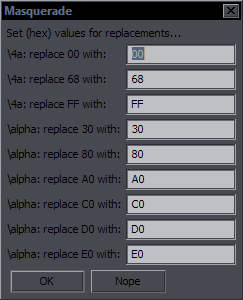 This Strikealfa alternative is called SvartAlfa because it was written by dark elves. (You didn't think I write all this shit by myself, did you?) They're good at blending in and disappearing, so it makes sense that they would know how to use alpha tags.
When you run this, it collects all alpha tags from selected lines, including 1a-4a, and loads them in this GUI you see on the left. As you can probably guess from the image, this allows you to tweak some values easily, no matter where the tags are (inline, transforms, whatever). Duplicate values aren't collected, so each FF for 1a will only be shown once, and if you change it to 80, then every \1a&HFF& in the selection will become \1a&H80&. Obviously you must set correct 2-digit hex values. Anything else will be skipped. The main point of this is that you can edit inline alpha tags for multiple lines easily. Recalculator doesn't do alphas, so this is to fill in that gap. It's probably not something you would run on large portions of the subs file (the image is from some 360 lines), so you'd normally only see a few lines. The Svart menu in the main GUI is the maximum of results that will be shown, so if you select all lines, this prevents the GUI from going off screen. The default is 20, but you can set it higher if it fits on your screen. I could load the max. 45, but honestly, it makes little sense to use it like that. (If it does go off screen, Enter and Escape trigger the buttons, like with almost every GUI in my scripts.) Also, if you hit the limit, the GUI will tell you what the total was, so you'll know how many you've missed. Betastrike This is an alternative option for strikealpha that replaces \s and \u tags with some other things.
{\s1}word1 word2 word3 word4{\s0}	-->	word4  word3 word2 word1
{\u1}some text1 {\u0}other text2		-->	other text2 some text1
[the space before {\u0} will remain there; \s and \u tags can be part of a larger block]
{~}{\tags1}abc def {•}{\tags2}ghi	<->	{•}{\tags2}abc def {~}{\tags1}ghi
{~}word1 word2 word3 {•}word4		<->	{•}word4 word2 word3 {~}word1
{~}{\tags1}word1 word2 {•}word3	<->	{•}word1 word2 {~}{\tags1}word3
Words between \s1 and \s0 will be reversed. Sections of text between \u1 and \u0 and from \u0 to the end will be switched.The ones with 1 must always be before the ones with 0, though that's how they should naturally occur. The part between s1 and s0 should not contain tags or comments. Then there are switches with {~} and {•}. (See HYDRA's Bell Shifter and Wave Shifter.) You need one of each, in either order. If they are both before tag blocks, those tag blocks get switched. If they're both before words, the words get switched. For this purpose, a "word" includes letters, numbers, _, and '. Not punctuation. If one is before a word and one before a tag block, the tag block gets moved to the location of the other mark. Strike and Underline tags get removed, but ~ and • stay, in this case. (They're comments, so they can be left there.) 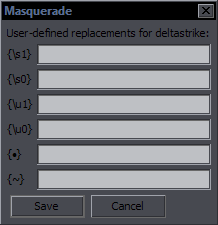 Deltastrike
This gives you yet more options, and this time you can define them yourself. You get to this image on the left when saving config. Here the \s and \u tags must be separate from other tags. You can type whatever you want in those 6 fields. Converter This is a separate macro in Masquerade that goes even further than Deltastrike.
You can define a whole list of conversions/replacements to be made upon pressing a hotkey. They are literal, so be careful about mismatching things. When you have it set up and run it, and it replaces things, there's no GUI. All you may see is some things changing in the Subtitle Grid. When it doesn't replace anything, because it doesn't match anything or because there's nothing in the list, the image you see on the right will pop up. If you have things set up and it's just that nothing was matched, you can just Cancel this. Or you can add new things to convert, by typing into the two edit boxes. For replacements you're sure you always want, use the always option. Otherwise you may choose ask, and every time one of those is relevant, you will be asked if you want to replace that thing. 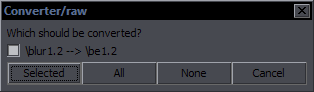
If there is a list of several options, you can select ones you want and press Selected, or if you accept all, you can press All and don't need bother selecting, or choose None if you want none of these at the moment, and only the always ones will be done. 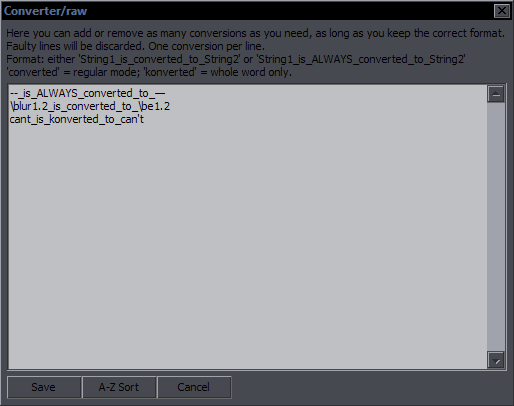 If you press Edit List in the first image, you get to see the whole list, and you can change, add, or remove anything. The format is as shown, with the two options - always/ask. You can make conversions of tags, or all kinds of editing tweaks. If you mess up the format, the line will be ignored and not saved. When adding new items, you can also check Whole word only. In the Edit list, these have the "konverted" spelling, to be distinguished from the rest. In the example you see on the left, this will prevent converting "canteen" to "can'teen". The Converter has two macros, raw and clean. They are almost the same and use the same list, but the clean one only replaces things in visible text, skipping tags and comments, which may be more useful to editors. Thanks to the "ask" option, you can have some overlapping choices. You can have \blur1.2 replaced with \be1.1, \be1.2, and \be1.3. (3 lines). Since you'll always be asked which ones you want, you can select one of the three and ignore the other two. This way you can also have two-way conversions like clip<->iclip. If you used those with ALWAYS, the second one would always revert the first one. Of course a functional clip conversion already exists, but you can apply this to anything. You can also use this to clean up some specific things, like leftovers from Arrow Shifter or the Switch. (Replace '>\' with '\', and '{switch}' with '' [empty string]. Incidentally, in this case, both of these would only work with raw Converter, so using the clean one would do other replacements without messing with this, even if they're set to 'always'.) Of course you can set some more conversions for {•} and {~}, even multiple ones with 'ask' (or just have them removed), as well as for underline and strikeout tags and whatever else can be introduced into the lines quickly and easily. To have some feedback, I have made it that when the selection is over 20 lines, you'll see a log of the changed lines so that you can see whether something went wrong. Under 20 lines, you should be able to see the changes in the Subtitle Grid easily, and I didn't want something unnecessary to pop up every time. |
NecrosCopy Purpose: Multipurpose Features: clip2fax; clip2frz; copy things from one line to others; split line into parts (Note: Formerly 'Fax This' / 'CopyFax This'. Renamed because I got bored with those names.) clip2fax/frz clip2fax calculates value for a \fax tag from the first two points of a vector clip. The clip should be in the vertical direction of the letters. The point is that however you stretch and rotate (only frz, not x and y) the letters, they will vertically always align based on the clip's direction. If the clip has 4 points, points 3-4 are used to calculate fax for the last character. If autogradient is checked, a gradient by character is made. \fscx, \fscy, and \frz are supported. If you have a bunch of lines with different rotations but same vertical alignment (this often hapens when typesetting a multi-line text on some paper), you can tweak each rotation as needed as many times as you need, and then select all lines, make the vertical clip line, and all lines will get the right \fax values. clip2frz switches to \frz mode instead of \fax. It calculates \frz from the first two points of a vectorial clip. Direction of text is from point 1 to point 2. If the clip has 4 points, the frz is average from 1-2 and 3-4. (Both lines must be in the same direction.) This helps when the sign is in the middle of a rectangular area where the top and bottom lines converge. Both these functions are explained/shown with images in the Alignment section of the TS guide. They both also exist in Relocator, but as they are two of the most useful functions for typesetting, I included them here for quicker access. They can also use hidden clips. Copy functions All copy functions [necroscopy, tags, text, colours] copy things from the first selected line to the other selected lines. If the other lines already have the thing that's being copied, it gets replaced, of course. bottom up reverses the direction of copying, and things are copied from the last selected line upwards. Necroscopy This lets you copy almost anything from one line to others. The primary use is to copy from the first line of your selection to the others. If you need to copy to a line that's somewhere far away in the grid, just click Copy with the selected things and then use Paste Saved on the line(s) you want to copy to.  The GUI always loads data from the first (or last with 'bottom up') selected line (not active line). Check what you want to copy from this line to the other lines in your selection. The tags on the left are start tags; on the right are inline tags. Inline tags will only be pasted to the first tag block. As you can see, you can also copy Start Time, End Time, Style, Text, Actor, and Effect. If you select only one line, check some things, and click Copy, this will be saved in memory. (It's the script's memory, not clipboard, so reloading automation nukes it, but it leaves clipboard free for other things.) You can then select one or more other lines and click Paste Saved, and the things saved in memory will be applied to those lines. You can also copy tags inside one line. This is similar to Shift Tags, but it leaves the tag in the original position too. So you can type an asterisk (*) before "nazg", check "\blur0.6", and the blur tag will be copied there. Copy tags after all linebreaks copies selected tags after all line breaks in all selected lines. This is useful when you have gradient by character and line breaks - you need the gradient for each "line" separated by line breaks, so you copy the needed start tag after each line break. [Un]hide lets you hide/unhide checked tags (by making them comments). If you check a tag, it gets hidden. If you don't check anything, whatever was hidden gets unhidden. This way you can hide something that you want to reuse later. Good for clips, for example. {\fad(2000,0)\an6\blur0.6\pos(980,108)}Azure Waters Check "\fad(2000,0)", click [Un]hide: {\an6\blur0.6\pos(980,108)}Azure Waters{//fad(2000,0)} The fade is now just a comment. If you run the script again, check nothing, and click [Un]hide, the line will return to its previous state. This has now been implemented in other scripts as well. Relocator can hide clips, and Script Cleanup can hide/unhide anything. The one thing that's an extra here is that while it only applies to one line, you can unhide one tag out of many, while SC unhides all. Copy Tags Copies the first block of tags in its entirety from first selected line to the others. copy style with tags will also copy the style. If you're using the same tags, you probably want the style too. Copy Text Copies what's after the first block of tags from first selected line to the others (including inline tags). only visible text will copy only visible text, i.e. no inline tags or comments. Copy Colours Copies checked colours (and/or alphas) from first selected line to the others. Unlike Necroscopy, this can read the colours/alphas from the style when tags are missing. 3D Shadow Creates a 3D-effect out of a shadow by making multiple layers with different shadow size, using xshad and yshad.  Split by \N Splits a line at each line break. If there's no line break, you can split by tags, spaces, or a marker. If you want to split by tags or spaces when you have line breaks, check the split GUI option. If you split by anything other than line breaks, then those get nuked.  Splitting will try to keep the position of each part. I decided not to add a \pos tag when there isn't one. It should support \fs, \fscx, \fscy, \fsp, \fn, \frz (but not inline), \move, and \an. (The positioning will be off in those cases.) In general, you can always expect some small inaccuracies wit the positioning, but the splitting will work fine. Split by Clip When splitting by spaces, there's an option to use a clip for positioning and rotating the words. It works like this: CP1 word1 CP2 word2 CP3 word3 CP4 [CP=clip point] You draw a clip with points at the start of the line, between the words, and at the end. Word1 will end up with \pos between CP1 and CP2 (and set to \an2, 5, or 8) and will be rotated along the line between them. Each word's position and rotation is thus determined by the two clip points around it. The clip must have one more point than there are words in the line, otherwise it's ignored. This is explained in more detail with images in the Alignment section of the TS Guide. Just a short illustration here:  --> -->  This works with "Tags" as well. You can have however many inline tags you want, but the clip must have one more point than that, and each clip segment is the part between two tags, so it's up to you to figure out how that's gonna work. It's the same as with the spaces, but those are more obvious on the video. To make this a bit more versatile, I added another option. This was mainly because sometimes, instead of by words, I just wanted to bend the line in one or two specific places. To do this, you can use the Marker option, and set the markers anywhere in the line. Let's say you want to split the line only before the last word, to make a kind of hockey stick shape. The marker can be anything, but a good choice is {}, because you won't see it in the video, and thus it won't change the look of the line. So it would be like this: Word1 word2 word3 word4 {}word5. You would draw the clip from the start to the marker, and the 3rd point at the end. Now when the GUI opens, you type {} into the Marker field and click on Marker. "Word1 word2 word3 word4" will be aligned to the first clip line, "word5" to the second. This gives you the tools to align the line pretty much any way you want.  --> -->  The line is: split by not a clip but {}marker The bonus here is that you can have two clip points between words. To give an extreme example, say the first part of the line should be somewhere at the top of the screen, and the second part, instead of continuing from the end of the first, will be disconnected, somewhere at the bottom of the screen. So you use the clip to make 2 points at the top and 2 at the bottom. Now you have a middle line that would normally get the second part of the text, but you'll use a simple trick: Word1 word2 word3 word4 {}{}word5. You just type the marker twice. Now the middle line contains no text, as there is none between the markers, and so it will be ignored completely. "word5" will be aligned to the third clip line, wherever it is. If you're not using a clip, you can still split by any marker. Note that whatever the marker is will disappear from the line. You can split by commas, for example, but they'll be gone from the resulting lines. [A last-moment change in v4.0 caused an issue where the {} wouldn't work as marker. Fixed in 4.1.] Split Text into Letters  This is the same as "Space Out Letters" in Relocator.
It makes a new line for each letter of the text.
This is the same as "Space Out Letters" in Relocator.
It makes a new line for each letter of the text.You can set a distance, and the line will be split into letters with that distance between them. Value "1" is the normal distance, otherwise the value is pixels. You can randomly expect about 1% inaccuracy. With a rectangular clip, the script tries to fit the text from side to side of the clip. Sometimes the split is so perfect that I don't even notice that anything happened; soetimes it's a few pixels off on one or both ends and it's hard to say why that happens. If the calculations were wrong, the errors would be more consistent, so I think the whole text measurement inbuilt in Aegisub has some rounding errors or whatever. \fscx, \fs, \frz, \fn, and \move are supported (from 4.1). Other rotations aren't, and line breaks get nuked. \fax is not a problem; \fay will just apply to each letter but not affect position. \frz will only work right without \org. Inline tags should work unless they have impact on the size/position. |
Encode - Hardsub Purpose: Encode a clip or the whole video with or without hardsubs, using x264 encoder Requirements: - x264.exe (8-bit and/or 10-bit depending on what you want to do. Mocha clips must be 8-bit.) - vsfilter.dll / vsfiltermod.dll for hardsubbing - avisynth (not required when encoding for mocha) Buttons: Encode - Creates scripts for encoding with settings from the GUI. It will ask if you want to encode now or later. x264 - Navigate to where your 8-bit x264.exe is. The path will appear in the top line of the GUI. x264 10bit - Same for 10-bit x264. vsfilter - Same for vsfilter.dll. vsfiltermod - Same for vsfiltermod.dll. Target - If Target folder is Custom, then this loads the path to the folder where you want your encode to go. The dialog only select files, so you have to select a file in that folder (or just type the path in the GUI). Secondary - Select secondary subtitles. Enc. Set. - Shows a list of recently used encoding settings to choose from. Save - Saves settings. Other Options: Source video - The video from which you're encoding. This will automatically show the name of the video you have loaded in Aegisub. Target folder - If Same as source, then the encode will be where your source video is. If Custom, then you need to specify a path. Encode name - Specify which extension you want, and adjust the encode's name if needed. Primary subs - Choose which filter you want to use. The file you have loaded in Aegisub should show up there. Secondary - Check this if you want two subtitle files, choose filter, and use the Secondary button to load a file. Encoder settings - Settings that will be used for encoding. Change as you wish. Settings 4 mocha - Settings that will be used instead if you check Encode clip for mocha. Trim from / to - First and last frame of the clip you want to encode. If unchecked, whole video is encoded. Mux with audio - Includes audio in the encode. Encode clip for mocha does automatically the following (meaning you don't have to do those manually): - disables 10bit - enables trimming - disables subtitles - sets target to .mp4 - disables avisynth use 10 bit - Uses the 10 bit x264 binary specified in the settings at the top. Delete batch file after encoding - Deletes the encoding batch file when done. Delete avisynth script - Same for the avisynth script. Delete A/V after muxing - Deletes temporary audio/video files when muxing with audio. Keep cmd window open - Keeps the cmd window open when encoding's done. This allows you to see what errors there were if encoding doesn't work. You can encode clips for mocha with this if torque's Motion script fails to encode for some reason, or you can use it for easy hardsubbing. |
Multiplexer Purpose: Mux video with subtitles, suitable for muxig fansub releases Features: create CRC; create xdelta; automatically use group tag; two subtitle files; mux chapters Half of this script is documentation, so there's really nothing to add here. |
RunemapPurpose: Show a list of hiragana/katakana with corresponding romajiThis was mainly a fun experiment to see if I can do this. (It was very tedious.) If you're typesetting and don't know which sign is which, this can help you identify them. If you type hiragana/katakana/romaji words in the corresponding fields and click on Transcribe, you should get the other two. It's probably buggy, and I probably won't fix anything much about it. |
Backup Checker Purpose: Save a backup of your script so that you can later check the original lines after you've edited them The GUI looks pretty much like Multi-line Editor, just with different functions. Load from Memory - Loads lines from memory, which is also what gets loaded by default (if you saved it before). Load from File - Loads lines from the file with the filename you see. (Type to change if you want from a different one.) Save to Memory - Saves the current script to memory. (This gets erased if you reload automation scripts.) Save to File - Saves it to a file with the name you see there, in the .ass script's folder. (You can make any number of these files.) Memory to File - Saves the content of memory to a file. File to Memory - Loads the content of a file to memory. No Comments - Removes {comments}. You can easily switch between different backups. If you split/join lines, the backup will be off by those, but you can just select more lines to load the ones you need to see. |