|
|
ASSDraw can be pretty useful for masking, but also for actually drawing some fun things, if you're a typesetter with imagination. Most of the time, for masking, this will be enough: {\p1}m 0 0 l 100 0 100 100 0 100 You'll use the scaling tool to stretch it and mask anything with roughly rectangular shape. If you add border, like \bord20, you can have round edges too. If you scale it down to 1 pixel and add border, you'll even have a circle. I'm sure you now understand how to make an ellipse, which you can then rotate etc. So for most masks, you won't need ASSDraw. But what if you do... I'll use a funny example from a recent episode. It's a bit unusual way of using ASSDraw, but it will do for this guide. 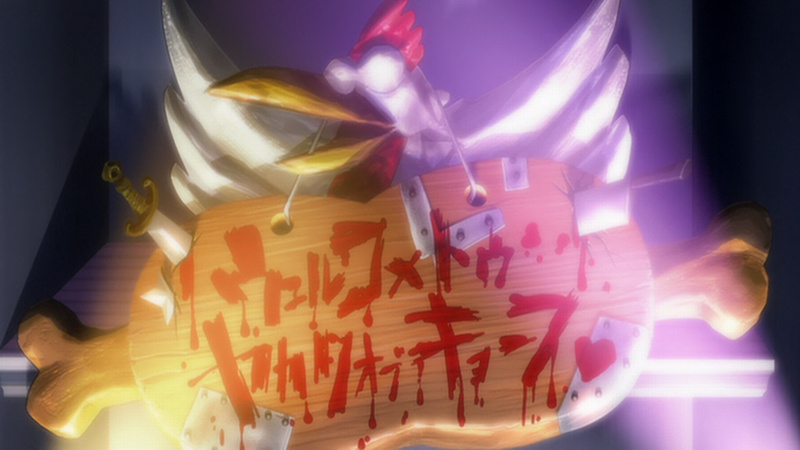 So I was supposed to typeset this sign. I'm thinking "What the fuck am I supposed to do with this? There's no space for the typeset unless I make it so small that it will be unreadable. I can't mask it either unless I wanna pull some retarded hadena stunt that would forever ruin what little reputation Commie has left. It's even fading out just to make it more complicated. What now?" After considering my options for a minute I decided that there's no point in trying to do the impossible. It's either \an8 or I have to come up with some unusual idea. And I really don't like \an8. I don't think I've ever done that. So I decided for ASSDraw. Here's how you use it: 1. Open it. [Duh] 2. Drag the zoom slider [under 'Background' in menu] all the way to the left. 3. In Aegi [on a frame where you wanna use the mask] right click on the screen and select "Copy image to Clipboard". 4. In ASSDraw go to Canvas -> Paste [or Ctrl+V]. You can set the opacity to 100 - better in most cases. 5. At coordinates 0,0 there's a red dot [actually a cross if you zoom in]. Right-click and drag it around. Put it where you want the drag point of your drawing to be [the anchor in aegisub] 6. Last 2 icons in the menu are 'Pan drawing' and 'Pan background'. First one should always be on. The second one you'll turn on after step 5 [ie now]. 7. Draw stuff. 8. Copypaste the final coordinates to aegisub. It's easy once you go through the process for the first time. The pain in the ASS for beginners is to figure out how to get the result in correct zoom and how to not have the anchor point 2000 pixels away from the actual drawing. That's what points 2, 5 and 6 are about. Now for the actual drawing. You could probably figure it out by yourself. That red dot/cross is the starting point. You can either work from there, or move the point, or create a new one. At the bottom of ASSDraw you can see "m 0 0" That's the starting point. If you start from there, it will also be the anchor point in Aegi. If you want the anchor point in the centre of your drawing, move the starting point or create a new one. Select Drag from the tools to move points. Select Move to create a new one. If you make a new one, delete the "m 0 0" from the line below. You have a starting point, so now you want lines. Obviously you'll choose Line from the tools and start drawing. Kinda like clipping in Aegi. Since you have 'Pan background' enabled, you can now zoom in [with the slider or mouse wheel] and move the screen with right click or arrows as much as you want. Just place dots with the Line tool till you have what you wanted to draw. Alternately there's the Bezier tool, just like with clipping in Aegi. Simple enough. A little demonstration: 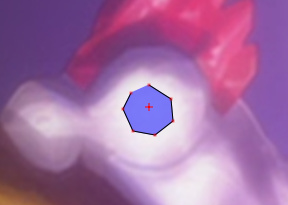 This is ASSDraw. The red cross is the centre. The line is "m 0 -11 l 11 -4 l 12 7 l 3 14 l -8 12 l -13 1 l -9 -7" Copypaste it to Aegi with these tags: {p1\an7}m 0 -11 l 11 -4 l 12 7 l 3 14 l -8 12 l -13 1 l -9 -7 Then position it where you want it to be. 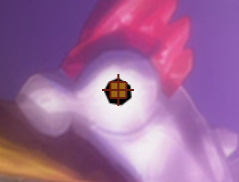 You'll end up with this. The point of aligning the red cross and using \an7 is that you have the anchor point where you want it to be. If you don't do that, things will still work, but your anchor point for this little drawing can end up on any place on the screen or even outside of it, which is a bit inconvenient. So you draw what you actually want... 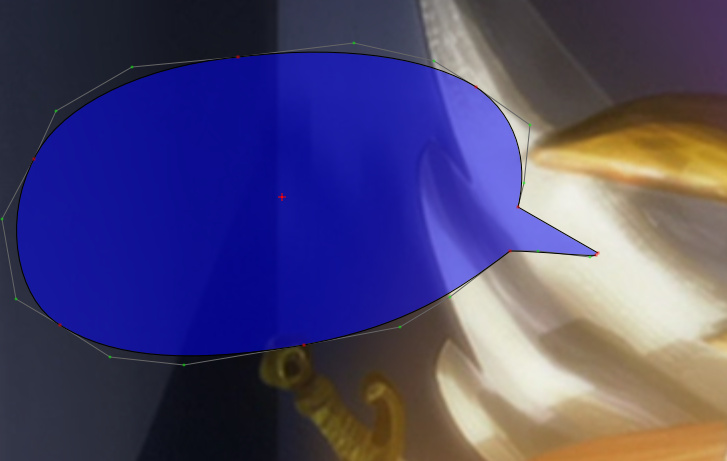 2 straight lines and the rest is Bezier. You can paste it in Aegi and see how it looks, then fix it some more and just paste the new line over again.  This is the result, in 2 layers, one with border, set colours and some transparency. Now you just add the styled text, and you're done. 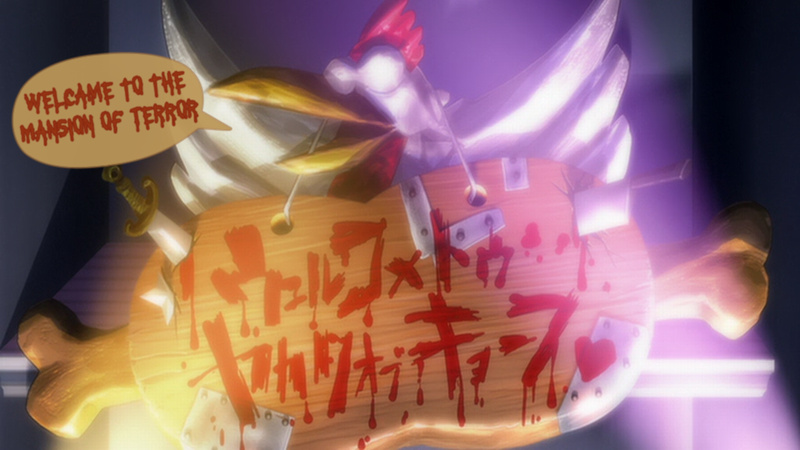 So that's how you typeset a sign like that. It may still be a bit ridiculous, but if you can typeset this and make it look better than this, please show. Also, the "welcame" is intentional, so you can stop laughing. How to make hollow shapes? One thing that may be hard to figure out is how to create an empty space inside a drawing. 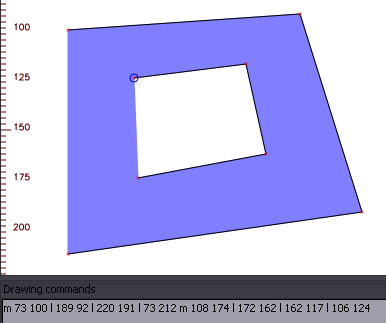 Each of the two shapes starts with m. The trick is that they have to be drawn in opposite directions. If you draw them in the same direction, you'll get this: 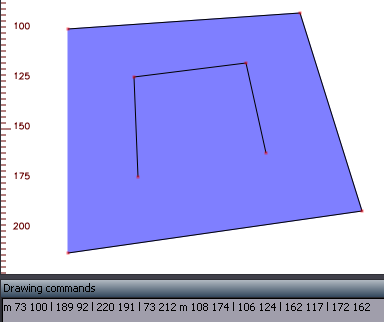 For illustration of what can be done with this, check this thing made by KKRais. And another example of what I did recently:  I couldn't find a font that I'd be satisfied with and wanted to try some drawing anyway, so I drew the whole title. Sometimes people give me ideas... < Haidaraaaaa > there needs to be an optional assdraw test. < reanimated > if optional, you can just make one for yourself < reanimated > like "draw an elephant with ASSDraw" < reanimated > there you go < reanimated > actually lemme try that  So I did. 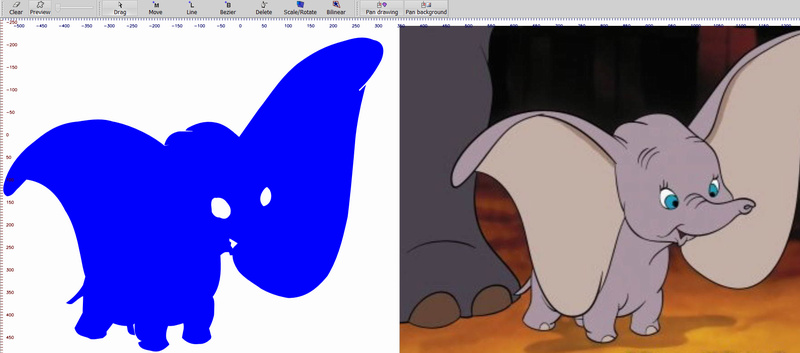 In the meantime Haidaraaaaa tried a cute elephant but got something out of a nightmare instead... You can use ASSDraw to make additions to your text, like I did with the M in Muromi here:  ASSDraw has no saving option and some bug when using Ctrl+Z that can mess things up pretty bad, so make sure to back up your drawing coordinates every now and then. 2015 Note: ASSDraw does have a saving option.  For most simple drawings, you can just use the clip tool in Aegisub and convert the clip to drawing with a script. |