|
|
This chapter will be a collection of fairly random tips. While the rest of the guide has been more or less systematic and step-by-step, here I will address various things from different perspectives, grouped together by other criteria than before. At this point I also assume that you can already typeset, so this will be more about efficiency. But first, allow me to reflect on what has happened during my time of 'putting text on screen'. Evolution of Sorts It's been 7 years since I started fansubbing, and typesetting has gone through a number of phases. Back then, there were only a few people who understood the whole concept of typesetting well enough to produce something of value. Even so, matching the original sign was only marginal, nobody was using blur, nobody was using layers, there were almost no scripts (except for kara?), and for the most part, \an8 was considered typesetting. I started as a timer and had no plans for becoming a typesetter. Had I stuck to that, I wonder where typesetting would be today. Right around that time, though, Commie's main (i.e. only) typesetter quit, and there was no (competent) replacement. When I saw what was being produced, I realised I could actually do better, simply because I knew a few tags and what they did. Yeah, at that time, that was enough to be better than almost everyone else. So I took over somewhere in the middle of whichever BakaTest we were doing back then. Already before the end of the season, I was doing things that made people go "Wow, how did you do that?" and "What, that was typeset?". And so it began. I like creative work, and there was no one else to do it anyway, so I first learned everything I could about all the tags from the official documentation and then started experimenting. As the TS got progressively better, this began changing the standards rather quickly. Those who were still doing just basic work were soon being laughed at, and typesetting became quite a competition between groups. I started writing this guide to share what I had learned, and others, being given the essential guidelines, were figuring out some more things, and the knowledge was building up. I didn't know anything about programming, so at first I was making scripts by taking existing ones and modifying them only very slightly. There was this primitive "add \be" script that I changed to "add \bord" and about 10 other versions. Pretty ridiculous in retrospect, but that was all I could do. It was only when lyger wrote some lua scripts that things sped up again. It took a while, but he managed to teach me the basics of lua and of how the whole subtitle object in Aegisub works. Honestly, I wasn't very fast at grasping it. =/ But I really wanted to (and needed to, given that I was doing like 10 shows per season around that time), so I persevered (and bothered him a lot, to the point that he wrote that one part of this guide). Once I figured out what the fuck I was doing, the limits were only in imagination and started dropping like flies. Typesetting now and typesetting in 2011 are worlds apart. By around 2015, I couldn't really think of anything new to write, because I had written everything I could envision. Unfortunately, with all the scripting, and after timing about 300 and typesetting about 600 episodes, my hands died, and some days I couldn't even touch anything because of the pain. It took 3 years for it to get somewhat better, and it's not over yet. But at least I can use the computer more or less normally. (Of course timing or typesetting every day does not qualify as "normally".) So I'm typesetting a little again, writing some new functions (mainly because it's fun, rather than out of any kind of necessity for it, but a few interesting things have come out of it), and writing some new things on this website. What has happened in the last 3 years? Well, mainly fansubbing in general has almost died. Only a handful of groups still edit and typeset for real. On the other hand, there are like 20 groups that download HorribleSubs, extract the subtitles, put them on a different raw without any change to the text, and release that. I guess it's easier than editing and typesetting. No issue with that per se, but when I'm looking for "some better subs than HS" to watch, I can't find shit. I suppose the fact that almost everything is on Crunchyroll these days has convinced most people that doing anything better is not worth the effort. Crunchyroll is pretty bad in many ways, and I don't like when I have to watch HS (which is partly why I started subbing again), but that's where we mostly are now. Most people don't care about quality. I'm grateful to the few who do and still make good releases. (Heck, I'm even grateful for herkz at this point, though he almost exclusively picks terrible shows. Still, gotta give him credit for remaining probably the most productive fansubber.) So we have come full circle, in a way. We have mostly crappy typesetting today (if any) because it's done by Crunchyroll. Typesetting in 2013 I've found some fun things on my HD, so let's have a look at that, first. June 2013 was when I started writing my own scripts. Before that, I only modified other people's scripts for completely trivial things. By the end of May, I guess, lyger managed to get me from "completely retarded" regarding lua to "ohhh! ...no, I still don't really get it." I think I was mainly just using gsub and thus figuring out the mysteries of regexp, or lua's version of it. After a month or so, I was able to do this: 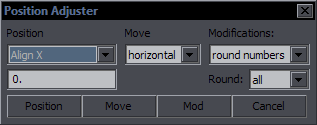  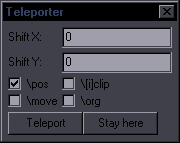
Each dropdown in Position Adjuster had... wait for it... two items! You can probably recognise that these are what 3 months later became the first version of Hyperdimensional Relocator. But this was huge progress back then. The only advanced things that existed at this point were lyger's gradient scripts (which replaced Gradient Factory, thank Satan, because that was horrible), border-split (for layers and blur), and fbf-transform, but even those were only a few months old, i.e. early 2013. Maybe the only really cool thing before that was torque's Motion script, which, however, in 2012, almost nobody used because almost nobody knew how to use Mocha. So mostly we just had "Add Tags", which was a small GUI where you typed something like "\bord3" and that was added to all lines, with no check whether there was already a \bord tag there or anything like that. To save myself a bit of that typing, I made variations with "\bord0", "\blur0.6", "\shad0", etc. already typed in, so I only had to change the 0. 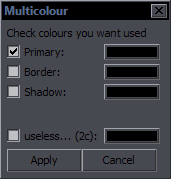 In mid June, I made this... with a comment at the top that said "why the fuck has nobody written this yet?" which showed my frustration at the fact that I, somebody who still had no idea how this fucking lua thing worked, had to write something as basic as adding colours to selected lines, because apparently nobody else had created such modern blasphemy before. You could only use Add Tags and type (paste) the colour tag there.
A month later, this somehow evolved into the first versions of HYDRA, which had this, 20 other tags, and could do transforms. That was some cool shit. It was so cool that many people said, "OMG, this is so confusing! All these options and stuff! I don't know what to do with it... I'll just use Add Tags." And some did that for, like, years to come. Seriously. I also found this on my HD: 
Judging by the awesome name "---test2---", I'm pretty sure nobody other than me ever used or had this, but as some of you can see, this is how the QC script later came to be, apparently. To see more of this, you can check this page. So yeah, things were nothing like they are now back then. Now, remember Acchi Kocchi? The show that had about 100 signs per episode? Well, I did that shit in early 2012. So imagine what that looked like. I spent 8-12 hours on each episode. Wonder how long that would take today. It was fun to work on that, but dude, 12 hours in a row... So those of you who came to this later, if you sometimes feel like typesetting is pain, look at this and be happy. Typesetting in 2018 I've seen a few good releases from the last 3 years, so there must be a few guys out there who can still make some use of this guide and the existing tools. Typesetting should be really easy nowadays, but maybe it's not quite that for some. Rather than there not being enough info, though, the problem seems to be that there's so much, and so many scripts and functions, that people find it hard to find what they need or what's important. Lots of time is wasted on inefficient methods. So I want to use this last chapter to address this problem and look at things from various points of view, even though I'm not sure if there will be more than like 2-3 people reading this. This section will be a bit all over the place. I want to talk about what things can be done and how, and what things shouldn't be because they amount to completely unnecessary effort. A few weeks ago, I saw an apparently recent video of somebody typesetting. He was TYPING tags and copypasting them from one line to another by, you know, selecting the tag carefully, ctrl+C, going to a bunch of lines, and pasting it there with ctrl+V one by one. Holy shit, I thought, what the fuck is he doing? So much effort, so much time wasted, so much wrist-killing activity. (He's probably OK on the last one for now, but give it a few years...) So, don't fucking type tags! That's like stone-age-era typesetting. But first, a few words about hotkeying. Use Hotkeys for EVERYTHING It's not just scripts. I'm sure you use hotkeys for timing, and the same way, just about anything in Aegisub can be hotkeyed. Create a new line, go to end of line, set times to nearest keyframes, colour pickers... hotkeying all of that makes work much faster. But don't just add hotkeys under Default. Set Hotkeys under Video and Subtitle Grid For typesetting, this is a must. It lets you have LOTS of hotkeys and lets you have single-key ones. The Default ones are limited because they also work in the Subtitle Edit Box, where you need keys for typing. But when the video or subtitle grid are active, you can't type anything anyway, so you can hotkey the most used scripts (and other functions) to just "A", "S", "D", etc. Using the first letter of the script's name makes it easy to remember, and even if several scripts share a letter, you can use "D", "Alt+D", "Shift+D", "Ctrl+D", "Alt+Shift+D", "Ctrl+Shift+D", "Ctrl+Alt+D", and probably even "Ctrl+Alt+Shift+D", but no need to go that far. This goes for all letters and numbers and a few other keys, so you have a few hundred options. Additionally, the numpad numbers are considered different from the regular ones. So I hope nobody's actually clicking on the Automation menu at the top and looking for scripts there. The 10 minutes it'll take you to set up the keys (might wanna backup hotkey.json so you don't have to do it again if something bad happens) will ultimately save you many hours. You shouldn't have to look for anything in the top menu, and basically you shouldn't use your mouse for clicking anything that's smaller than an icon. Speaking of icons, I have even switching between the icons on the left of the video hotkeyed. Often I have a more complicated hotkey under Default, so that I can use it no matter what, and a simple hotkey under both video and grid, and sometimes even audio if that's useful. The video and grid ones are just clones of one another, since with typesetting you go from one to the other a lot and need the same hotkey to work in either case. So... Don't Fucking Type Tags! This was pretty bad even in 2013. I don't know why anyone would do that now. There are two ways you can create most tags. One Click Solution for some of the most used ones - blur, border, shadow, alpha. Use the Cycles script and bind it to a single key under Video and Subtitle Grid, perhaps best to keys you can easily find with your left hand without looking, like A S Z X. It literally takes less than a second to add \bord0 to all selected lines, including incorporating it into existing tags. If you want \bord2, you just hit the key 3 times, which you can do quickly enough to still make it under one second. Why anybody would go to the edit box for a single line and type the tag including { } is beyond me. I mean, do what you want, but it's your time and your hands that are wasting away. (The Cycles script even has instructions for how to add more macros for other tags, if you're missing something vital there.) HYDRA is for pretty much everything else. One key to open the script, select as many tags as you need, just type the numbers for values (default ones can be saved, so no need to type those), and Apply. Transforms are done exactly the same, just clicking the Transform button instead of Apply. By clicking yet another button instead, you can actually create gradients with the same ease. With one extra click, you can create inline tags. And of course HYDRA can do a lot of more complex things with only minimal additional effort. IMO it pays off to read the manuals to my scripts to find out what you CAN do. Not that you need to remember how to do everything a script does - even I don't remember it for my scripts, but it's useful to know what it CAN do. You can always look up the details when needed, instead of regularly doing something completely unnecessary and tedious. Plus the manuals are longer than half of this whole guide and explain a lot of things, so once you've read and learned the stuff in this guide, it's probably the next logical step. Copying Tags from Line to Line If you're SELECTING a tag to copy, you're doing it wrong. Having to go to the EditBox, having to start and end the selection in a precise 3-pixel area, going to another line and finding another 3-pixel-wide area to paste the tag into, never mind pasting it into several lines one by one, all of that is unnecessary. Most copying can be done with one key and 1-2 clicks. Since you usually progress from top to bottom in the grid, you mostly copy things from lines above to lines below. This is what NecrosCopy was made for. Select the line from which you want to copy and the line(s) to which you want to paste, and just check what to copy from one to the other(s). Copying all start tags or text only requires one click. Copying a specific colour tag takes two clicks. Copying any other specific tag from the first line takes three. And you can select as many of the tags as you need. But of course there's much more that can be done, including copying from bottom up. Necroscopy lets you copy just about anything you want from the first line. Aside from pasting it immediately to the other selected lines, it also keeps the tags in memory. So then you just select some lines higher up in the script, use Necroscopy again, and instead of copying use Paste Saved. Shortly after I had written that, I added a "bottom up" option to NecrosCopy, so copying fom last line upwards is now even easier for all the copy functions. Alternatively there's MultiCopy, which works in a different manner and allows for copying LOTS of things, not just tags, from one set of lines to another. Or from one to many. Again, check the manuals to find out what the options are. The possibilities are so countless it's ridiculous. And if that wasn't enough, Relocator also has a simple interface for copying \pos, \move, \org, and \clip, with some additional features. Navigating in the Subtitle File When typesetting, you're likely to create lots of lines, and then it becomes difficult to find things. To help with that, I wrote this script. The first function was to go to the next line that has a different text (ignoring tags and comments). So it would skip all mocha tracked lines for the same sign and find the next one (unless it happens to have the same text). This, again, should be bound to a simple hotkey. I have since created several macros in that script so that each can have its own hotkey. You can read about all it can do on the page, but generally I would recommend at least 4 hotkeys. - Jump to the next line with different text (as already described) - Jump to the previous line with different text (the opposite) - Jump to the next line with different style (good for finding signs among dialogue in a time-sorted script) - The GUI, where you can select any of the other options The bonus is that this works on multiple lines. If your sign has 3 lines with different text and is mocha-tracked and sorted by time, select the first 3 (whatever's on the first frame - good idea to hotkey subtitle/select/visible), and the script will find the first line after this that doesn't contain any of the 3 texts (or styles, or whatever you use as the marker). It also works for Actor and Effect, so that gives you more options to find some specific lines that you may have marked in those fields. It can also find commented lines. Split Text into Smaller Parts Think of the signs in open books/magazines, with bow-shaped text, or any other cases where you can get some advantage of splitting the text into parts. When each part of the line is different, it may sometimes work with a gradient, but other times it's just convenient to split the line into parts. This may have been a pain in the ass years ago, but thanks to the tools we have now, it's pretty simple. Firstly, splitting the text is easy, even for multiple lines at the same time, and secondly, just about every script can work with many lines at a time, some in pretty sophisticated ways. Splitting text can be done with the "split by \N" function in NecrosCopy. Obviously it splits by line breaks by default (even maintaining the position of each segment in the more basic cases), but if there is no line break (or if you check 'split GUI'), it allows you to split by spaces or by tags. By spaces usually means each word on a separate line; by tags means if you have inline tags, a new line will start at each of those. This can be applied to multiple lines, and you can also number the resulting lines, so if you have several layers with the same text and split by spaces, all lines with the first word will be number '01' (in Effect), etc. If you want to go further than that, you can also split by letters, using the 'split into letters' function in Significance. This works by keeping the whole text for all lines and setting alpha FF for all letters that shouldn't be seen, which means you get to keep the sizes, rotations, and everything. (Unlike 'split by /N', which really splits the text.) Should you want to really split into letters so as to have only one letter on each line, you can use 'letterbreak' from Relocator's Morphing Grounds and then split by \N. (Letterbreak puts \N before every letter.) This way, though, you lose the alignment and have to arrange the letters from scratch. Relocator will help you realign them in various ways. (Align X/Y or FBF Retrack from Repositioning Field can be useful.) Yet another way to split the text by letters is 'space out letters' from HR's Repositioning Field. Here you set how many pixels apart the letters should be. This basically combines 'letterbreak', 'split by \N', and some realigning. So depending on what you want to do, you can do either this or 'split into letters'. If you then select all the lines and use the \frz tool, the 'split into letters' version will rotate like whole text in one line, whereas in the 'space out letters' version, each letter will stay in place and rotate on its own axis. The Relocator version is now also in NecrosCopy, thus accessible more quickly. A new option split by clip, useful for those bow-shaped book texts, is part of Split by \N in NecrosCopy. It's mentioned further down when talking about clips and described in detail in the Alignment section. Creating Inline Tags, Even for Each Character Creating inline tags is easy with HYDRA. This is done using the Tag position field and its presets. The simplest way is to put an asterisk in the text. (The text is shown for the first selected line.) This way all the tags you select will go to the asterisk position. It will apply to multiple lines, but only if they share the same text. Then there are the presets. One of them is "before last character", which is useful if you want to gradient the line with lyger's gradient by character. Then there are several that calculate the positions based on proportions: middle of the line, 1/4, 5/8, etc. These are only useful when you're trying to do something very specific. The next two are quite practical, though: "custom pattern" and "section". The former works similarly to the asterisk position mentioned above, but it's less restricted. Instead of using the asterisk in the whole text, you can use it with a pattern. So instead of "Whole *text", you use "*text", and the tags are applied before the word "text", wherever it's found, no matter what the rest of the line is. Also works for "text*" or "te*xt". You can even use a pattern like " *", and the tags will be put after every space, so this is pretty versatile. The other option, "section" is similar except that it matches only the first instance in each line and returns tags to original position at the end of that section. This can be used when one word in the line is a different colour (or size, or whatever) from the rest. This saves you the trouble of picking tags before AND after the word. There are presets for putting the tags before each character or each word. The point of this is that, while they are the same tags and thus are useless in this phase, this allows for various kinds of tweaking later. It can be used for setting up a gradient. It can be used for changing the colour for each word with Colourise. If you need a different colour for each word, set one colour for each word with HYDRA, and then use Tune Colours from Colourise to easily change them without having to click before each word for the positioning. If you add a tag before each word, you can then add transforms (for the same tag, in this case) to each block (there's an "all tag blocks" option for transforms in HYDRA). Then you can randomise either the original ones or the transformed ones, so the words will either transform from one value to various ones or vice versa. (We'll get to randomising later.) The last preset is "text position", which uses number input, like "6", and puts the tags after the 6th character in each line, whatever the text is. So if you had several lines that should start with a red letter but the rest of the text would be blue, you first add red to all lines and then add blue to position 1. (The beginning of the line is 0.) There's also one little hack in the Special functions (HYDRA): "convert strikeout to selected". If you really have to go to the Edit Box, instead of typing the tags, you can just apply strikeout, select this option in HYDRA's Special functions, select tags as you normally do, and the \s1 will be changed into those tags. Additionally, if you also use \s0, tags will be reset there, so selecting a word in the Edit Box and clicking on strikeout will create "{\s1}word{\s0}", and selecting border 3 and shadow 2 in HYDRA will turn it into {\bord3\shad2}word{\bord\shad}. This also allows for specifying different positions in different lines and applying the same tags to all those positions. New additions in HYDRA 6 are presets replace {•} and replace {~}. For those, there are also two macros in HYDRA: Bell Shifter and Wave Shifter. This has become my favourite way of creating inline tags. With pressing one key, the Shifters move "{•}" or "{~}" word by word. I rarely put inline tags in the middle of words unless it's a full line gradient, so this way I just quickly mark the right word, open HYDRA, scroll one line up in the presets, and apply tags I want. The {•} becomes {\bord3} or whatever I select. If you need to, though, you can move them letter by letter too, if you comment the line first. The letter counting is done by lua without the re module, so ä is 2 characters, thus it takes two turns to move "through" it, but that's not an issue when you're just repeatedly pressing one key. So you can use these presets to put inline tags anywhere. You can shift the symbols to any place in any line and turn them all into tags at the same time. Other scripts have some options for inline tags as well. Colourise can apply a set of 2-7 colours by character or by word. It can also shift these by character or word. "Set colours across whole line can set several colours in regular intervals. If you go with 7 colours, the first is at the beginning, the last before last character, and the other 5 regularly spaced in between. This, again, helps set up a gradient by character. Masquerade's Shift Tags can shift inline tags left or right by a number of characters or words, so tweaking inline tags' positions isn't hard either. It can also shift start tags, so you can create a colour tag in the start tags, and then shift it by one word, instead of creating an inline tag in the first place. Inline tags get shifted as whole blocks; start tags get extracted from the block and shifted individually. Additionally, it has an even easier way of shifting tags marked with HYDRA's Arrow Shifter. The Shifter, similarly to the other two mentioned above, shifts ">", not by spaces, but by tags, always ending before the tag (">\"). Shift Tags detects it and asks you where you want to shift the tag thus marked, and you only mark a place in the clean text. Going even further, if there's "{•}" in the line from the Bell Shifter, the tag goes there immediately. So if you want to move a tag somewhere else, mark the tag with Arrow Shifter, Mark the target place with Bell Shifter, and then it's just a click on Shift Tags. Of course one of the common ways to create inline tags is making a gradient by character. There are a number of scripts that can do it. The most versatile two are lyger's Gradient by Character and HYDRA. GBC creates a gradient between any two tags of the same type. This means that you need to place at least two of them in the line first (or one if the starting value is from the style). But it also means that you can place them anywhere you want, and as many as you want, and set the line up for gradienting exactly the parts you want, exactly the way you want. HYDRA works differently. You don't need any tags present in the first place. The starting values can be taken from style, and you set the final values in the GUI. The gradient always goes across the whole line. There are some extra options, though. You can use accel with the gradient, you can use centred gradient, and you can set the centre in a specific place. This is explained in detail in HYDRA's manual, so I won't go into that here. Both scripts allow for mixing gradients for different tags with different values. Colourise creates gradients for colours. An extra option here is to do a HSL gradient, rather than the normal RGB. (HYDRA can now do this too.) This means that saturation is preserved when similar on both ends, while in the RGB one, the middle tends to get greyish. There's also a double HSL gradient, which will go through the range of colours twice. (Effective with long lines in song styling, for example.) There's an option to reset after \N, which means that if there's a linebreak, the parts before and after it will be gradiented separately. And there's a Reverse Gradient option that simply reverses the order of colours in the line. Another thing that can do a gradient is the clip2fax function mentioned below. Apply Tags by Layers, Style, Effect, etc. With HYDRA, you can restrict what lines you want to apply the tags to. This means that you can keep a large selection and apply tags only to certain layers or styles, or lines marked with something specific in Effect/Actor. Numbering lines can also help for this purpose, which you can do with Significance. You can even restrict by text pattern, which includes tags, so for example only apply to lines with \frz in them. Use Clips to Do Lots of Things Clips are useful not only for clipping but also for making some points on the screen from which other things can be calculated. If you make two points with a clip, you have two positions, X distance, Y distance, and a direction. From this, many things can be determined, so there are several functions that make use of it. clip to frz (NecrosCopy, Relocator) If you need to rotate a sign to align it with a straight line in the video, simply draw two points with a vectorial clip along that line, and use this function. If there's some perspective, you can use two lines. Let's say there's a rectangular area for the sign, and the \frz at the top is different from the \frz at the bottom, and you need the \frz for the centre. You draw 2 points along the top and 2 along the bottom, and clip2frz will calculate \frz for the middle (averaging out between the two lines). Note that the two lines have to be drawn in the same direction. (And in the direction of the text, so right to left will give you an upside-down sign.) clip to fax (NecrosCopy, Relocator) This is similar, but you draw a line for the vertical alignment of the letters. Usually it's used in connection with the previous one. First you rotate the sign, then you adjust \fax with this. It supports \fscx\fscy. (The ratio of the two changes the visual effect of \fax.) Again, this can use two lines, one on the left and one on the right end of the sign, if the \fax needs to be different on each end. So you can draw a rectangle around the sign, with the sides leaning in the intended directions of the first and last letters. In this case, the order of the drawing doesn't matter, except points 1 and 2 are left side, and 3 and 4 the right. This function will not only set the \fax on each end but also immediately create a gradient between the two. The combination of these two is one of the things I use most frequently when typesetting. It's very easy, very quick, and very useful. clip to reposition (in Relocator) This takes the distance and direction of the first two clip points, and changes \pos based on that. The clip is basically used to determine values for Teleporter. The usefulness is in that you can draw the clip over something on the screen and get the precise distance you need. This is not very essential, as Aegisub can handle relocating and dragging multiple signs quite well now, but in some cases it can still come in handy, like when repositioning a bunch of signs with \move. clip to move (in Relocator) A rather guessable one, this will use two clip points to calculate \move coordinates for signs with \pos, so it's an easy tool for setting \move for multiple lines. By default there are no times in the \move, but if you check "times", you get times for the first and last frame. If selected lines have different timing, each will get the right timecodes. If you use Teleport fields, you can get timecodes from that. For some reason, you can only draw two clip points with more lines selected, and at the third point, the selection drops and you're drawing in only one line. You can either use Alt and draw in all at the same time, or you can make the clip in the first line and then use Necroscopy or Cloning Laboratory to copy it to the others. create shadow from clip (in HYDRA) If you need a shadow in a different direction than the default, you can use a clip to set the direction, instead of tinkering with the x/y values manually. Obviously, the direction will be from the first to the second point of the clip. Shadow distance is taken from a \shad tag or from style if no tag present. (It also sets a value of 4 if the value found is 0. You can easily change the size using Multiply in Recalculator later.) The resulting shadow is created with \xshad\yshad. size transform from clip (in HYDRA) This is kind of a mocha-alternative for zooming, as long as it's linear. The goal is to get \t(\fscx\fscy). So you pick an object in the video that's getting larger or smaller, something that you can match the size of easily with a clip. Use 2 clip points to match the size on the first frame and 2 points on the last frame. The script calculates the ratio between the 1-2 distance and 3-4 distance, checks the starting scaling, and calculates the final size. With linear zoom, this can be a pretty quick solution without having to use mocha. If it needs a little bit of tweaking after that, you could use "line2fbf" from Relocator and play with that. By the way, if you do use mocha and the movement/zoom is linear, there is an option in the Motion script to apply the data as linear, creating \move and \t instead of many lines. This is actually quite nice because you don't clutter the script with hundreds of unnecessary lines. convert clip to drawing (in HYDRA and Masquerade) This is pretty essential, as it is the best tool to quickly create masks of any shape. Instead of using ASSDraw, you just draw a vectorial clip right in the video and convert it to a mask/drawing. Conversion is available both ways in HYDRA, so if you have a mask that needs some adjusting, convert it to clip, adjust, and convert back. (Relocator also has an "adjust drawing" function that lets you adjust the clip without removing the drawing.) split by clip is a new option in NecrosCopy's Split by \N. When splitting by spaces (words), you can make use of a clip to easily bend the text word by word. It's described in detail in the Alignment section. 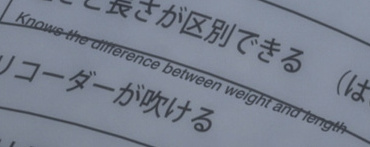  It takes only a few seconds to get from the straight line on the left to the bent one on the right, and it doesn't clutter the subs with too many lines like when you split for each letter. In the latest script versions, "clip to (frz/fax/reposition/move)" also works with hidden clips and iclips. This makes it possible to see the before/after states with Ctrl+Z/Ctrl+Y. (Otherwise the clip is likely to make the text invisible.) Hiding clips, now available in Script Cleanup and hotkeyable in Relocator, is an interesting thing in itself. It allows you to see the text outside the clip but also to save the clip for later use. Randomisation Randomised effects can come in handy either when there's some kind of a crazy sign like letters flying all over the screen or for things like song styling. It's not needed very often, but when it is, these tools can be pretty powerful, and creating something like that without them would be tedious as hell. Relocator - shake: This shifts position by a random value within a given limit. It's meant for fbf lines with the same pos tag. On each line, the position will be slightly different, creating a shaking effect. Relocator - randomove: This randomly changes start or end coordinates of \move. A line split into letters can then either scatter in different directions or converge from various places to form a solid line. 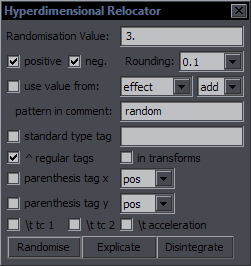 Relocator - randomise...: This fairly advanced utility can randomise values for X and Y values of pos, move, org, clip, and fad separately, as well as values for any tag with a simple number value, plus alphas, and additionally also \t times. It can randomise pretty much anything except colours. (Use Colourise for that.)
This has many uses. I explained how you can apply the same tag to each letter in the line and add transforms to each of those. Now you can use this to randomise the values of that tag either outside of or in the transforms (or both if you want). So each letter can trasform from same value to different ones, or from varying values to the same one. It will also apply different values on each line, so use it for random fbf effects. If you use it for \fs, then every \fs tag encountered will get its own random value, whether on the same line or not. Even if you use the same tag+transform for each letter in one line, randomising the \t times will create some interesting effects. It can also be applied to \t accel, but that's a bit tricky. Maybe with an original value of 2 and randomising by 1.5, thus getting a range of 0.5-3.5, it might work well enough. There's additional functionality, for which we need... Significance - random numbers: You can find this as "random" under "Numbers". It will generate a random number for each line. You set min and max values in Left and Right, and each line will get a number somewhere between those two. These can go to effect, actor, a comment in the form of {random: #}, or margins (with obvious limitations). If you replace "random:" with "random1:" in all lines, you can create another set, or basically as many as you want, and use them for different purposes. Back to Relocator's randomise... This can make use of those values generated by Significance. Instead of generating its own values, it can take them from Effect or wherever you created them. There's only one value per line, but you can use it for multiple things, if you want some consistency. Also if you need the same values on the same frame but multiple layers/signs, Significance can use the same value for each X lines. You can use the stored values in two ways: either add them to the existing ones, or replace those. So if Effect is "2.5" and you have \bord3, you can either add it to get \bord5.5, or just set the \bord2.5. Significance - randomised transforms: This adds transforms to start tags. You can select a tag and min/max values. For colours, you set percentage of allowable change. You can also randomise duration of the line, affecting either start or end time. Combined with Relocator's randomise function, the possibilities are almost endless. Micro-Management There are a few things I've added recently to help tweak the smallest details. There are four Teleport-based macros in Relocator, each shifting in one direction (left, right, up, down). This is obviously best to somehow tie to arrow keys. I found that the default actions for Ctrl+arrows were pretty useless, so I kicked them out and set the Teleport macros under these (for Grid and Video). So now with Ctrl+arrows, I move signs by 1 pixel like in Photoshop, which, I must say, is pretty damn convenient because anything that requires moving a mouse by exactly 1 pixel is a fucking pain in the ass. In continuation of going in that direction, I was recently tweaking a sign with frx and fry, and that shit is even more of a pain in the ass, because not only are you trying to change frx by 1 degree but also to NOT change fry at the same time, and since the tool handles both, this tends to be supremely annoying, especially since Aegisub has a little tendency to crash when messing with these rotations and remote org point. So I needed some kind of a plus/minus function for rotations that would change them by 1 like the Teleport macros. I ended up with creating two macros in Relocator, called Positive Spin and Negative Spin. Positive adds 1 to a rotation, Negative subtracts 1. Or some other number you choose. To set it up, you need to open Spin Doctor in Morphing Grounds. 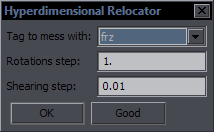 Here you select what rotation you want to affect with the two macros, and you can change by how much it will spin in each direction. I added fax and fay since that kinda offered itself, and for those there must be a different step, so that's the 0.01.
After some testing, I thought of using HYDRA's Arrow Shifter to offer another option to mark tags that should be affected. This way you can switch between frx and fry more quickly, especially after I've tweaked Arrow Shifter to shift back as well (using the {switch} from Cycles). So whichever tag is pointed at, like >\frz, is the one the macros will affect. If the arrow points at something irrelevant, like alpha, the macros default to whatever is set in Spin Doctor, or frz if nothing. At one point, I made a mistake while writing this and found that when pointing at bord, the macros were changing that. I thought about it for a while, about how that might work, and did kind of a compromise. I didn't add tags like bord and blur, but adding ones that work with negative values was trivial, as it basically meant just adding the tags on the list, so there's also xshad, yshad, and fsp. I decided adding bord and others wasn't necessary, as those are handled by the Cycles script pretty well anyway (and I would have to do something about not allowing negative values for some tags). The small step is only for fax/fay; the regular one is for everything else. After some experimenting, I'd say using the Arrow Shifter is more convenient that switching with the Spin Doctor menu. You can't change the step this way, but that should hardly ever be necessary. And if you sometimes want to change value by 0.5, it may be easier to just go for Recalculator for that one half step. Then I was trying to change \fsp for one letter in the line, and I realised that if I have fsp in start tags, it changes too. This was intended, because if you have a gradient for frz or fax, I want the spin to change all of them, but here I wanted to affect just one specific tag. So I've made the distinction that if a specific tag is pointed at with the Arrow, only that one is changed (which I think makes a lot of sense), while using the settings from Spin Doctor will change all tags of the selected type in the line. If you only have one frx and one fry in start tags, then using the Arrow to switch between them still works fine. This then gives us an extra option to affect one tag or all. So mainly you just have to get used to all the new hotkeys, and things go pretty smoothly after that. As I've already hinted at, the Cycles script has a Switch function, which puts a "{switch}" comment at the end of a line. This is primarily used by Cycles to go backward in the sequences instead of forward. The switch is an on/off function that adds or removes this comment, and since that works like a binary marker for two different states of a line that doesn't really interfere with anything else, I used it for some other things too. (I started with commenting the line as an on/off switch, but then you can't see it in the video, and while you can type things in Effect to mark the line, this requires clicking into Effect, typing, and clicking back into Grid, plus you might need Effect for other things, so I went for adding that comment in a way you can hotkey.) So there's the backward sequence in Cycles, there's reversed direction for Arrow Shifter, and there's Masquerade's Shift Tags, which shifts tags for multiple lines by one character to the right, and when the {switch} is on, by 1 to the left. The switch aso works for Bell Shifter and Wave Shifter, switching from word mode to letter mode. Many Ways to Do Things The other day somebody said he doesn't know how to set fixed position (like 640,360) for a number of lines with Relocator (or potentially another script). True, Relocator doesn't specifically do that in the regular way of setting "640" and "360" for X and Y, but I could think of a few ways of doing this, and the more I thought about it, the more ways I could come up with. So I'll use this as a general example to show how many things can be done in many different ways. So the issue here is to set "\pos(640,360)" to all selected lines. I'll list a number of options, more or less in order of usefulness. 1. Relocator - Cloning Laboratory. You'd set the position for the first line by just double-clicking on the screen, and this will copy the pos tag to the other lines. This is what I normally use to set the same position for selected lines. 2. NecrosCopy. This is pretty much the same - copy from line 1 to the others, selecting the pos tag from the list. 3. Use Script Cleaner to delete pos tags, and then just double-click on the screen to set pos for all selected lines. This works even when they have different timing. (You just have to be somewhere in the video the active line is timed to.) 4. Use HYDRA's Additional tags to simply type "\pos(640,360)". This requires typing, but it would be the most straightforward way of "setting a fixed position for selected lines". (There won't be any problem with existing pos tags - they get overwritten by the new ones.) Now for some more complicated and less useful solutions, just to show that there are options. The guy said he actually used regexp replacement to do it. That's certainly a way to do it too, but I'd still go for these before that. 5. Relocator - Align X and Align Y. Two ways to do this. Either with "by first", you align the other lines by the first one, so it's like Cloning Laboratory, but for X and Y separately, or you can actually set "640" for X and "360" for Y in the disPosition field, but you must uncheck "by first". This is very straightforward as well, but it's in two steps. 6. You could use MultiCopy to copy the pos tag from one line and paste it into others. You have to use the "any tag" option, type "pos" in the big textbox, copy the result, paste it with the "any tag" option, and select "loop paste" so that it goes into all the selected lines. 7. Recalculator - First Multiply pos to 0%. This gives you pos(0,0). Now Add "640" for pos X and "360" for pos Y. Obviously silly when you have the options above, but still workable. 8. You could even use Relocator's "Find Centre". This sets pos to the centre of a rectangular clip, so if you draw the clip really small (with Alt for all lines), you would get the position with enough precision, I guess. So that's eight ways to do this, excluding the regexp replacement. HYDRA doesn't have checkboxes for all tags, but with "Additional tags", you can apply any tag you want to all selected lines if you just type it. In fact, it can even add fake tags like "\derp666", as it doesn't check the additional tags for anything except that there's a backslash. There is also this link, which can be useful sometimes when you're trying to figure out how to do something specific. Even after the 3 years that my scripts went unchanged, I see people asking "is there a script that can do ...", and most of the time, one of my scripts can. Heck, sometimes even I wonder how to do something specific easily, only to find out that I wrote a function for exactly that 4 years ago. The point is, most things you're looking for indeed do already exist. Adding More with Each Line Sometimes you need to increase values line by line in regular intervals. There are many tools for this. HYDRA has "Add with each line". So if you use \bord2 and add 1 with each line, you get \bord2 on the first line, \bord3 on second, \bord4 on third, etc. This works with all the regular number-value tags. Relocator has Warped Teleport, which does a similar thing. If you use 0, 0 as regular Teleport input and 5, 0 in Warp, the first line stays where it is, second moves 5px right, third 10px right, etc. Similarly, you can use Teleport input with Cloning Laboratory to space out lines in regular intervals. If you use 0, 30 and clone position, line 2 will be 30px under line 1, line 3 60px, etc. While with Warped Teleport the starting point is each line's original position, with Cloning it's the first line's position for all lines. Recently, I had this to typeset: 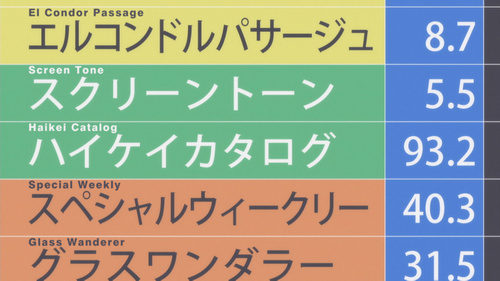 It was pretty clear that all lines had the same height, so I measured the distance between two horizontal lines, got that it's 146, set the first line where I wanted it, and used Cloning with 0, 146 in Teleport. All lines were immediately where they needed to be. This kind of stuff can save you a lot of tedious tinkering with things. Another script that uses this is Recalculator. In the example above, I could place all lines at the same position as the first one and use Recalculator with this setting. I'd select all but the first line, type 146 into 'Increase values by', check pos y, and the 'add more with each line' option. That would give me the same result as you see above. Recalculator can do this with almost any tag and has x and y coordinates separate, so there's a lot that can be done with that. It can even be applied to layers or timing. To be continued... |